
Block Storage is currently supported at 4 locations:
-
Australia (HDD and SSD NVMe)
-
Singapore (HDD and SSD NVMe)
-
Netherlands (SSD NVMe)
-
USA (SSD NVMe)
It works as an addon to your existing VPS. You can easily move the storage between VMs in the same region since Block Storage can be attached and detached at any time. Block Storage behaves just like a regular storage device, on Linux it can be partitioned and mounted with a filesystem.
In this tutorial we will buy and mount Block Storage to use as storage for Nextcloud data disk. You may have other use case, but the setup itself should be pretty similar.
Creating Block Storage
-
Ensure you have an active VM in the desired location. In the Onidel Cloud Panel, go to Compute > Virtual Machine to see a list of your Virtual Machines.

-
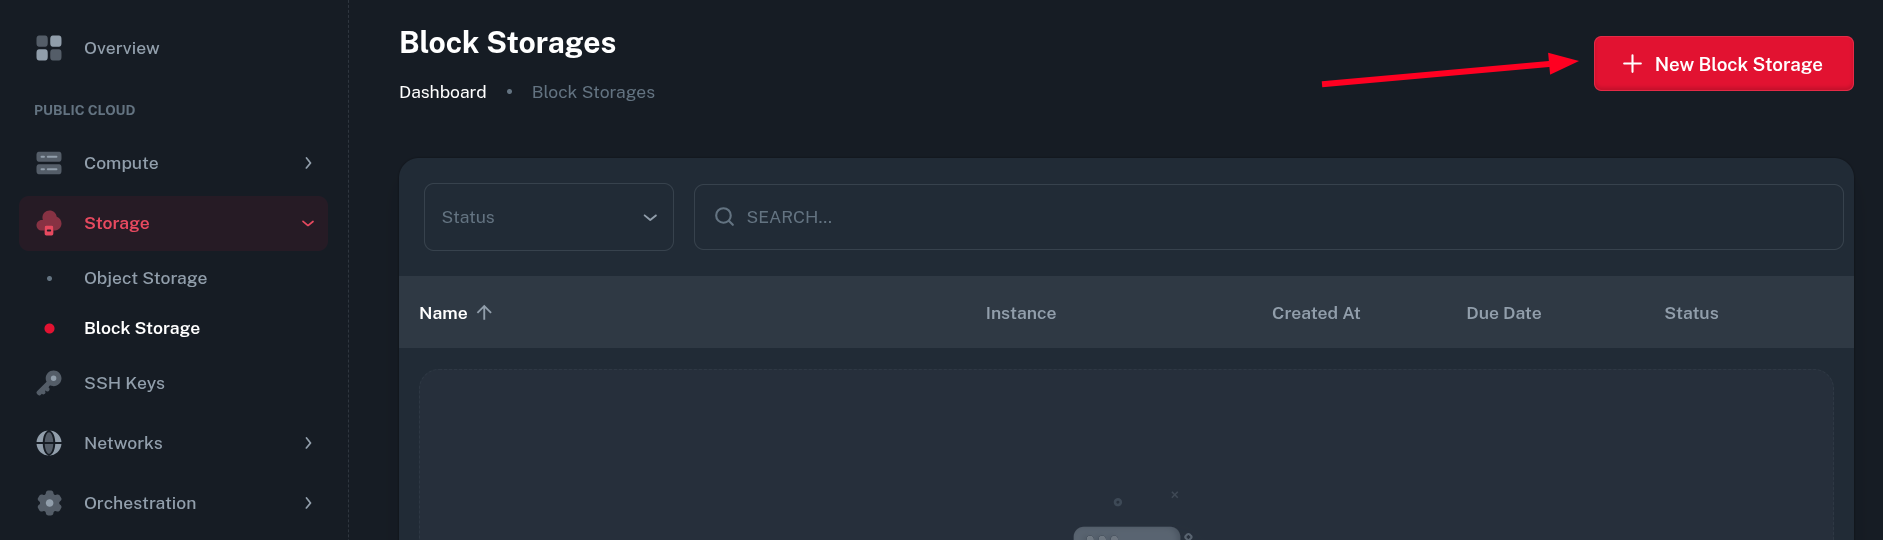
Next, navigate to Storage > Block Storage and click on New Block Storage button.
-
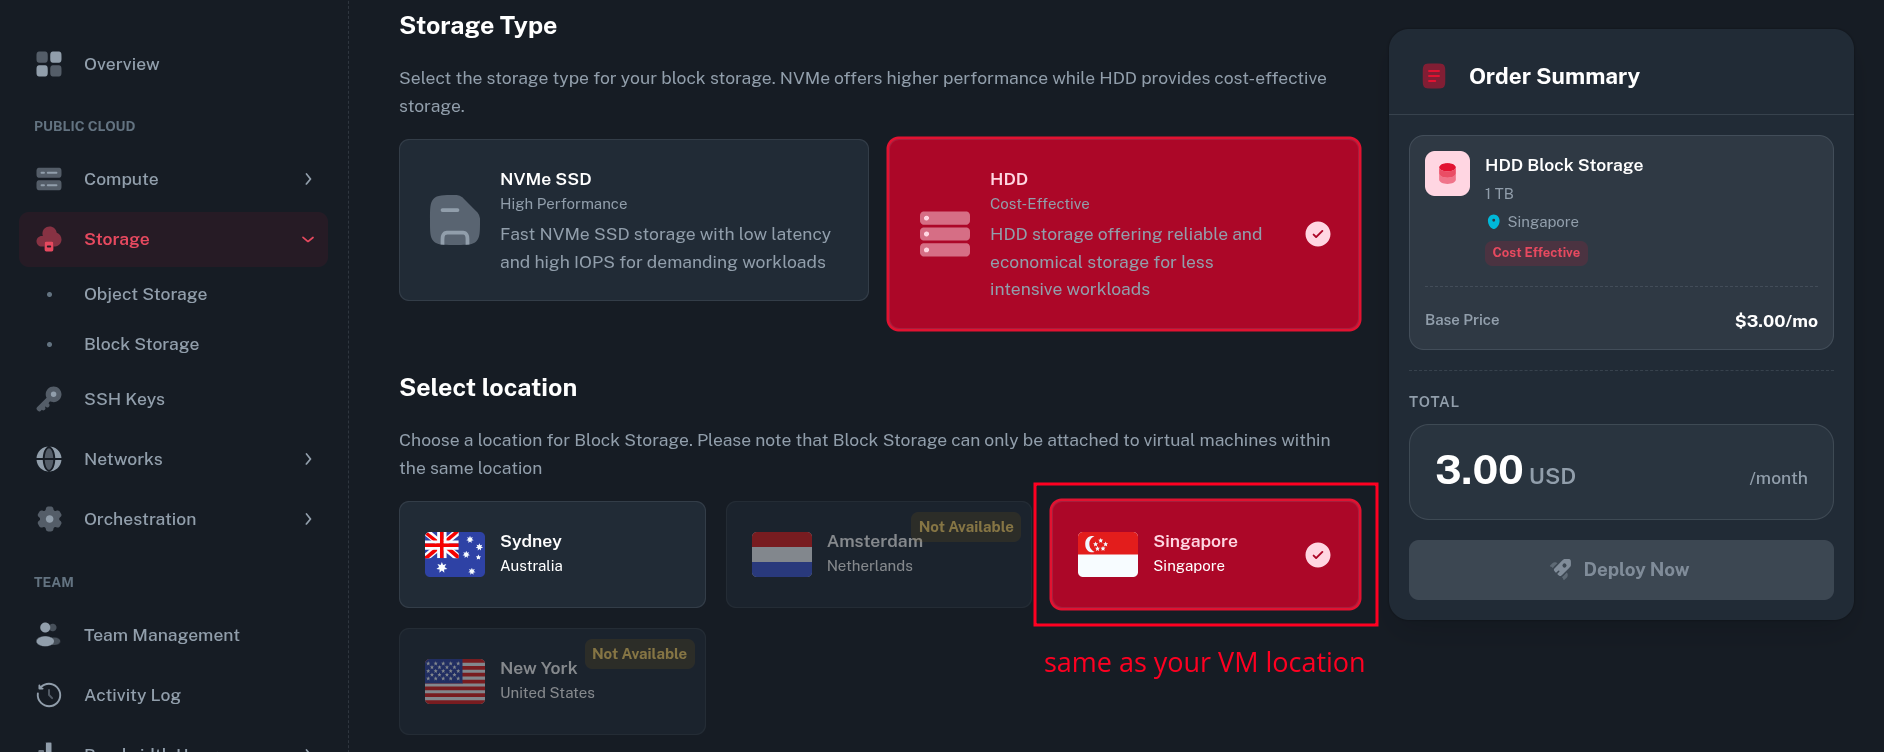
Then you will be asked for storage type and location you want the storage to be created in.
The storage type selection should depend on your intended workload, in our case HDD storage should work just fine for storing personal files with Nextcloud.
Make sure the location is the same as your VM. It can not be changed once the storage is ordered.
-
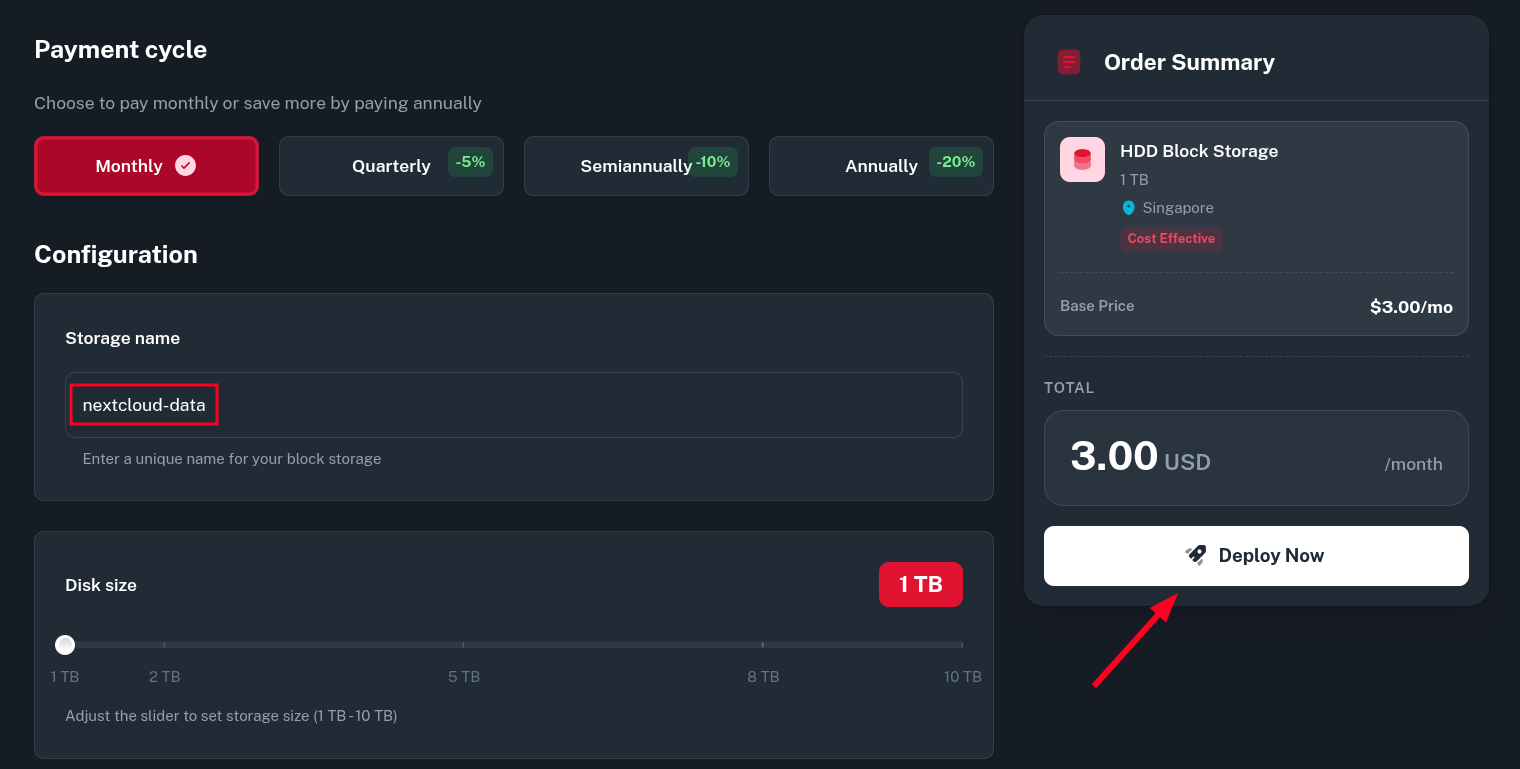
Next, pick your desired Billing cycle, Storage name and Disk size and click Deploy Now.
The name can be changed later and disk size can be increased (but not decreased) on demand.
-
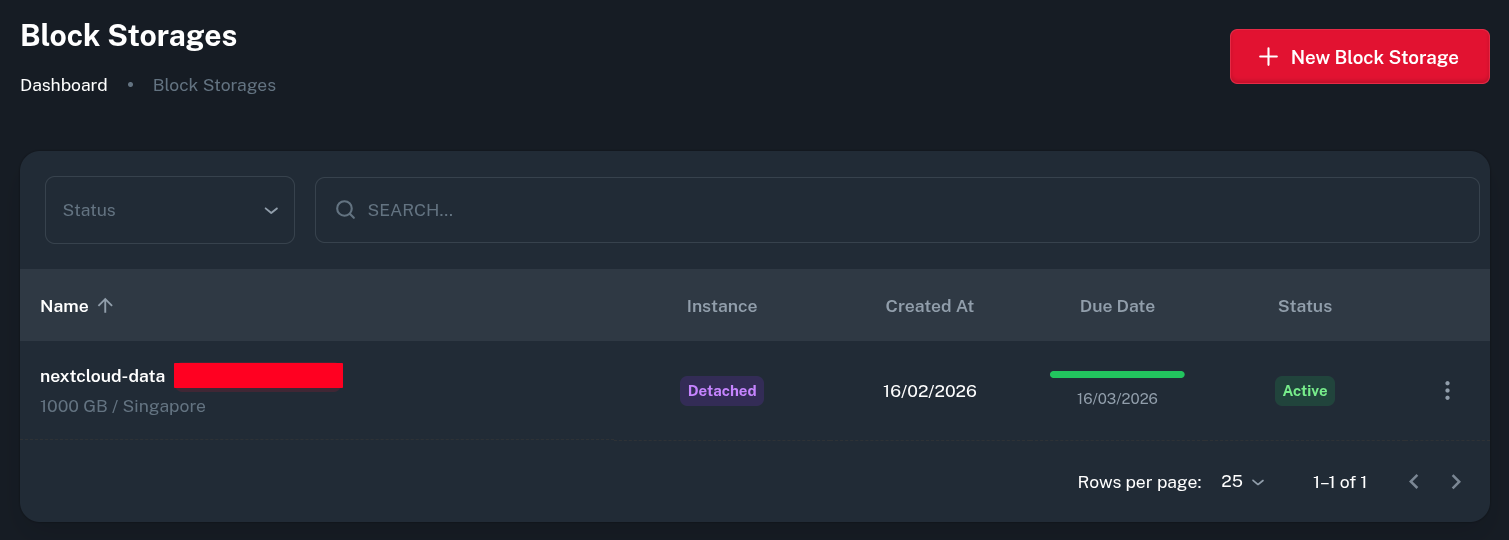
After paying the generated invoice, you should see the service being active in the list of Block Storages.
Attaching Block Storage to the VM
-
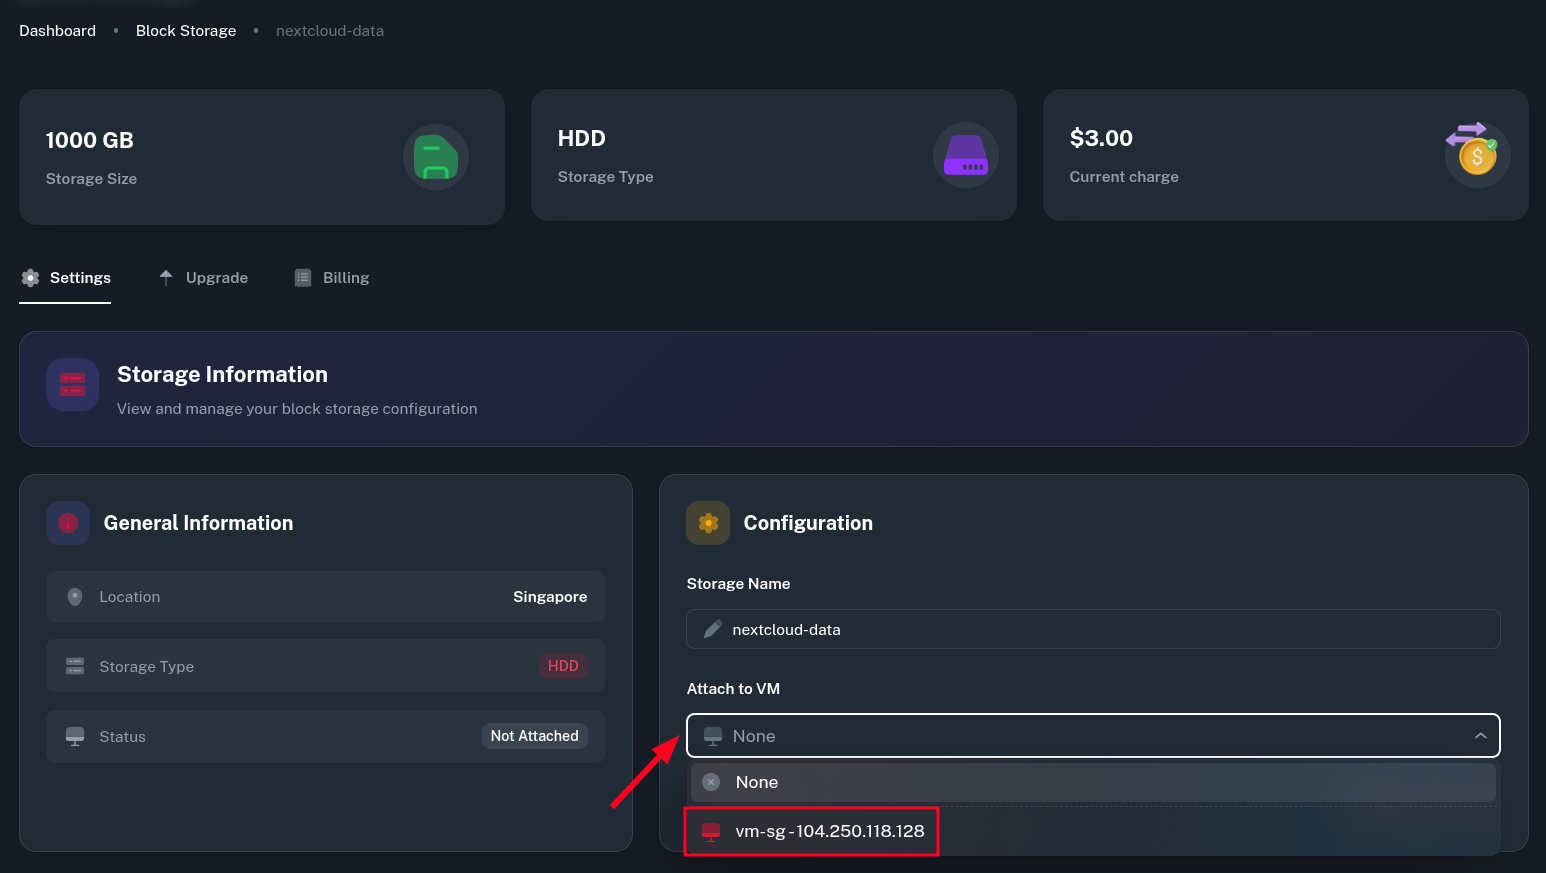
By clicking into the newly Block Storage, you can select which VM to mount it to. The dropdown should show all VMs you have running in the same location as your storage block.
-
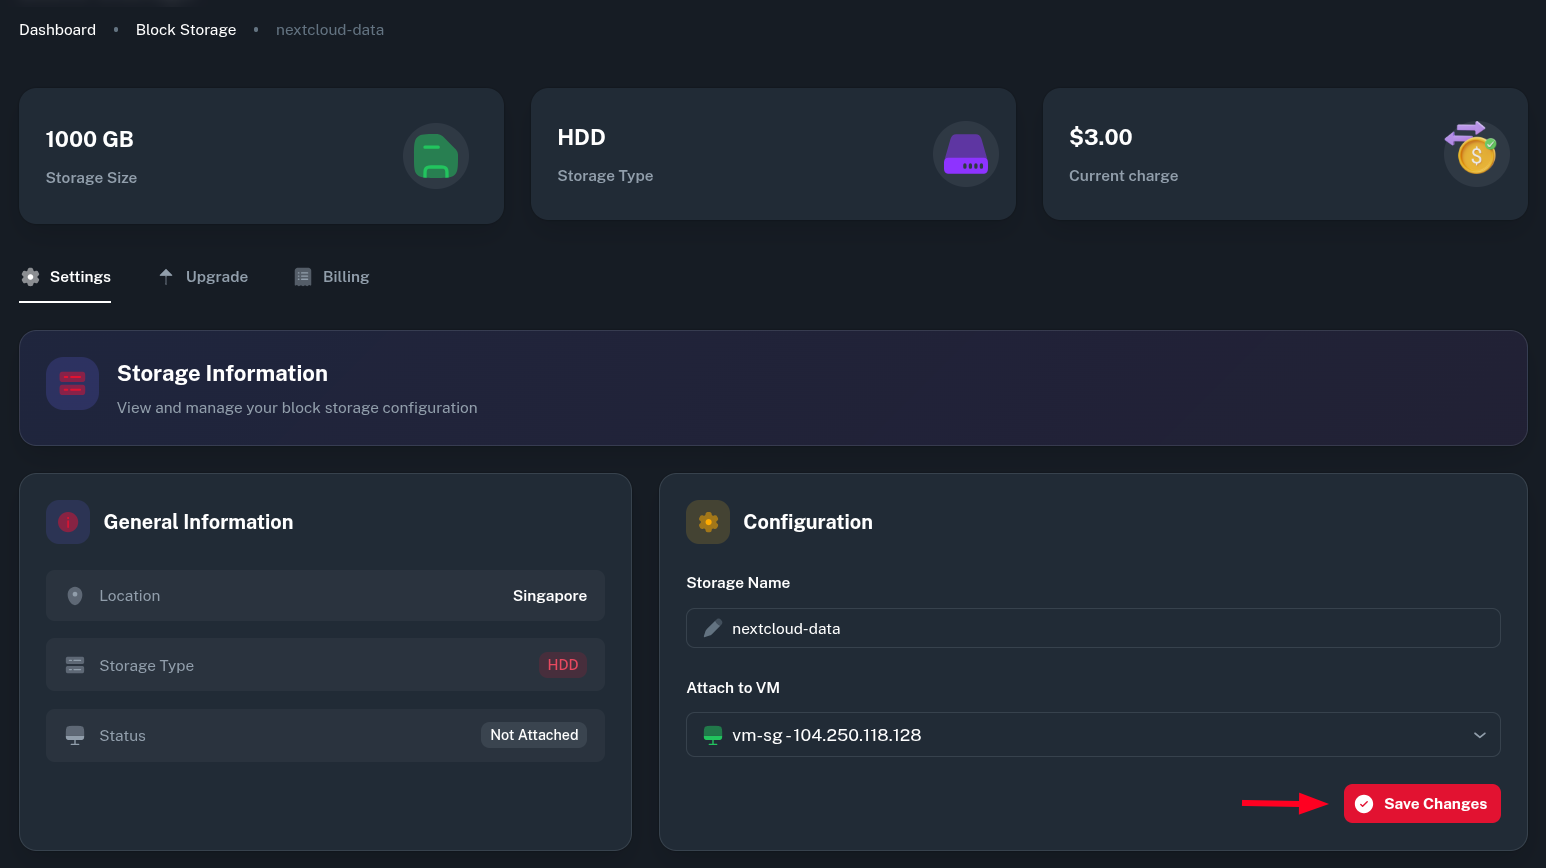
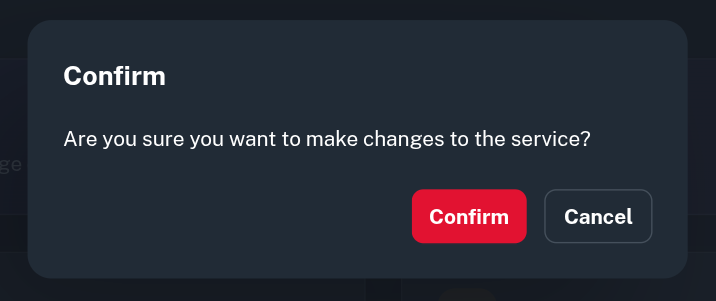
After selecting the VM you want to attach the storage to, click on Save Changes button and Confirm you want to make changes to this service.
-
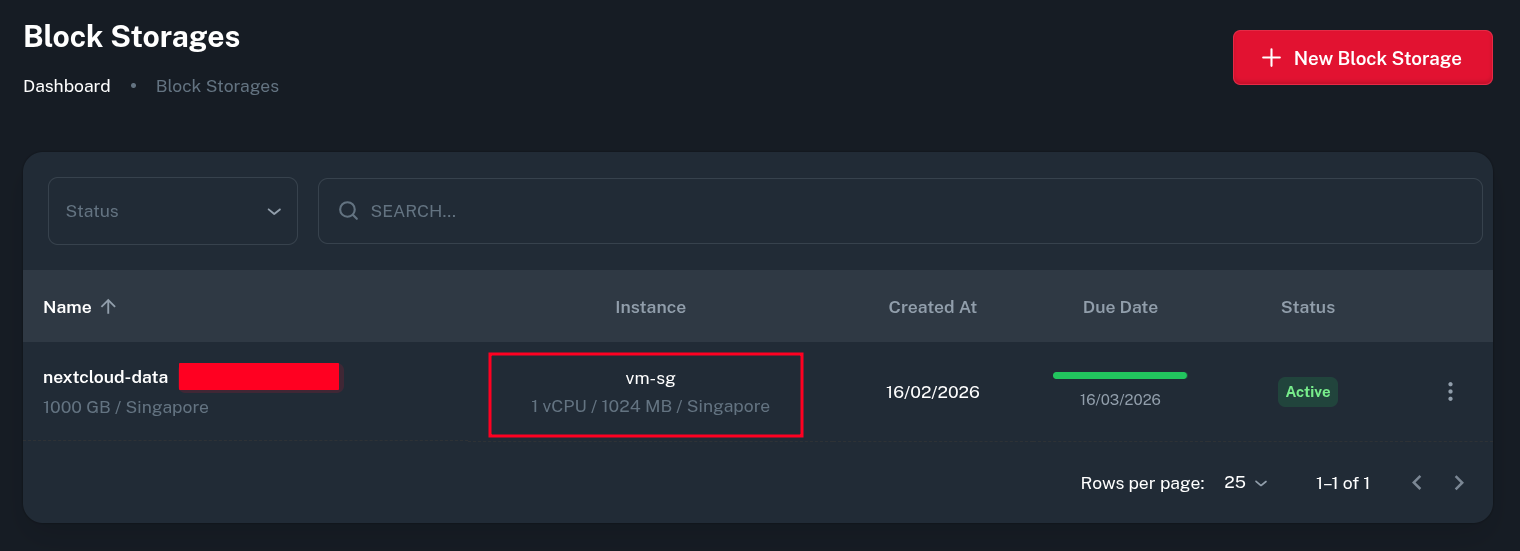
The VM instance should now be listed alongside your storage in Block Storages list.
-
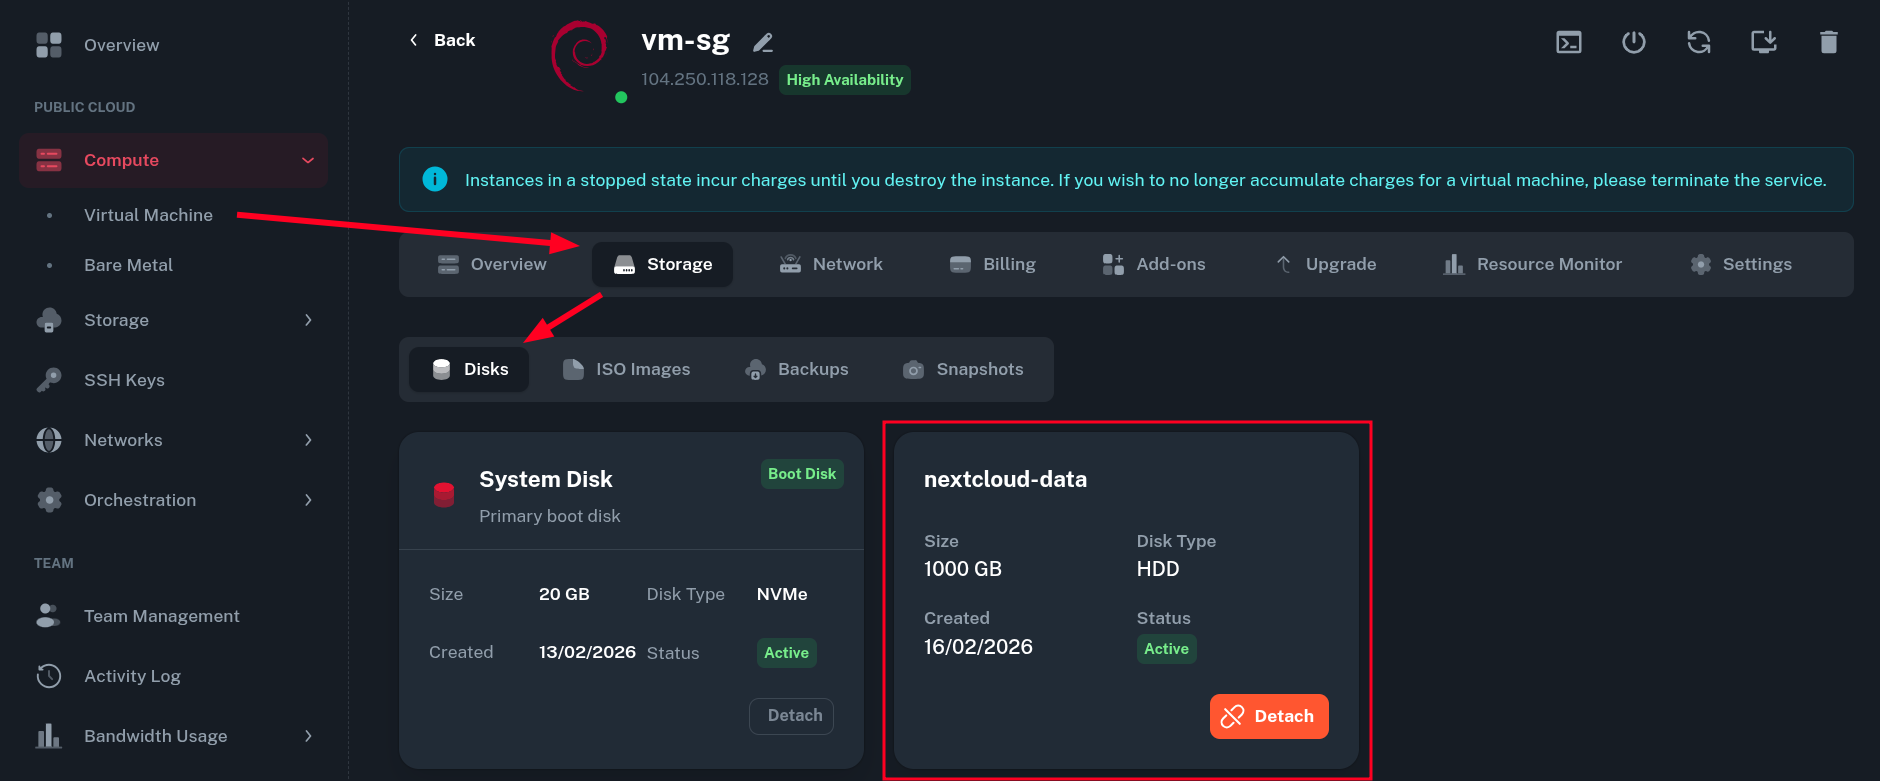
After going to Compute > Virtual Machine > (select your VM) > Storage > Disks, you should also see the storage now being attached properly from there.
Mounting Block Storage inside the VM
-
Firstly, login into your Virtual Machine using SSH. You will need root privileges to perform most of the tasks listed below.
-
Verify the storage was mounted correctly inside the guest OS.
root@vm-sg:~# lsblk
NAME    MAJ:MIN RM  SIZE RO TYPE MOUNTPOINTS
sr0      11:0    1 1024M  0 rom
sr1      11:1    1    4M  0 rom
vda     254:0    0   20G  0 disk
├─vda1  254:1    0 19.9G  0 part /
├─vda14 254:14   0    3M  0 part
└─vda15 254:15   0  124M  0 part /boot/efi
vdb     254:16   0 1000G  0 disk
Your 1TB block storage drive /dev/vdb should be visible at the bottom.
-
Now you can create partition table and first partition on the drive.
We will use fdisk for that - to create GPT partition table, use the
gcommand, then create one large partition withnand write changes to the drive withw. Leave defaults where asked.root@vm-sg:~# fdisk /dev/vdb Welcome to fdisk (util-linux 2.41). Changes will remain in memory only, until you decide to write them. Be careful before using the write command. Device does not contain a recognized partition table. Created a new DOS (MBR) disklabel with disk identifier 0x77eca7ed. Command (m for help): g Created a new GPT disklabel (GUID: C54D761B-AD48-4C64-93A2-FA5D78F118AD). Command (m for help): n Partition number (1-128, default 1): First sector (2048-2097151966, default 2048): Last sector, +/-sectors or +/-size{K,M,G,T,P} (2048-2097151966, default 2097149951): Created a new partition 1 of type 'Linux filesystem' and of size 1000 GiB. Command (m for help): w The partition table has been altered. Calling ioctl() to re-read partition table. Syncing disks. -
Next, create a filesystem on the one large partition we just created. Here, we create ext4 filesystem using
mkfs.ext4, but you can use other one if you want.root@vm-sg:~# mkfs.ext4 /dev/vdb1 mke2fs 1.47.2 (1-Jan-2025) Discarding device blocks: done Creating filesystem with 262143488 4k blocks and 65536000 inodes Filesystem UUID: 201c4e8d-1d35-48d0-aa8b-97dd893a4795 Superblock backups stored on blocks: 32768, 98304, 163840, 229376, 294912, 819200, 884736, 1605632, 2654208, 4096000, 7962624, 11239424, 20480000, 23887872, 71663616, 78675968, 102400000, 214990848 Allocating group tables: done Writing inode tables: done Creating journal (262144 blocks): done Writing superblocks and filesystem accounting information: done -
Create mount point for created partition (can be arbitrary directory on your system).
root@vm-sg:~# mkdir /mnt/nextcloud-data -
Note down the
PARTUUIDvalue of your partition.root@vm-sg:~# lsblk -o PARTUUID /dev/vdb1 PARTUUID 78ddd192-302a-46b1-95a5-94bf16f99a50 -
Add this entry at the end of
/etc/fstabfile (replacePARTUUIDvalue with the one you got above and mount point if different one was used):PARTUUID=78ddd192-302a-46b1-95a5-94bf16f99a50 /mnt/nextcloud-data ext4 rw,noatime,errors=remount-ro,x-systemd.growfs 0 2 -
To check if everything was done properly, mount all fstab entries with
mount -aand verify the filesystem was mounted:root@vm-sg:~# mount -a mount: (hint) your fstab has been modified, but systemd still uses the old version; use 'systemctl daemon-reload' to reload. root@vm-sg:~# systemctl daemon-reload root@vm-sg:~# df -h /dev/vdb1 Filesystem Size Used Avail Use% Mounted on /dev/vdb1 984G 2.1M 934G 1% /mnt/nextcloud-dataAfter the addition to fstab, the filesystem should be remounted automatically on each boot.
Nextcloud specific configuration
You can skip this section if not interested. By this point, your storage should be configured properly and ready to use!
-
There are several ways of running Nextcloud but probably the easiest way is to go with Docker and docker compose.
-
You can use this docker compose file and replace the mount points so that the app uses your Storage Block as storage for data:
...
    image: nextcloud
    restart: always
    ports:
      - 8080:80
    depends_on:
      - redis
      - db
    volumes:
      - /mnt/nextcloud-data:/var/www/html/data
      - config:/var/www/html/config
      - apps:/var/www/html/apps
...
Remember this setup is only for demonstration purposes. In reality, you need to secure your Nextcloud instance - setup strong passwords and use a reverse proxy to communicate over HTTPS.
-
You may need to change permissions on the storage directory to align with the user Nextcloud is running as (id 33), like mentioned here:
root@vm-sg:~# chown -Rv 33:33 /mnt/nextcloud-data/ changed ownership of '/mnt/nextcloud-data/lost+found' from user:user to 33:33 changed ownership of '/mnt/nextcloud-data/' from user:user to 33:33 -
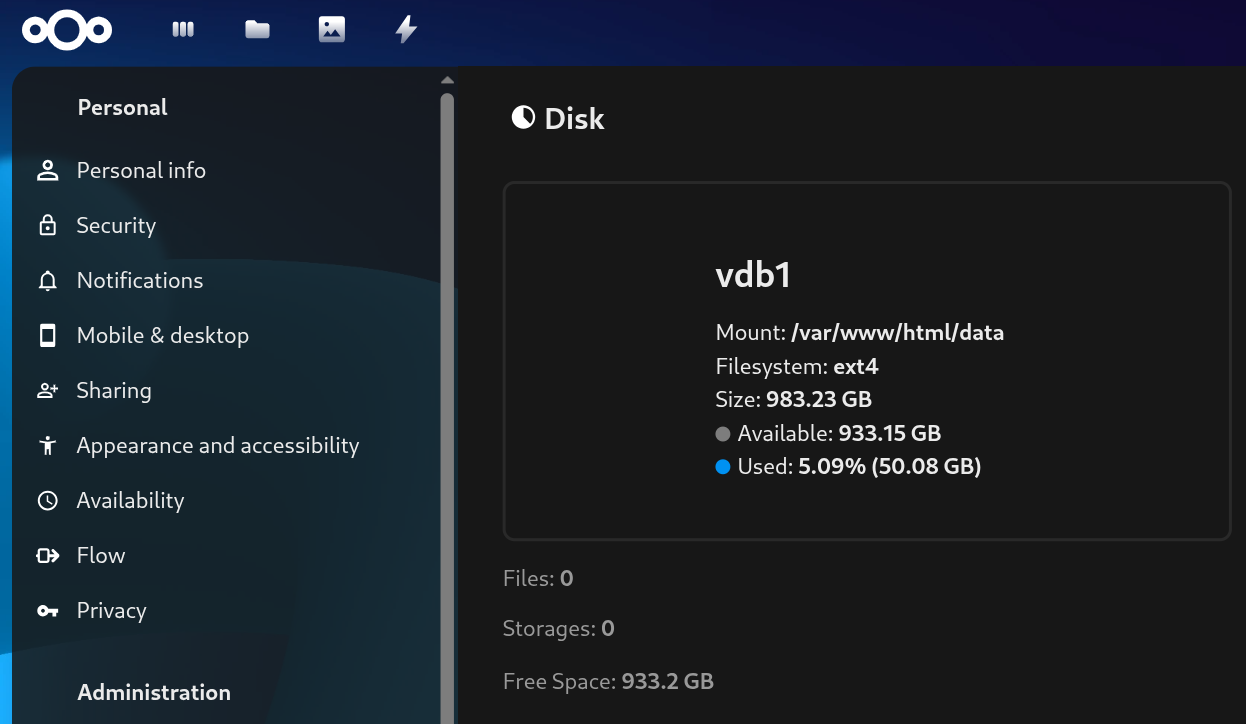
After the initial setup, you Nextcloud should be using your Block Storage drive.
Upgrading the Block Storage
If you ever run out of capacity on your block storage, you can easily upgrade it from Onidel Cloud panel.
-
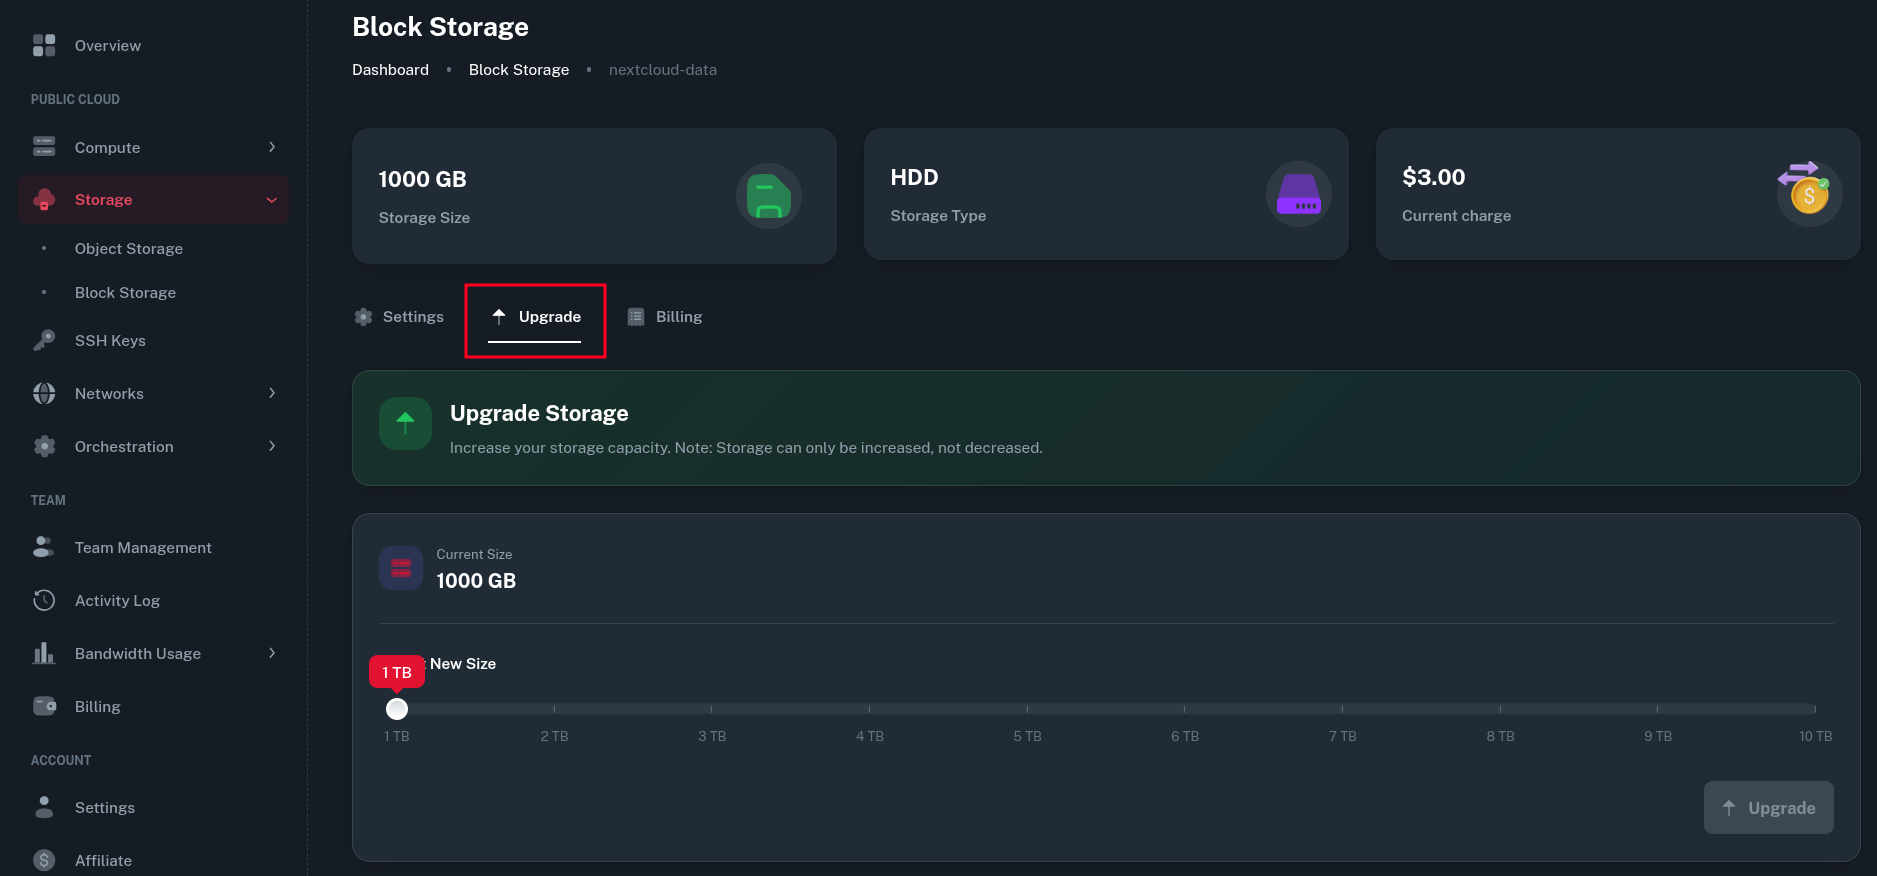
Go to Storage > Block Storage > (select your Block Storage) > Upgrade.
-
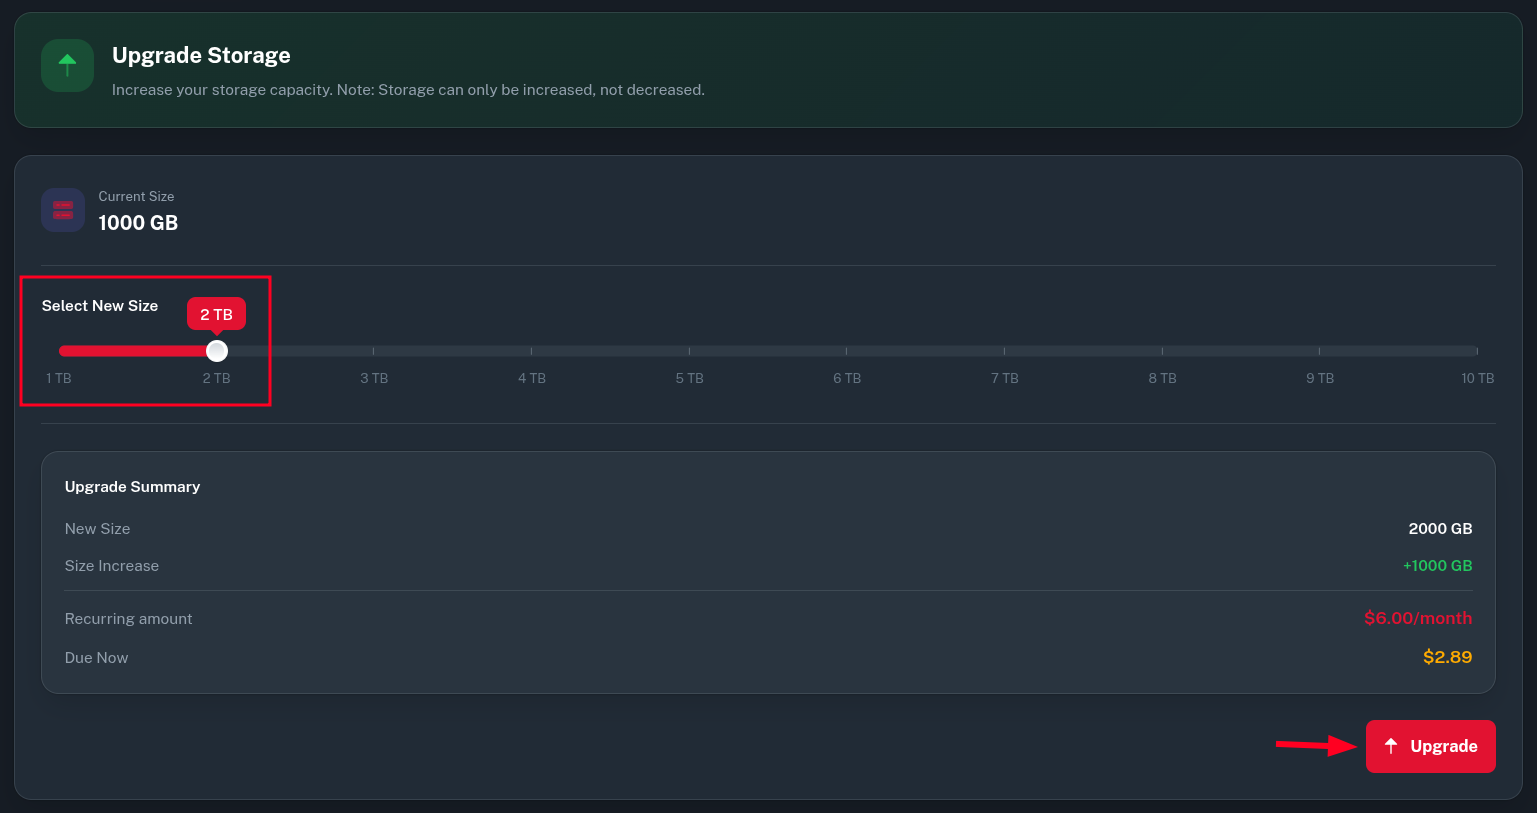
Then increase the size of your drive using the slider and click the Upgrade button.
-
Confirm the change and pay the generated invoice.
-
Now, going back to the SSH console, you will see the drive changed size to 2TB, however the partition is still only 1TB.
root@vm-sg:~# lsblk /dev/vdb vdb 254:16 0 2T 0 disk └─vdb1 254:17 0 1000G 0 part /mnt/nextcloud-data -
The easiest way to resize partition is to use the
growpartcommand as such:root@vm-sg:~# growpart /dev/vdb 1 CHANGED: partition=1 start=2048 old: size=2097149951 end=2097151966 new: size=4194301919 end=4194303966 -
After this, reboot your VM and the
x-systemd.growfshook we specified in fstab earlier should automatically resize the filesystem as well. Then you will see the new size being available.
FAQ
Can my Storage Block be moved to another location?
No, the Storage Blocks are limited only to one location and can only be used in location they were created in.
Can a Storage Block be moved to different VM?
Yes. You just need to unmount and detach a Storage Block from your VM and attach, then mount it to another one. This is possible as long as all VMs are in the same location.
Is it possible to shrink a Storage Block?
No, we do not support shrinking a Storage Block due to high risk of data loss. If you need to shrink a storage block, you will need to create a new, smaller one and migrate your data manually there.
Can storage type be changed?
No, storage type (HDD vs SSD NVMe) can not be changed after the Storage Block is created. You will need to migrate your data manually.
What kind of IO performance to expect?
Some quick benchmarks I ran in Singapore using ext4 as a filesystem on mounted storage with yabs.sh (fio) to measure the IO performance:
NVMe SSD
fio Disk Speed Tests (Mixed R/W 50/50) (Partition /dev/vdb1):
---------------------------------
Block Size | 4k            (IOPS) | 64k           (IOPS)
  ------   | ---            ----  | ----           ----
Read       | 136.29 MB/s  (34.0k) | 1.09 GB/s    (17.1k)
Write      | 136.65 MB/s  (34.1k) | 1.10 GB/s    (17.2k)
Total      | 272.94 MB/s  (68.2k) | 2.20 GB/s    (34.4k)
           |                      |
Block Size | 512k          (IOPS) | 1m            (IOPS)
  ------   | ---            ----  | ----           ----
Read       | 1.04 GB/s     (2.0k) | 1.03 GB/s     (1.0k)
Write      | 1.10 GB/s     (2.1k) | 1.10 GB/s     (1.0k)
Total      | 2.14 GB/s     (4.1k) | 2.13 GB/s     (2.0k)
HDD
fio Disk Speed Tests (Mixed R/W 50/50) (Partition /dev/vdb1):
---------------------------------
Block Size | 4k            (IOPS) | 64k           (IOPS)
  ------   | ---            ----  | ----           ----
Read       | 40.03 MB/s   (10.0k) | 629.06 MB/s   (9.8k)
Write      | 40.13 MB/s   (10.0k) | 632.37 MB/s   (9.8k)
Total      | 80.16 MB/s   (20.0k) | 1.26 GB/s    (19.7k)
           |                      |
Block Size | 512k          (IOPS) | 1m            (IOPS)
  ------   | ---            ----  | ----           ----
Read       | 922.29 MB/s   (1.8k) | 902.43 MB/s    (881)
Write      | 971.29 MB/s   (1.8k) | 962.53 MB/s    (939)
Total      | 1.89 GB/s     (3.6k) | 1.86 GB/s     (1.8k)
Do not take those as a guarantees, the actual results may differ based on storage utilization and other factors in a shared environment.