

Overview
Reserved IP addresses (also known as floating IPs) are flexible, re-routable IP addresses that can be dynamically assigned to different virtual machines within your Onidel Cloud infrastructure. Unlike standard IPs that are permanently bound to a specific VM, Reserved IPs can be instantly moved between instances, providing high availability and seamless failover capabilities.
When you provision a Reserved IP, it exists independently of any VM instance. You can attach it to a VM and later reassign it to another VM without changing DNS records or updating client configurations.
Key Benefits
-
You can move the reserved IP address from one VM to another (e.g. during maintenance or in response to failure) through our control panel or API.
-
You can assign one or more Reserved IP addresses to your VM, allowing it to communicate with external systems using multiple public IPs.
-
When you decommission an old VM and provision a new one, you can attach the same Reserved IP. This avoids updating DNS records or client configurations, making migrations frictionless.
-
You can hold on to your favourite IP and use it again later - for any reason you like!
How Reserved IPs Work
A Reserved IP address has a dynamic, one-to-one relationship with an "Anchor" IP address. The Anchor IP is the primary IP address of the VM that the Reserved IP is being routed to.
This sounds complicated, but it simply means that the Reserved IP piggybacks on another IP address, which you can choose and change at your leisure.
Via the Onidel Cloud Control Panel and API, the Reserved IP ↔ Anchor IP relationship can be updated in real-time, allowing you to direct traffic to the VM of your choice.
Example Scenario:
-
A user enters the Reserved IP address
198.51.100.50in their browser -
This Reserved IP's current Anchor IP is
203.0.113.10, which belongs to VM-A -
The user will be served the website running on VM-A
When you change the Anchor IP to 203.0.113.20 (which belongs to VM-B), the same user accessing the same Reserved IP will now be served the website running on VM-B.
This change is instant, without any perceptible downtime from the end user's perspective. Behind the scenes, our infrastructure simply updates the routing table to forward all traffic destined for the Reserved IP to the new Anchor IP.
Use Cases
Unplanned Downtime Recovery
If your primary VM becomes unavailable, instantly redirect traffic to a standby VM by reassigning the Reserved IP. This provides near-zero downtime recovery without DNS propagation delays.
Zero-Downtime Maintenance
Before performing maintenance on your production VM:
-
Ensure your standby VM is synchronised
-
Reassign the Reserved IP to the standby VM
-
Perform maintenance on the primary VM
-
Optionally reassign the Reserved IP back after maintenance
Provisioning Reserved IPs
Via Control Panel
Navigate to Network > Reserved IPs in your Onidel Cloud dashboard.
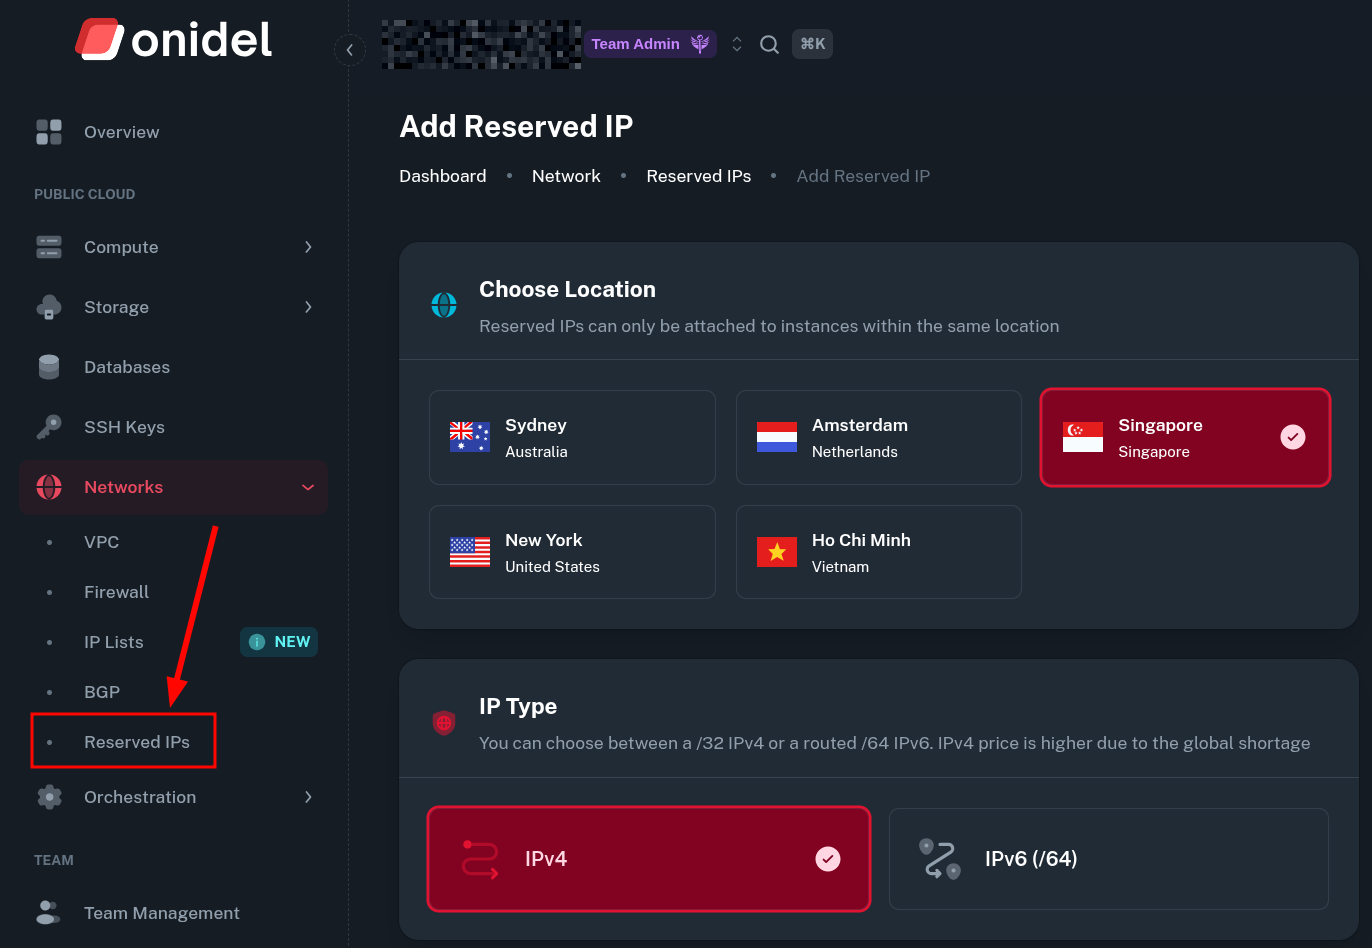
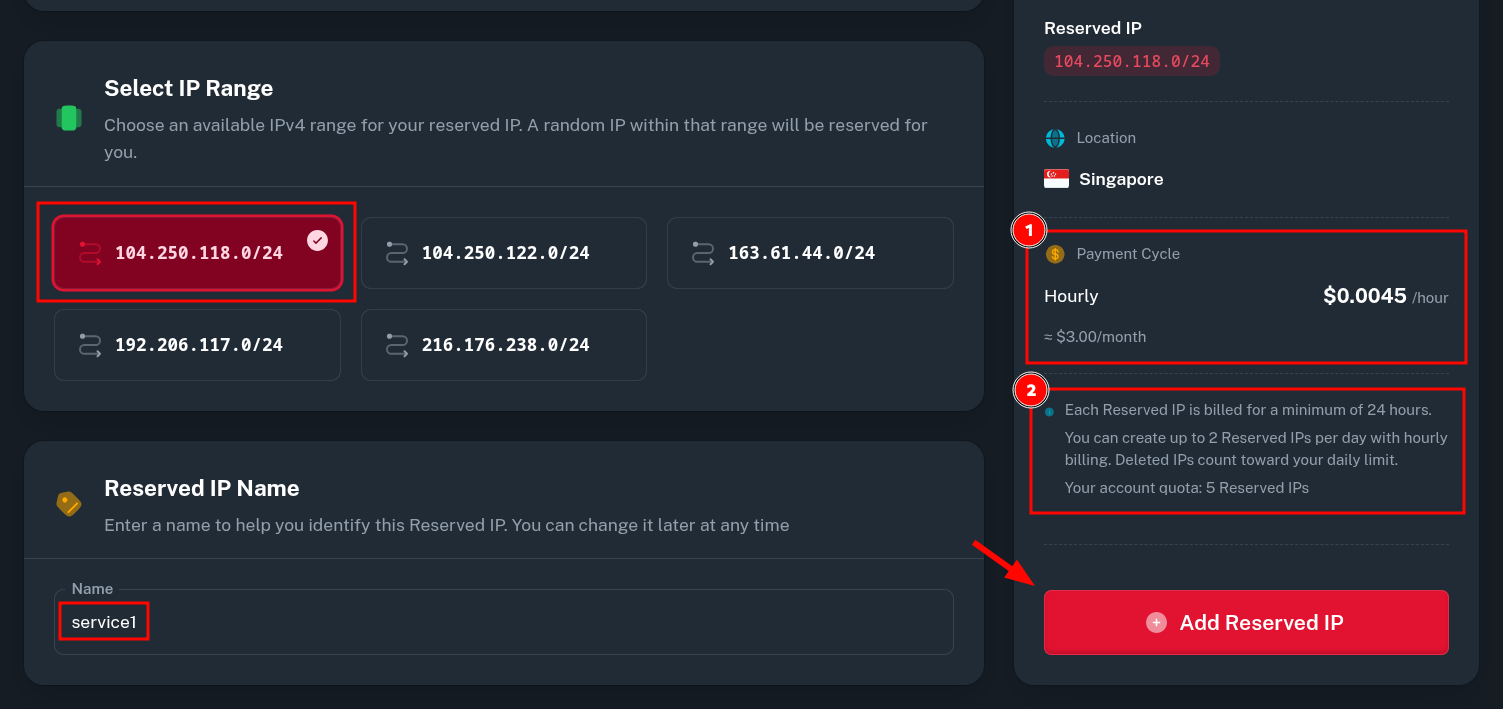
Then select the your desired location, IP type, the subnet and enter reserved IP name. Finally, click the Add Reserved IP button.
-
Reserved IPs are billed on hourly basis. See the pricing section below.
-
There are limits on how many reserved IPs you may create within a day and per account.
Via API
curl -X POST https://api.cloud.onidel.com/network/reserved_ips \
  -H "Authorization: Bearer YOUR_API_TOKEN" \
  -H "Content-Type: application/json" \
  -d '{
    "ip_type": "ipv4",
    "location": "sydney"
  }'
Reference: Reserved IPs - Developer Docs
Pricing
-
Billing: Hourly billing with a maximum of $3.00/month ($0.0045/hour) per /32 IPv4 or $1.00/month ($0.0015/hour) per /64 IPv6 subnet
-
Minimum Charge: 24 hours
-
No bandwidth charges: Uses your VM's allocated bandwidth
Attaching Reserved IP to the VM
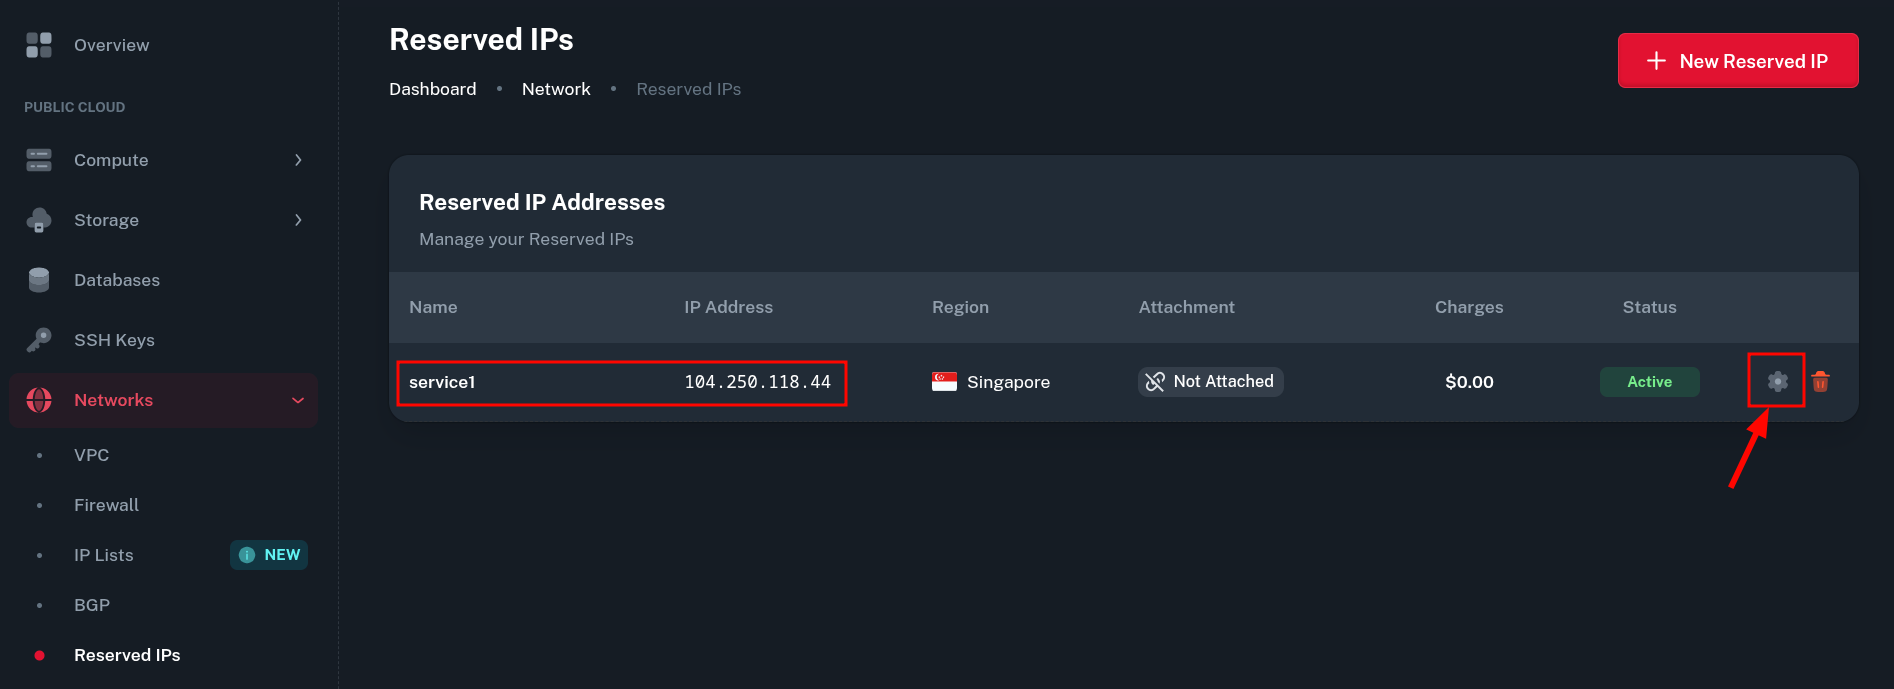
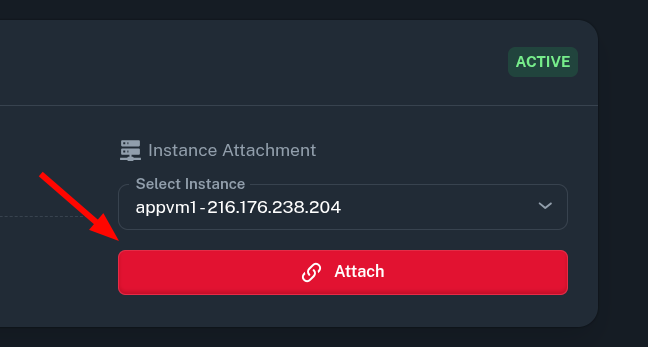
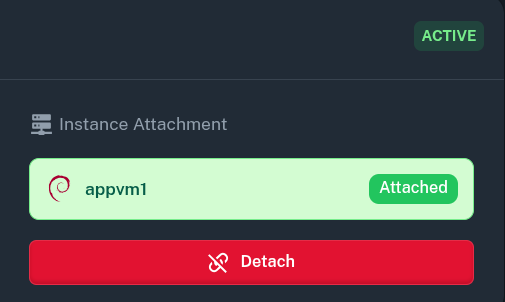
Once purchased, you should see the Reserved IP in the Network > Reserved IPs tab. You may manage it by clicking the Gear icon.
In the Instance Attachment dropdown, pick the VM you want to attach Reserved IP to. The list will only include instances in the same location as the reserved IP itself.
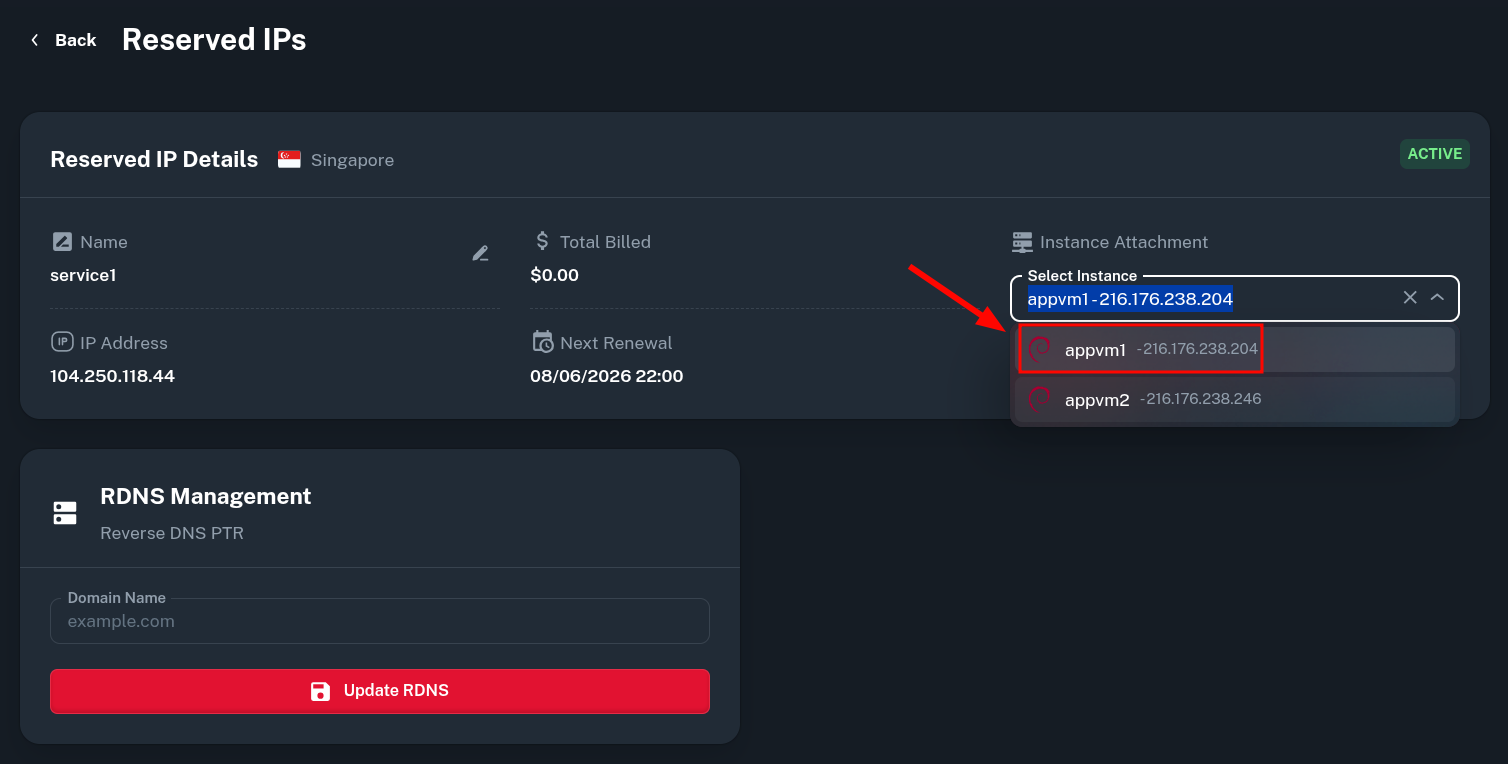
After you click Attach, the Reserved IP will be connected to the selected VM. This does not involve any downtime, Reserved IP will be available to the VM as soon as it's attached.
Configuring Reserved IPs
Step 1: Configure on Target VMs
Reserved IPs must be configured as secondary IPs on all potential target VMs:
Ubuntu 22.04+ (Netplan):
# Create a new file: /etc/netplan/60-reserved-ip.yaml
network:
  version: 2
  ethernets:
    eth0:
      addresses:
        - YOUR_RESERVED_IP/32
Apply the configuration:
sudo netplan apply
Ubuntu 20.04 and earlier / Debian:
# Add to /etc/network/interfaces
auto eth0:1
iface eth0:1 inet static
    address YOUR_RESERVED_IP
    netmask 255.255.255.255
Apply the configuration:
sudo ifup eth0:1
# Or restart networking service
sudo systemctl restart networking
CentOS/RHEL:
# Create /etc/sysconfig/network-scripts/ifcfg-eth0:1
DEVICE=eth0:1
IPADDR=YOUR_RESERVED_IP
NETMASK=255.255.255.255
ONBOOT=yes
Apply the configuration:
sudo ifup eth0:1
# Or restart network service
sudo systemctl restart network
Step 2: Assign to Anchor IP
Via Control Panel:
-
Go to Network > Reserved IPs
-
Click on your Reserved IP
-
Choose the target VM and click Attach Reserved IP
Via API:
curl -X PUT https://api.cloud.onidel.com/network/reserved-ips/YOUR_RESERVED_UUID \
  -H "Authorization: Token YOUR_API_TOKEN" \
  -H "Content-Type: application/json" \
  -d '{
    "anchor_ip": "TARGET_VM_PRIMARY_IP"
  }'
Reference: Reserved IPs - Developer Docs
Step 3: Verifying Configuration
Test connectivity to ensure the Reserved IP is properly routed:
# From external host
ping YOUR_RESERVED_IP

# From the VM
ip addr show | grep YOUR_RESERVED_IP
Limitations
While Reserved IPs provide great degree of flexibility, there are also a few limitations to be aware of:
-
Reserved IPs may be billed only on hourly basis.
-
Reserved IPs can not be moved across locations or subnets.
-
Once VM's Primary IP address is converted into a Reserved IP, it can not be converted back.
-
To prevent abuse and frequent IP rotation, a maximum of 2 reserved IPs can be created per day and total of 5 per account. If your workload requires more, please contact us by opening a ticket to get the limit increased.