This tutorial explains how to deploy a MikroTik Cloud Hosted Router (CHR) on an Onidel VPS.
What is MikroTik CHR and Why Deploy It?
MikroTik Cloud Hosted Router (CHR) is a specialized version of the RouterOS operating system tailored specifically for running in virtual machines. Unlike hardware-bound versions of RouterOS, CHR comes optimized with VirtIO drivers out-of-the-box for high-throughput virtualized networking.
Common reasons for deployment of MikroTik CHR in Onidel Cloud environment include:
-
Building High-Performance VPN Hubs: Create highly configurable WireGuard, IPsec, L2TP, or OpenVPN endpoints to securely link remote home, office, and mobile clients together.
-
Utilizing Advanced Cloud Routing: Leverage enterprise routing protocols (BGP, OSPF, MPLS) in an inexpensive cloud environment for staging or production setups.
-
Creating Powerful Firewall and QoS: Use RouterOS's intricate packet filtering, queuing, and traffic shaping features.
-
Cost-Effectiveness: Obtain enterprise-grade networking features for a fraction of the cost of traditional cloud networking appliances.
Prerequisites
System Requirements
Minimum System Requirements of MikroTik CHR v7:
-
1 CPU core
-
256 MB RAM (1 GB recommended)
-
at least 128 MB disk space
Any VPS configuration available on Onidel Cloud should be sufficient.
Live CD
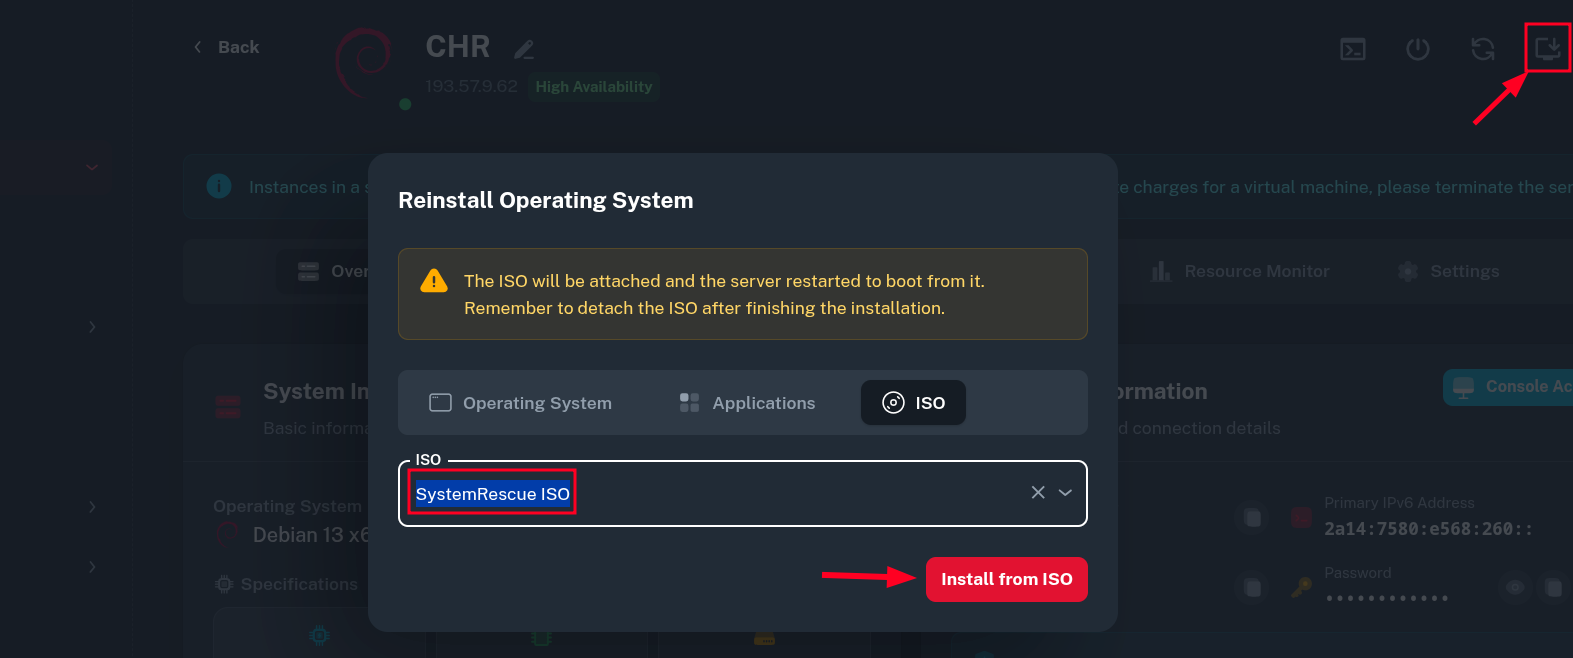
Installing MikroTik CHR requires flashing the virtual drive with a disk image provided by the vendor. This action overwrites the main drive of the VM, so running in a live environment is highly recommended.
You may use any Live Linux distribution of your choice or choose the included SystemRescue CD during deployment or VM reinstallation.
During VM deployment:
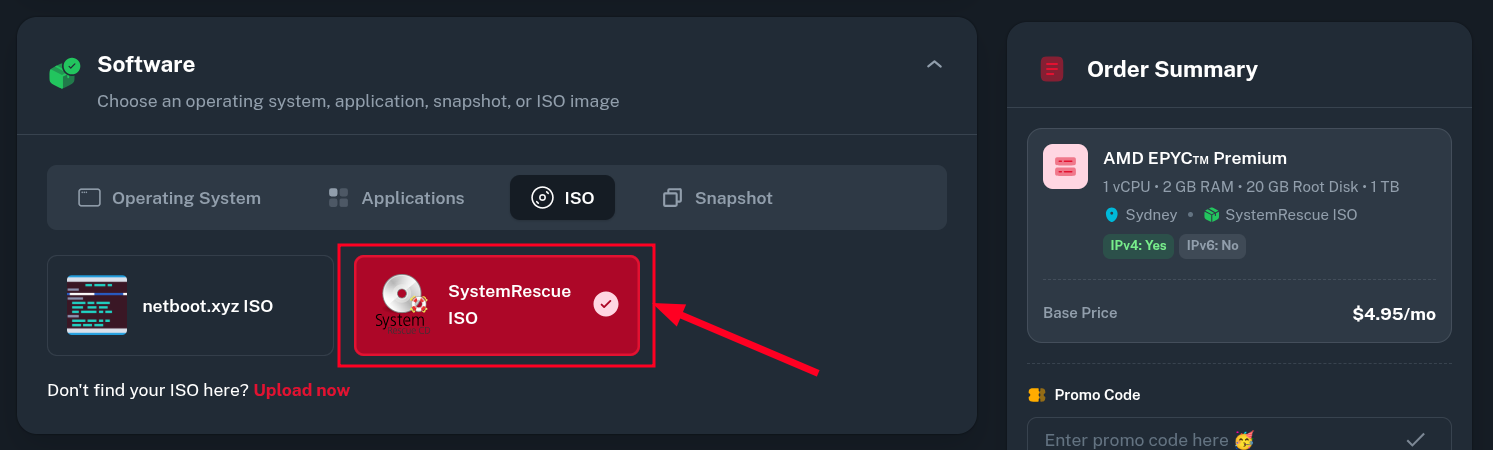
On already existing VMs:
For convenience, we will be using SSH in later parts of this tutorial and by default SystemRescue comes with firewall enabled. To disable it, interrupt the GRUB boot process by pressing Tab key while first boot option is still selected. This will let you edit the boot parameters, append nofirewall option at the end and press Enter to continue boot.
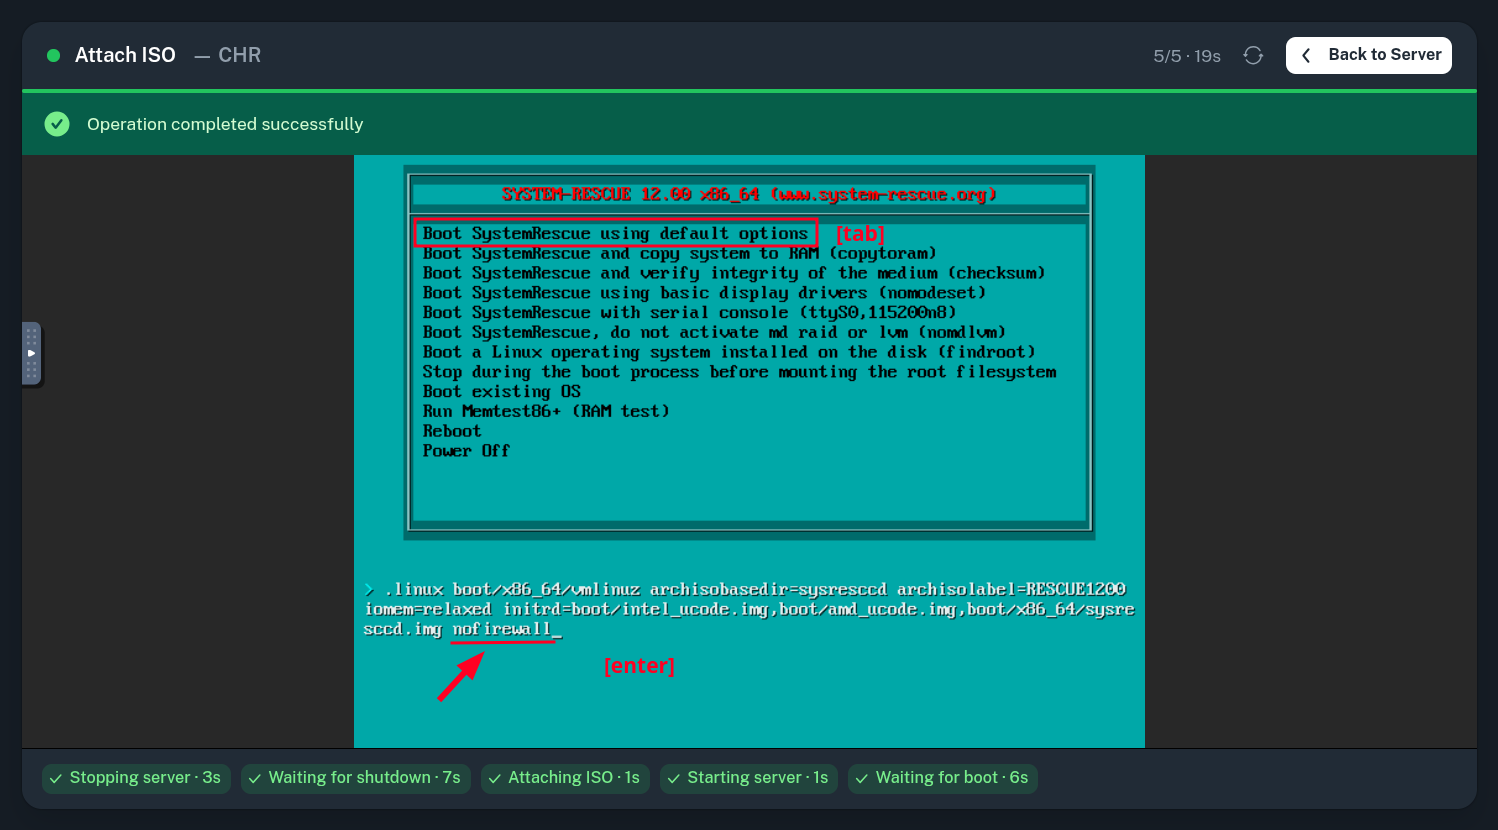
Once the Live environment is booted, you'll need to set a temporary root password used for SSH connection.
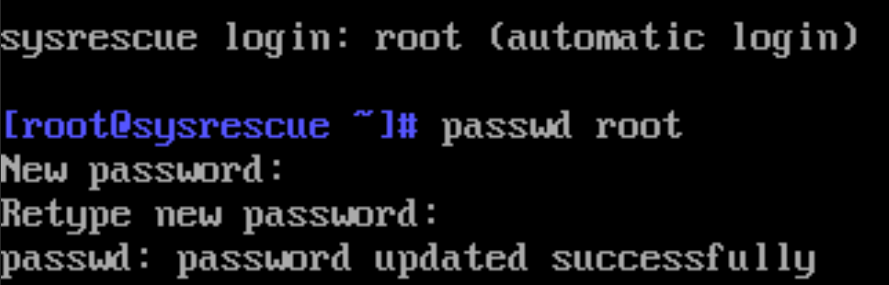
Then, using SSH client you should be able to connect to your VM providing the previously set temporary password.
$ ssh root@<vps-ip>
[email protected]'s password:
[root@sysrescue ~]#
Installation
Obtaining the MikroTik CHR image
Inside the live environment, we will download and unpack the latest MikroTik RouterOS version.
$ ROS_VER=$(wget -qO- https://upgrade.mikrotik.com/routeros/NEWESTa7.stable | cut -d' ' -f1)
$ echo $ROS_VER
7.23.1
$ wget "https://download.mikrotik.com/routeros/${ROS_VER}/chr-${ROS_VER}.img.zip"
...
2026-06-28 10:39:00 (56.2 MB/s) - ‘chr-7.23.1.img.zip’ saved [44973097/44973097]
$ unzip chr-7.23.1.img.zip
Archive:  chr-7.23.1.img.zip
  inflating: chr-7.23.1.img
Flashing image onto main drive
Once the image is downloaded and ready, we will flash it onto the main drive of the VM using the dd command. Since the MiktoTik CHR image weights only approximately 130MB, this operation should take at most a few seconds to complete.
$ dd if=chr-7.23.1.img of=/dev/vda conv=sync status=progress
129679872 bytes (130 MB, 124 MiB) copied, 3 s, 43.2 MB/s
262144+0 records in
262144+0 records out
134217728 bytes (134 MB, 128 MiB) copied, 3.20383 s, 41.9 MB/s
By now the partition layout should look as shown below.
$ lsblk /dev/vda
NAME   MAJ:MIN RM SIZE RO TYPE MOUNTPOINTS
vda    254:0    0  20G  0 disk
├─vda1 254:1    0  32M  0 part
└─vda2 254:2    0  94M  0 part
Pre-boot configuration
By default, the RouterOS configuration allows for remote access without a password until first-time configuration is performed. This is a serious security risk, especially when the system is accessible from the internet.
We will mount the main RouterOS partition and edit initial configuration before booting for the first time.
$ mount /dev/vda2 /mnt
Now edit the /mnt/rw/autorun.scr file - set the RouterOS login password (<mikrotikpassword>) and disable unnecessary services to limit exposure.
/user/set 0 password=<mikrotikpassword>
/ip/service/set disabled=yes api,api-ssl,telnet,ftp
Then umount the partition and make sure the changes are synchronized.
$ umount /mnt
$ sync
Booting into MikroTik CHR
We can now go back to the storage tab of your VM in the Onidel Panel and detach the Live CD image from your VM.
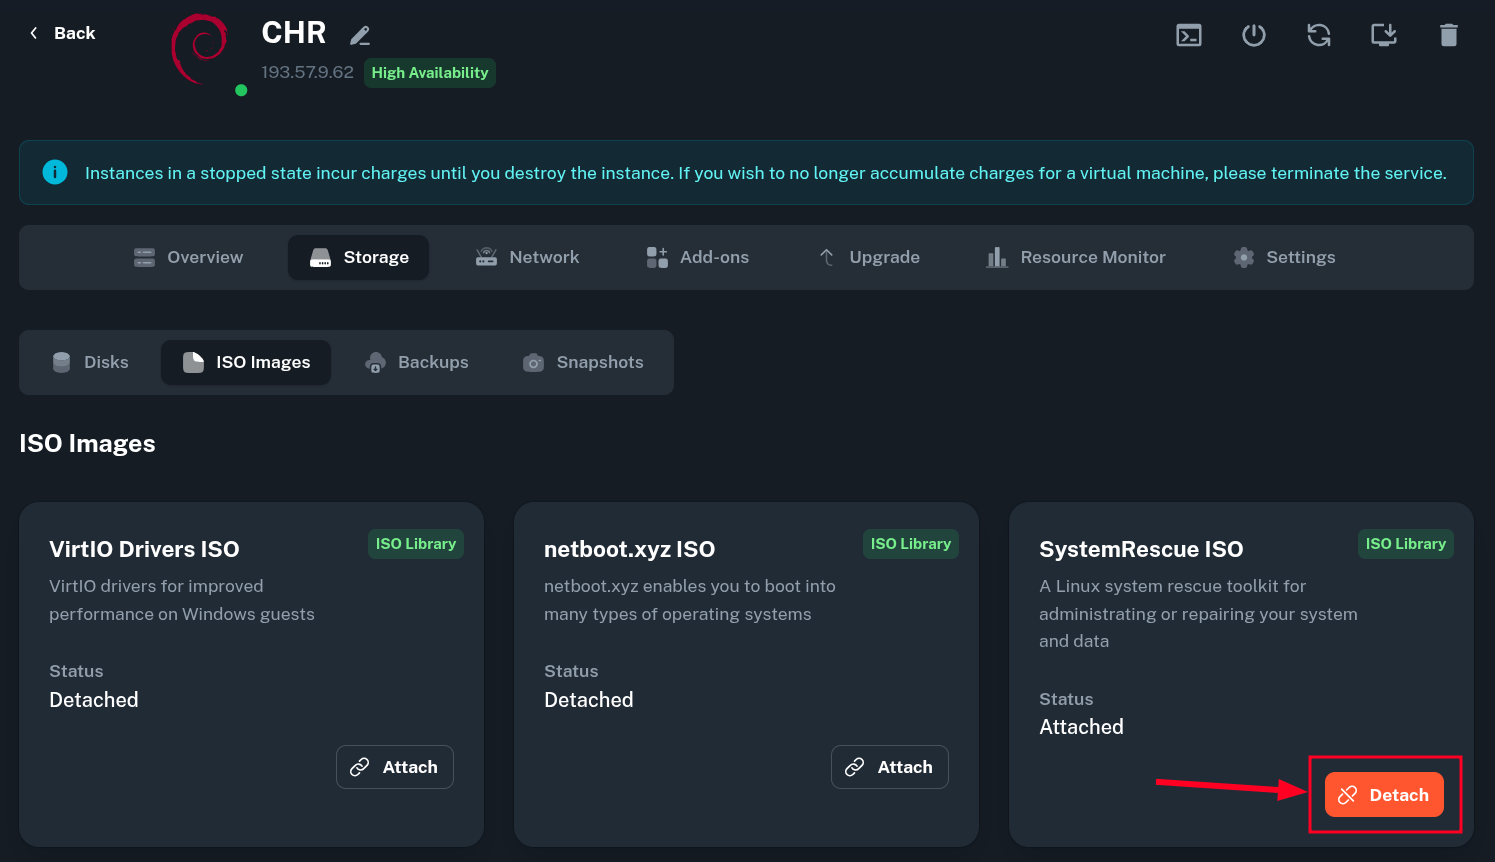
This will automatically reboot the VM into RouterOS.
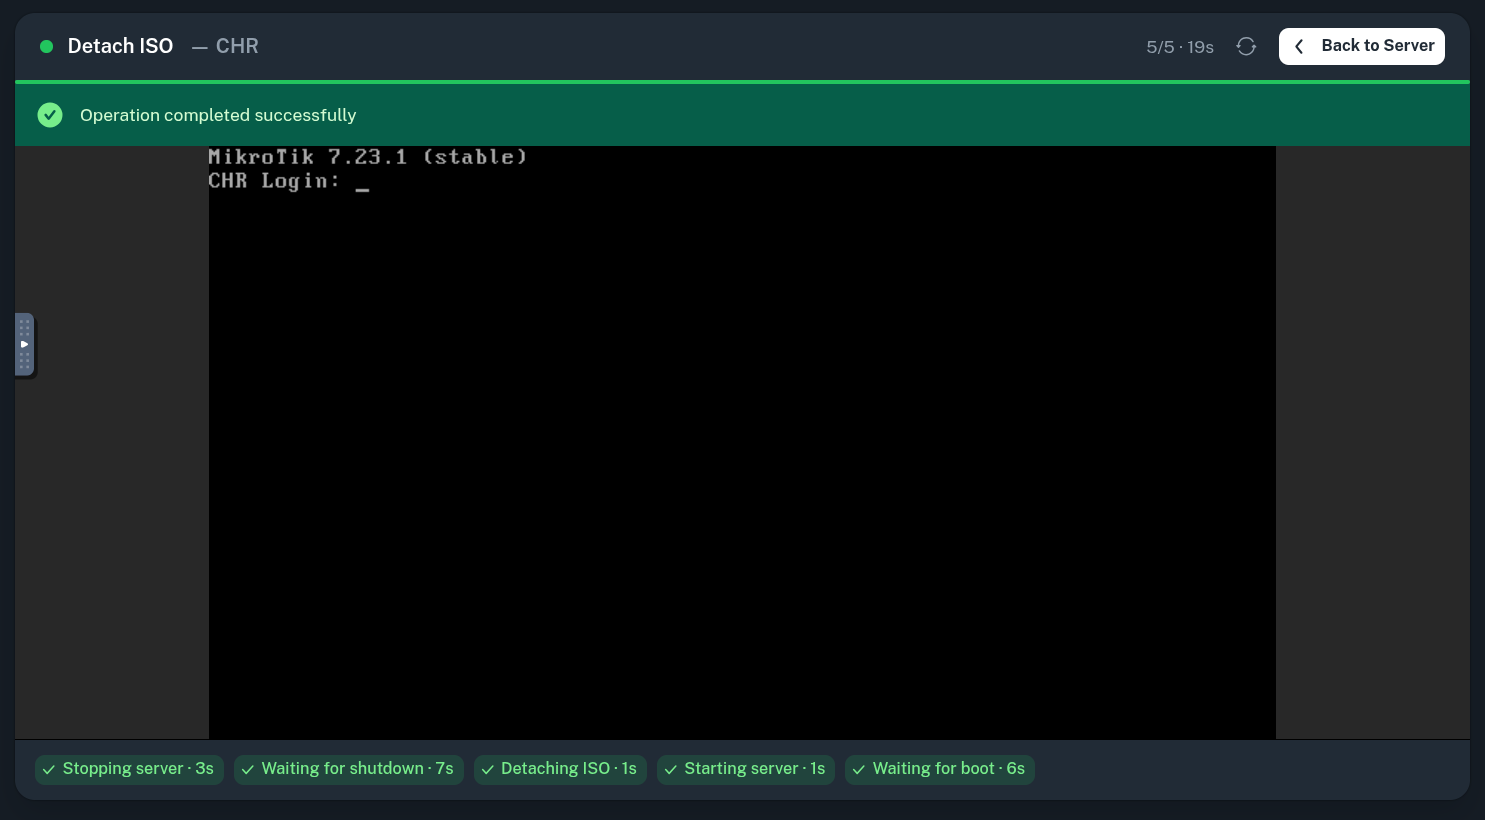
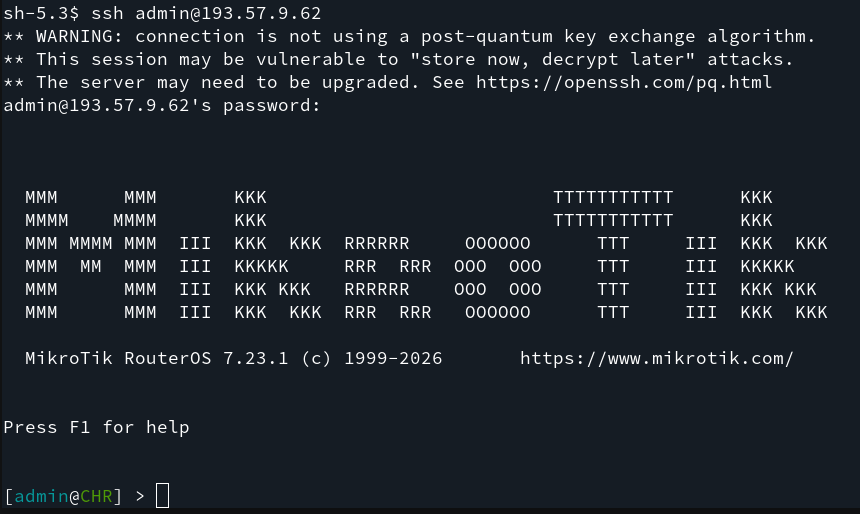
When connecting over SSH, you may need to first remove the old host key fingerprint of the temporary live CD environment. Then login as admin using the password set at the pre-boot configuration stage.
$ ssh-keygen -R <vps-ip>
$ ssh admin@<vps-ip>