
This guide is a continuation of the the main AMD SEV-SNP article and assumes you have already enabled and verified SEV-SNP on your VM.
Introduction
In an AMD SEV-SNP environment, the memory and CPU registers of your guest virtual machine are cryptographically protected from the hypervisor. However, ensuring confidentiality is only half of the puzzle. With SEV-SNP architecture, it's also possible to cryptographically verify the integrity of the operating system code executing at boot.
During the initial launch, the AMD Secure Processor (ASP) measures the initial guest memory state, which includes the virtual firmware (OVMF) and the loaded boot artifacts. In a traditional boot architecture, the kernel and initramfs are separate files loaded dynamically from disk. If kept separate, a malicious hypervisor could modify the initramfs (to inject malware) or alter the kernel command line parameters without changing the kernel binary itself.
A Unified Kernel Image (UKI) solves this by packing the UEFI boot stub, the Linux kernel, the initramfs, and the kernel command line into a single .efi PE/COFF binary. Because the entire binary is loaded into memory and measured as a single unit at boot, any tampering with the command line or early userspace code will alter the SEV-SNP launch measurement.
The AMD Secure Processor calculates the launch measurement based on several inputs: the number of vCPUs, CPU model, the UEFI firmware (OVMF) and the UKI (kernel+parameters+initramfs). If any of these parameters differ, the resulting hash will change. You may calculate the expected launch measurement value independently in a trusted environment using the sev-snp-measure utility. Then compare it with the measurement hash returned by the AMD Secure Processor.
For the ASP to include the UKI in its OVMF measurement, a QEMU direct boot needs to be performed. The simplified procedure is explained in the section below.
Measured Direct Boot Process
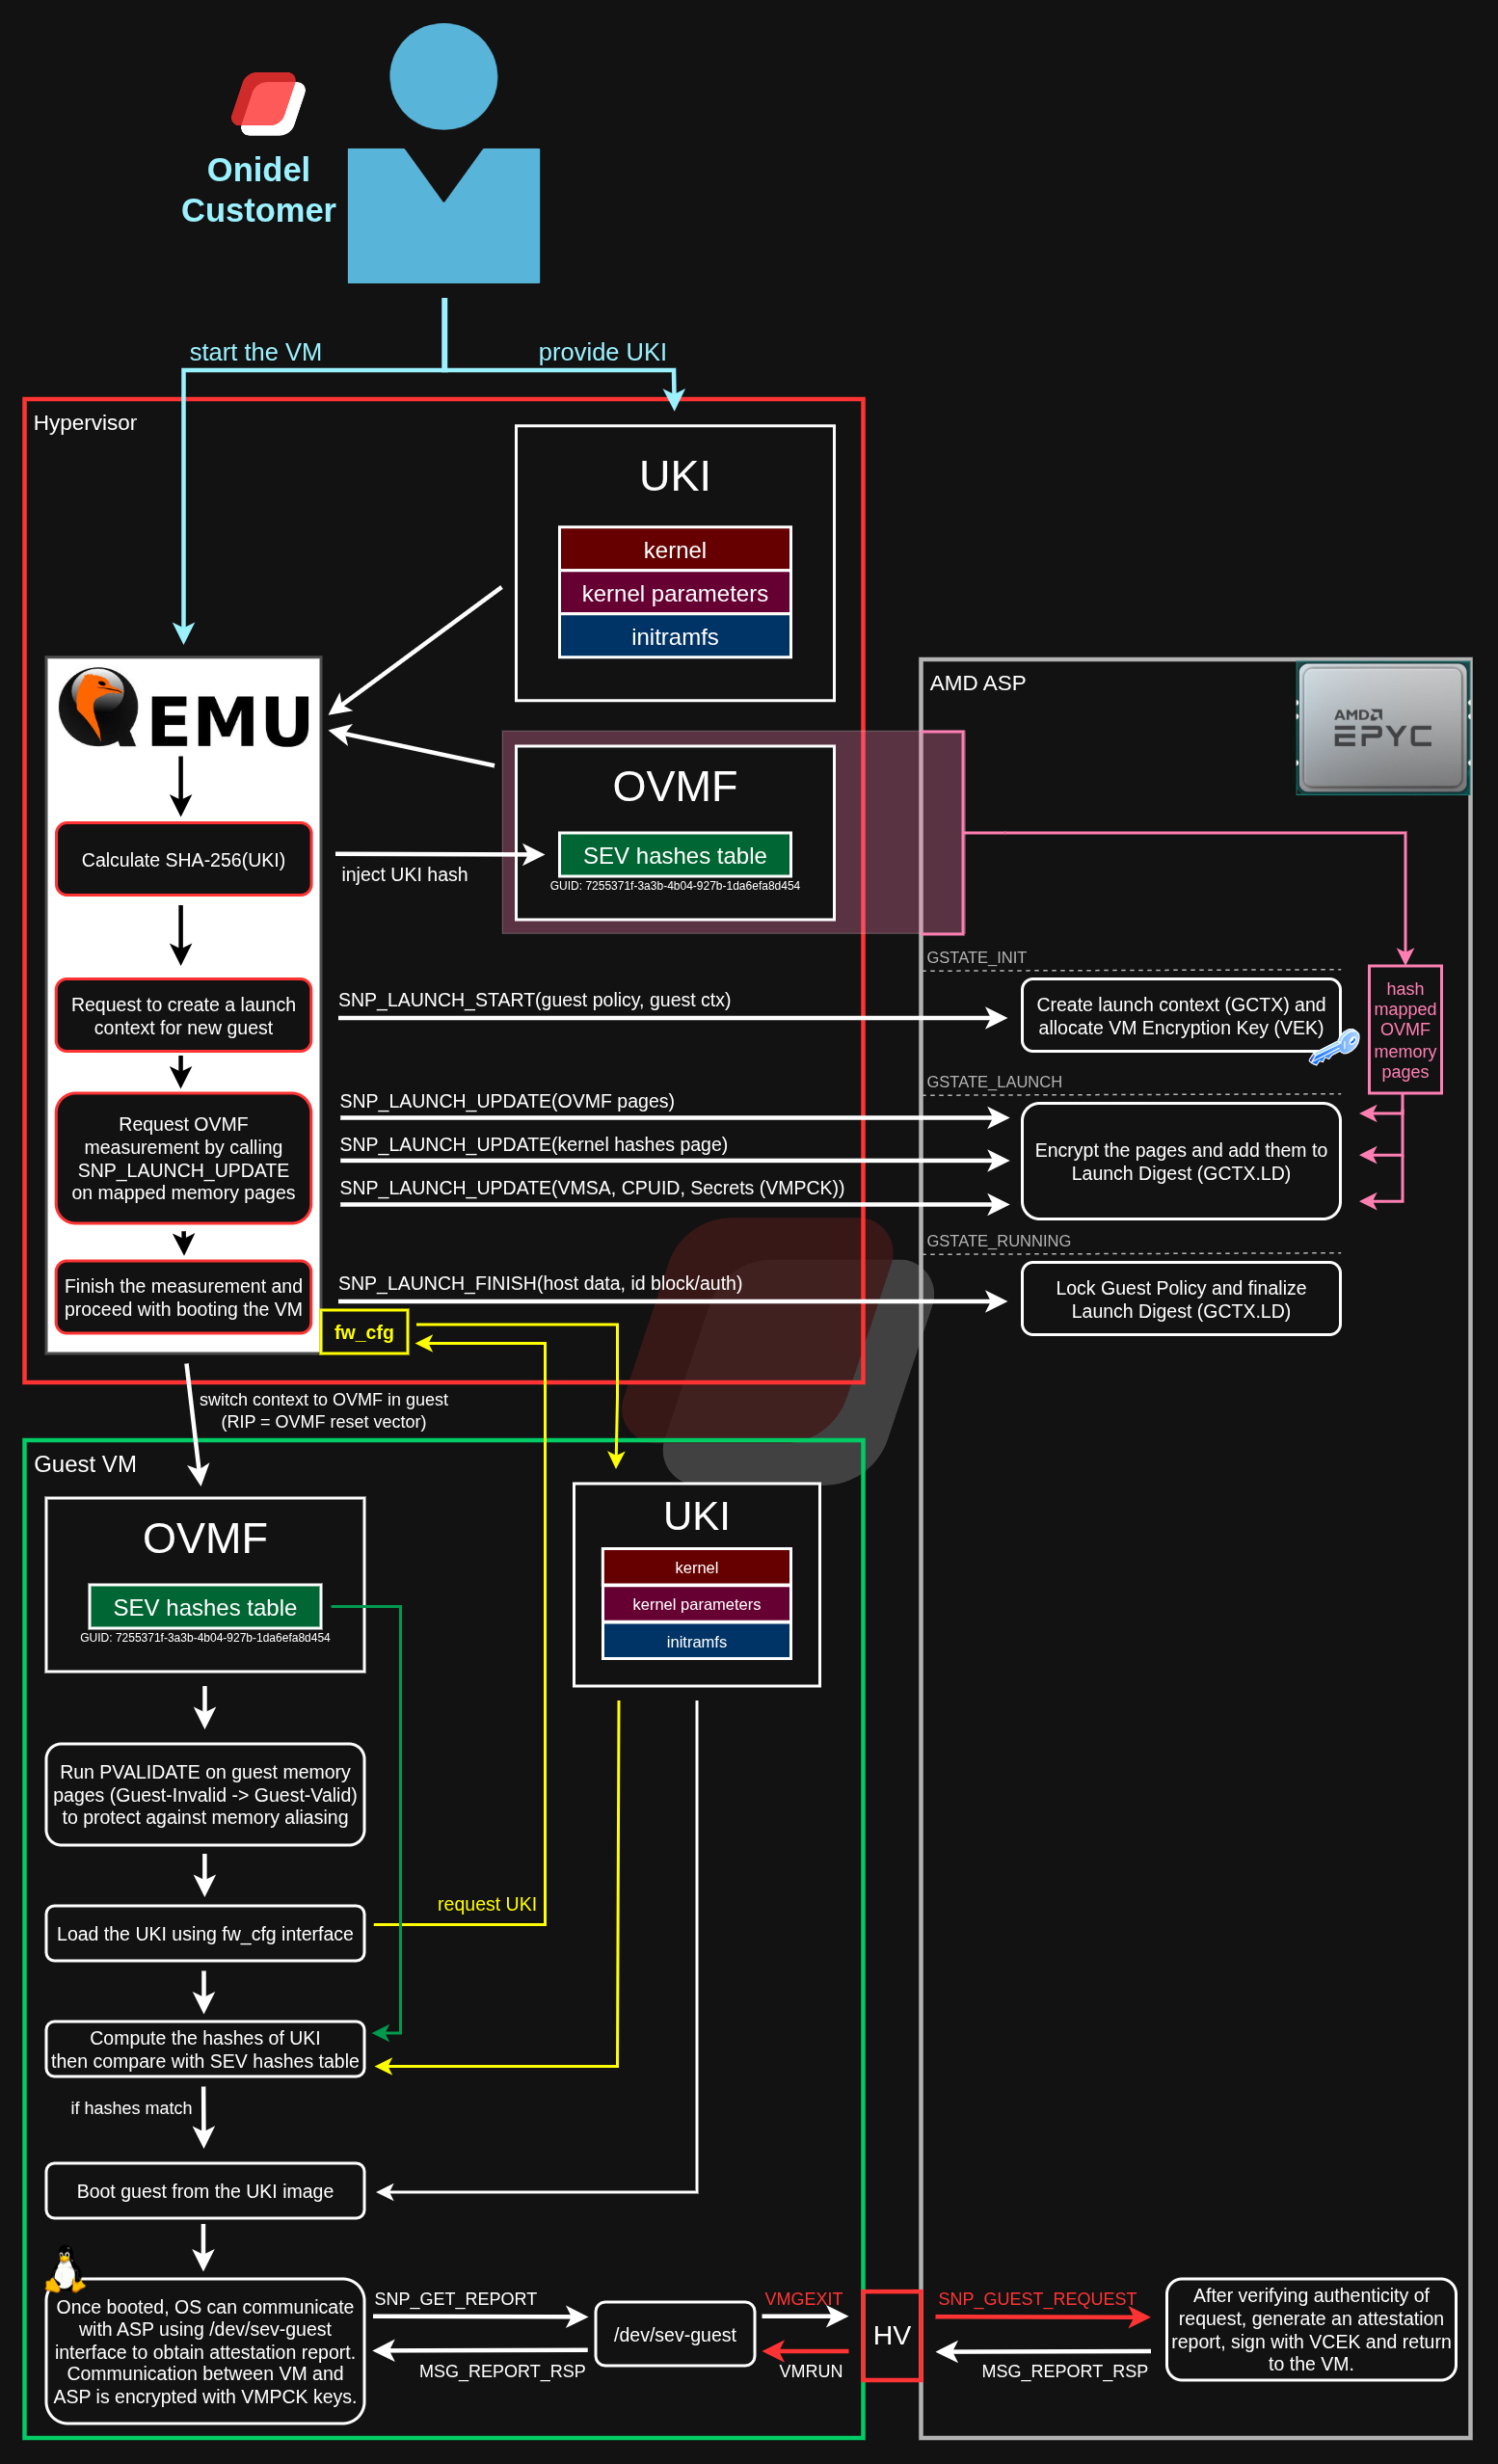
We start by User supplying their UKI image and booting the VM. Before the actual boot process starts, QEMU calculates SHA-256 hash of UKI and puts it in a special reserved section of memory where OVMF was loaded (SEV hashes table section, type: 0x10, GUID: 7255371f-3a3b-4b04-927b-1da6efa8d454).
Right after this, QEMU reaches out to the ASP initiating the launch of new VM. SNP_LAUNCH_START allocates a new Guest Context (GCTX) and creates a key (VEK - Virtualization Encryption Key) which will be used for establishing encrypted communication with the VM.
Once the context is allocated, QEMU issues 3 subsequent SNP_LAUNCH_UPDATE commands to the ASK to measure and encrypt OVMF memory pages:
-
At first, the main OVMF firmware code gets measured and encrypted with
VEK. -
Next, the injected
SEV hashes table(the included kernel, kernel parameters and initramfs get measured at this stage). -
Finally, the Virtual Machine Save Area (
VMSA),CPUIDandSecretspage get encrypted and measured. The last one is particularly important - besides measuring it, within the Secrets Page structure ASP also returns 4 unique encryption keys used for communication at different Virtual Machine Privilege Levels -VMPL0-3(corresponding keysVMPCK0-3).
Lastly, the SNP_LAUNCH_FINALIZE command is sent. The ASP locks the Guest Policy and finalizes the Launch Digest (GCTX.LD) computation. ASP has finished all stages required to generate attestation report. At this stage, the guest VM can be booted.
More details regarding specific commands and parameters used for communication with AMD ASP can be found in the SEV Secure Nested Paging Firmware ABI Specification document.
Transitioning to Guest VM context, at this point OVMF is already encrypted in the guest's memory (with SNP_LAUNCH_UPDATE(OVMF pages), the ASP performed encryption). QEMU starts execution setting the CPU Instruction Pointer at the OVMF Reset Vector table. In the next step, OVMF executes a special PVALIDATE instruction on all accessed guest memory pages. A bit on memory page needs to be changed from Guest-Invalid to Guest-Valid when accessed from guest. This is an important step which aims to mitigate memory aliasing attacks.
To load the UKI into the memory of the guest, a special fw_cfg interface of QEMU is used. It allows guest to read full contents of UKI kernel image into its own (encrypted) memory. Additionally, a hash of UKI is computed. If it does not match the hashes stored in SEV hashes table, OVMF will halt boot at this stage. Otherwise, it will proceed with booting the kernel by jumping to its entry point.
Configuring Measured Direct Boot
Generating UKI image with dracut
Since most SEV-SNP supporting Linux distributions come with dracut initrd generator, this section will assume it is already installed and configured on the system. Unlike the old initramfs-tools (default generator on Debian), dracut can also generate UKI kernel images natively.
We just need to install the systemd-boot dependency.
$ apt install systemd-boot           # Ubuntu 26.04+
$ dnf install systemd-boot-unsigned  # AlmaLinux 10.2+
The systemd-boot (or systemd-boot-unsigned) package contains the pre-compiled UEFI boot stub (/usr/lib/systemd/boot/efi/linuxx64.efi.stub). dracut requires this stub to act as the entry executable. The UEFI firmware runs this stub first, which then transitions execution to the embedded kernel and initramfs.
After that, you need to note the kernel parameters (cmdline) of currently booted environment.
$ cat /proc/cmdline
BOOT_IMAGE=/vmlinuz-7.0.0-22-generic root=/dev/mapper/ubuntu--vg-ubuntu--lv ro
Next, create a new file in /etc/dracut.conf.d/uki.conf.
There we will tell dracut to generate UKI image (uefi="yes" with the uefi_stub of systemd-boot bootloader) and provide predictable kernel parameters from the step above. You should omit the BOOT_IMAGE or similar variables and put just the parameters after root=.
Then, reproducible="yes" makes dracut omit non-deterministic build metadata. That means, unless the actual kernel/initramfs is modified, the UKI should be byte-to-byte identical across builds.
Lastly, the machine_id="no" will not include machine-id systemd parameter in the resulting UKI filename, making it deterministic.
uefi="yes"
uefi_stub="/usr/lib/systemd/boot/efi/linuxx64.efi.elf"
kernel_cmdline="root=/dev/mapper/ubuntu--vg-ubuntu--lv ro"
reproducible="yes"
machine_id="no"
Once the file is saved, you can trigger dracut UKI generation manually.
$ dracut --force
/var/tmp/dracut.d3EEoNP/uefi/uki.sbat does not contain a valid SBAT section, skipping.
Wrote unsigned /var/tmp/dracut.d3EEoNP/uefi/linux.efi
Given we do not use UEFI Secure Boot (but rather ensure verified boot via SEV-SNP), this warning regarding empty SBAT metadata block is actually expected and can be ignored.
The resulting generated UKI kernel image can be found in /boot/efi/EFI/Linux/ directory:
$ ls -lah /boot/efi/EFI/Linux/
total 77M
drwxr-xr-x 2 root root 4.0K Jun 19 07:44 .
drwxr-xr-x 5 root root 4.0K Jun 19 07:36 ..
-rwxr-xr-x 1 root root  77M Jun 19 07:44 linux-7.0.0-22-generic.efi
Download it into a local directory using scp.
$ scp root@<vm-ip>:/boot/efi/EFI/Linux/linux-7.0.0-22-generic.efi .
Optionally, you may also inspect the contents of generated UKI stub. Using the ukify inspect command, you can see the dummy SBAT section, bootloader parameters, kernel version and cmdline, size and hashes of kernel and initrd contained in the UKI image.
$ apt install systemd-ukify
$ ukify inspect /boot/efi/EFI/Linux/linux-7.0.0-22-generic.efi
.sbat:
  size: 237 bytes
  sha256: a47a46e2ddb7de186cba107151279408dc23ad54a4c8e8d3dac4203894d824b6
  text:
    sbat,1,SBAT Version,sbat,1,https://github.com/rhboot/shim/blob/main/SBAT.md
    systemd-stub,1,The systemd Developers,systemd,259,https://systemd.io/
    systemd-stub.ubuntu,1,Ubuntu,systemd,259.5-0ubuntu3,https://tracker.debian.org/pkg/systemd
.osrel:
  size: 406 bytes
  sha256: de1a366db70de1ae4b6612a1696f9c1f37948028fab733508a3d5cf49836faac
  text:
    PRETTY_NAME="Ubuntu 26.04 LTS"
    NAME="Ubuntu"
    VERSION_ID="26.04"
    VERSION="26.04 LTS (Resolute Raccoon)"
    VERSION_CODENAME=resolute
    ID=ubuntu
    ID_LIKE=debian
    HOME_URL="https://www.ubuntu.com/"
    SUPPORT_URL="https://help.ubuntu.com/"
    BUG_REPORT_URL="https://bugs.launchpad.net/ubuntu/"
    PRIVACY_POLICY_URL="https://www.ubuntu.com/legal/terms-and-policies/privacy-policy"
    UBUNTU_CODENAME=resolute
    LOGO=ubuntu-logo
.cmdline:
  size: 42 bytes
  sha256: faa725c8adfe1844c61c5c70f149f4ba18d2bb77e7e74ba0329ed5a5b5d68f4a
  text:
    root=/dev/mapper/ubuntu--vg-ubuntu--lv ro
.uname:
  size: 16 bytes
  sha256: 29980f8b6e12ad60bd90ebde5a461cb5678ba325b22c5f69e30c0a4abac5ebb8
  text:
    7.0.0-22-generic
.linux:
  size: 17275272 bytes
  sha256: bf61b5a973bc279c55209e737987d54accb5e6b22b5ef4a7ef556a4d286641e0
.initrd:
  size: 63168764 bytes
  sha256: 06990edf68727363a27748cc9561a09b411cb9d2109227e8b8a9d2ea2b089fce
Uploading the UKI image
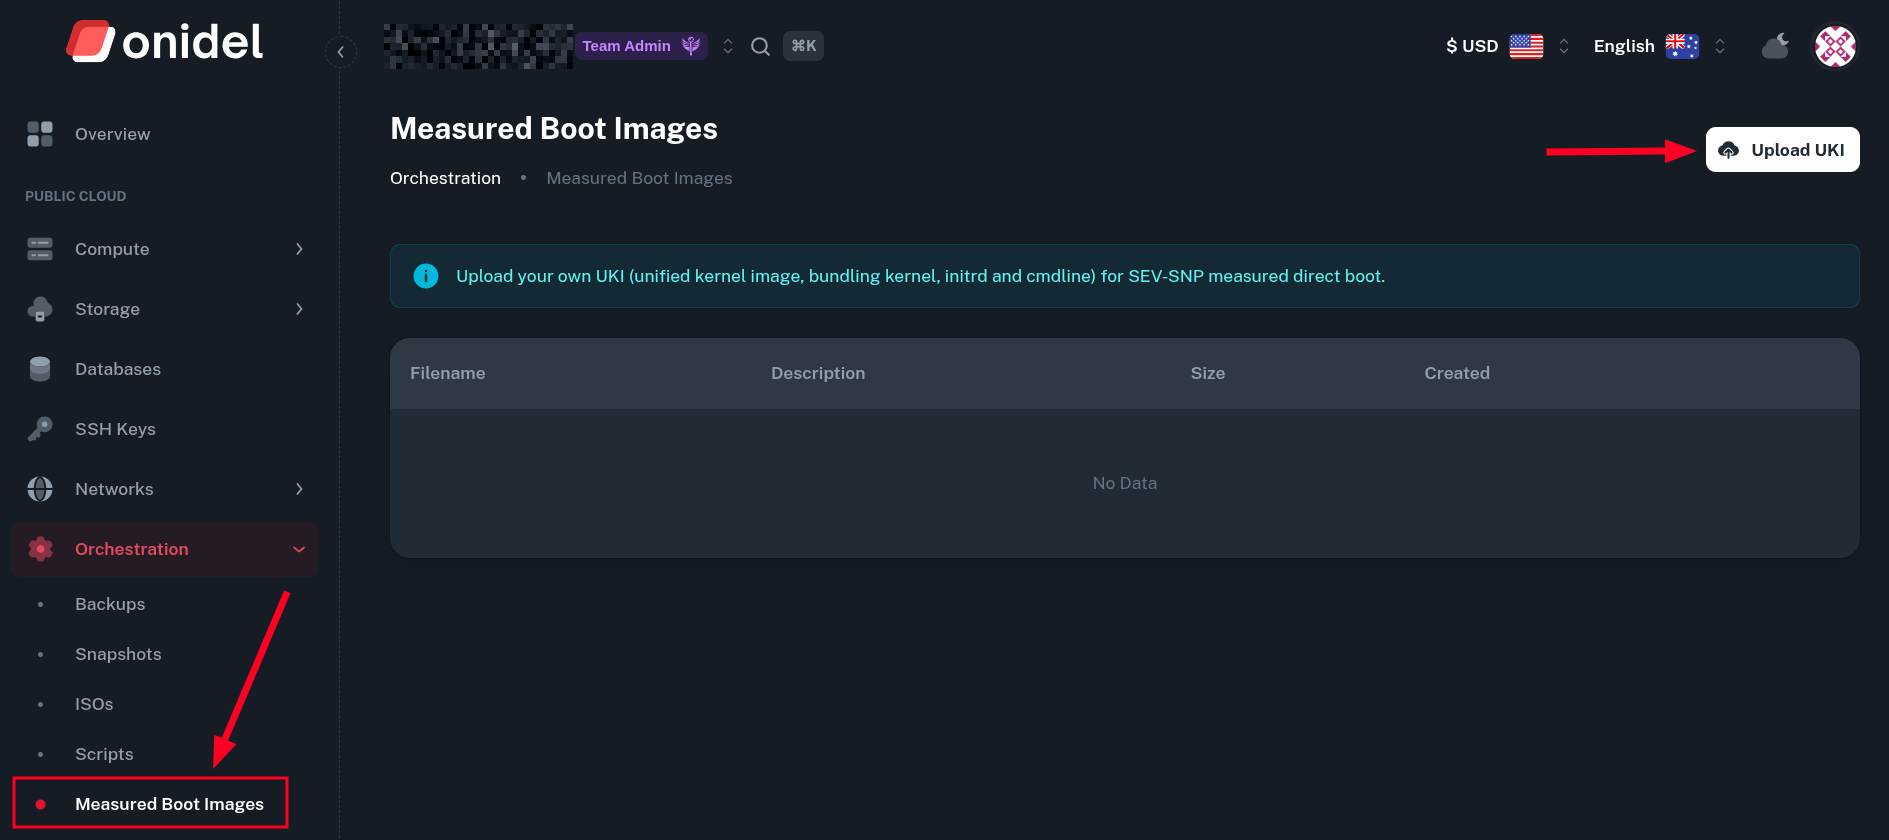
To upload an UKI kernel image for measured boot, go to Orchestration > Measured Boot Images.
Then click on Upload UKI button.
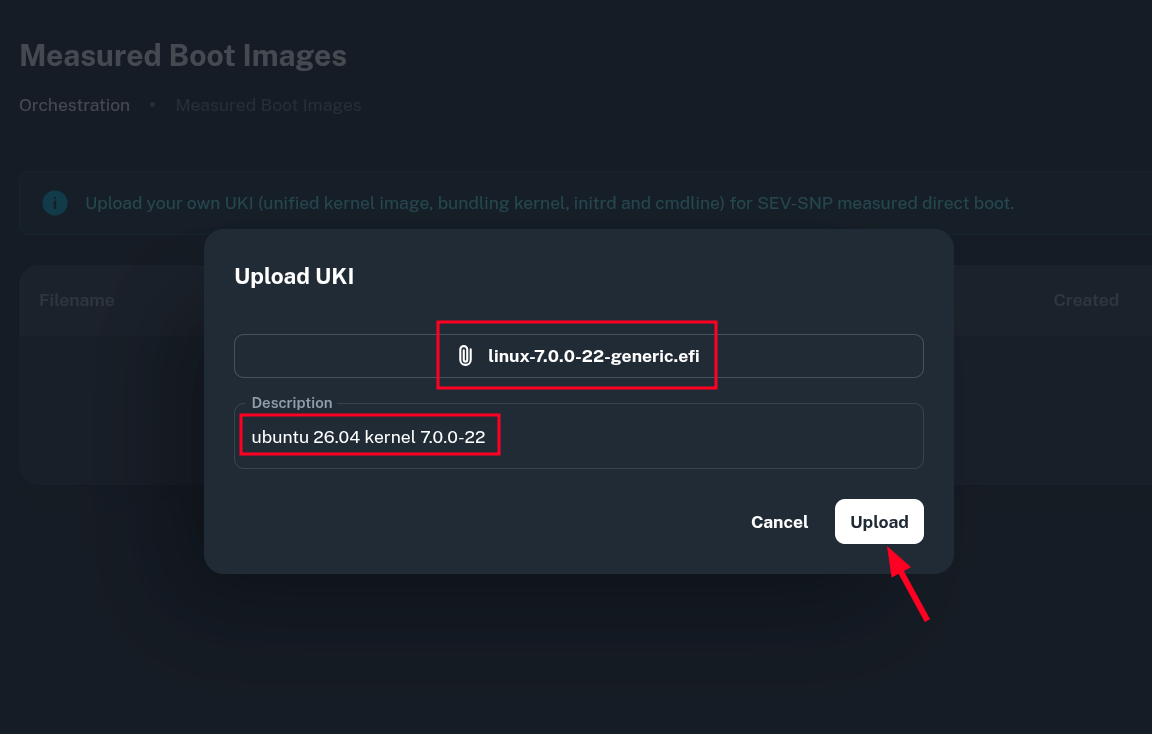
You will be presented with a popup which lets you pick a local UKI file and its description, then upload it into our platform.
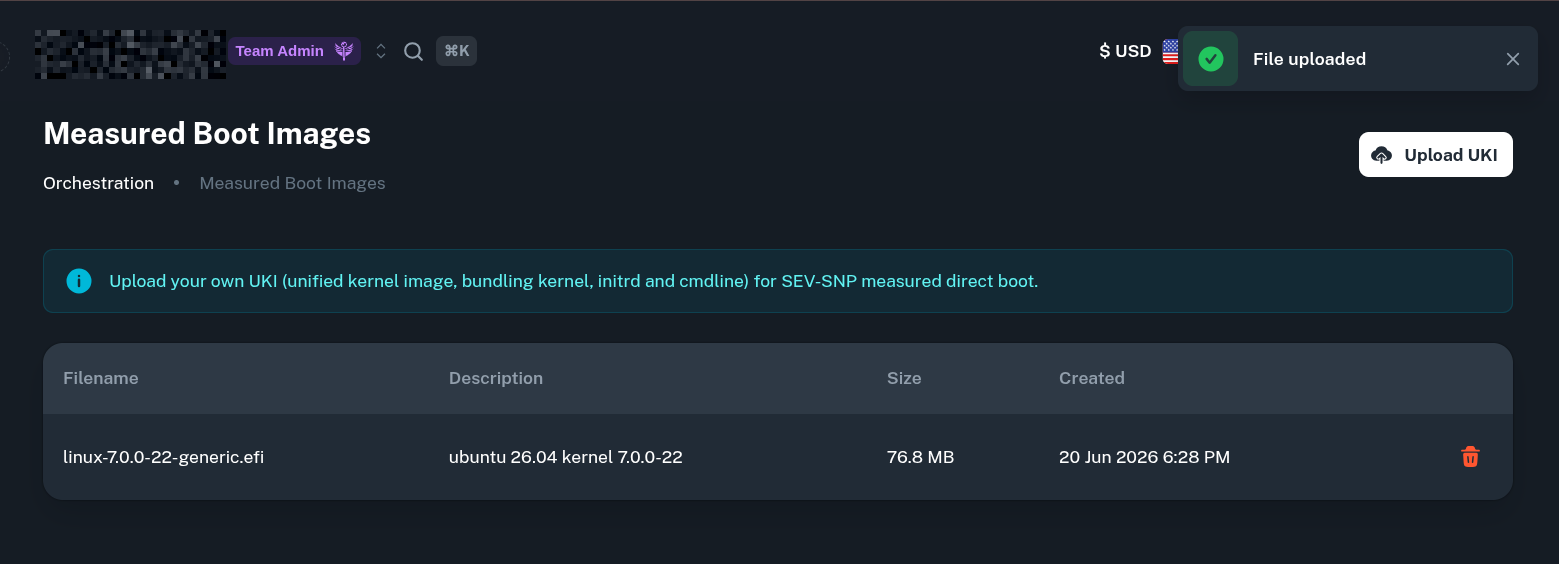
Once the file is successfully uploaded, you will see it in the list of Measured Boot Images.
Enabling Measured Direct Boot
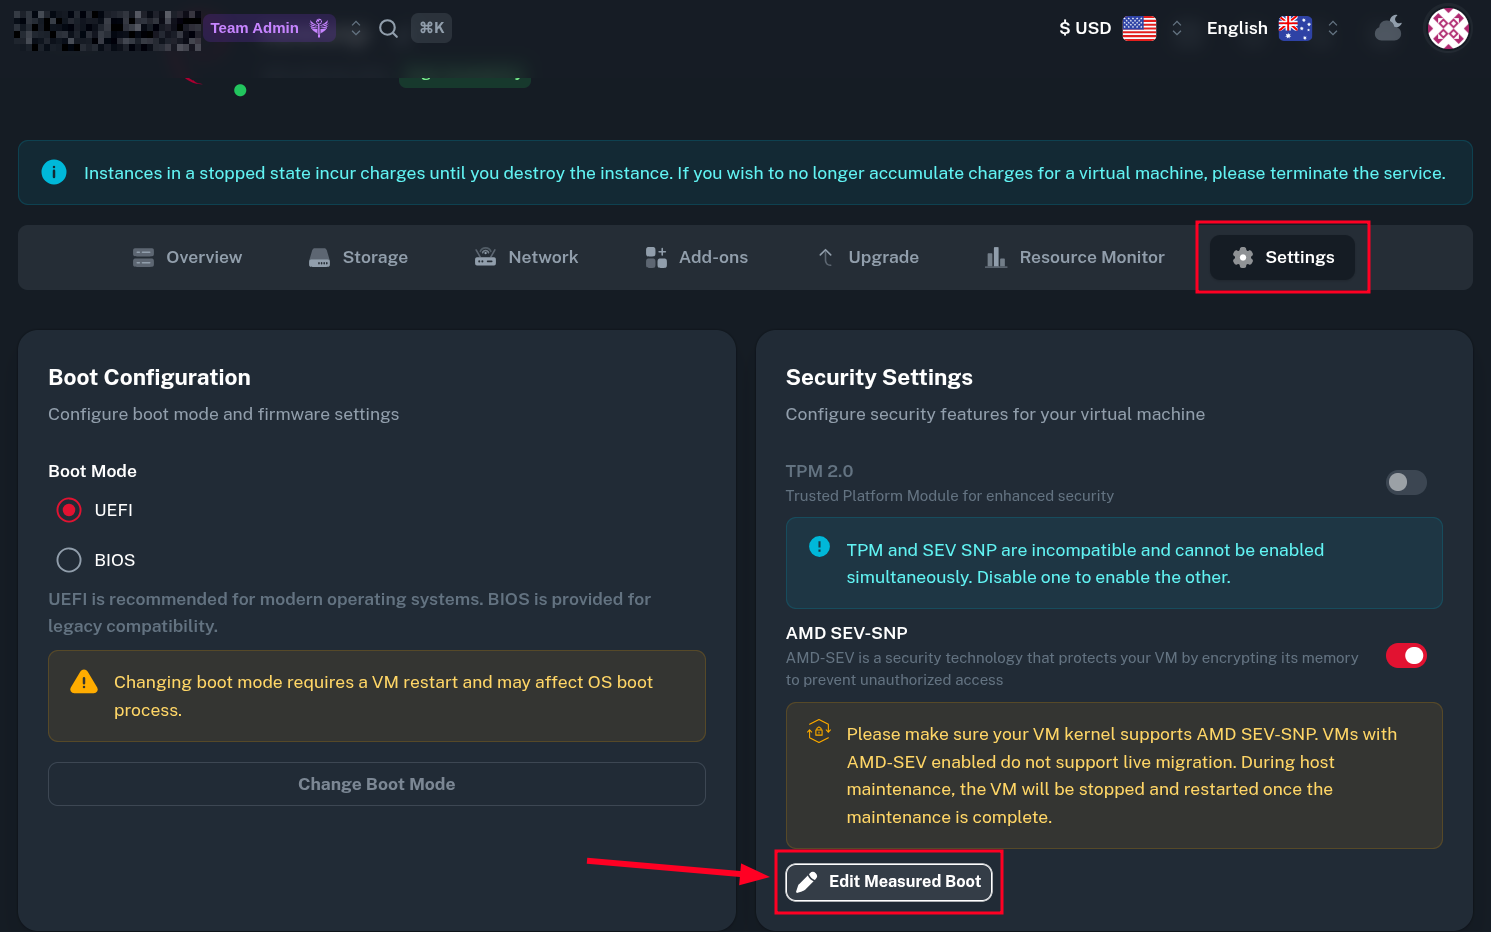
After the UKI image was added on the platform, you may assign it to a VM. To achieve that, you need to first enable SEV-SNP and then click on Edit Measured Boot in Security Settings tab.
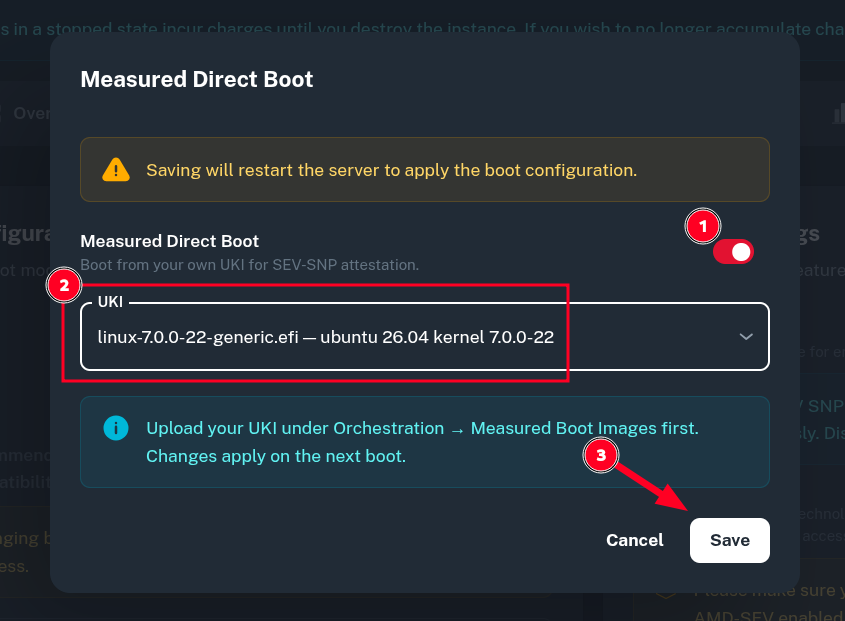
In the popup window, first switch the toggle on Measured Direct Boot, then pick the UKI image we've just uploaded and click Save.
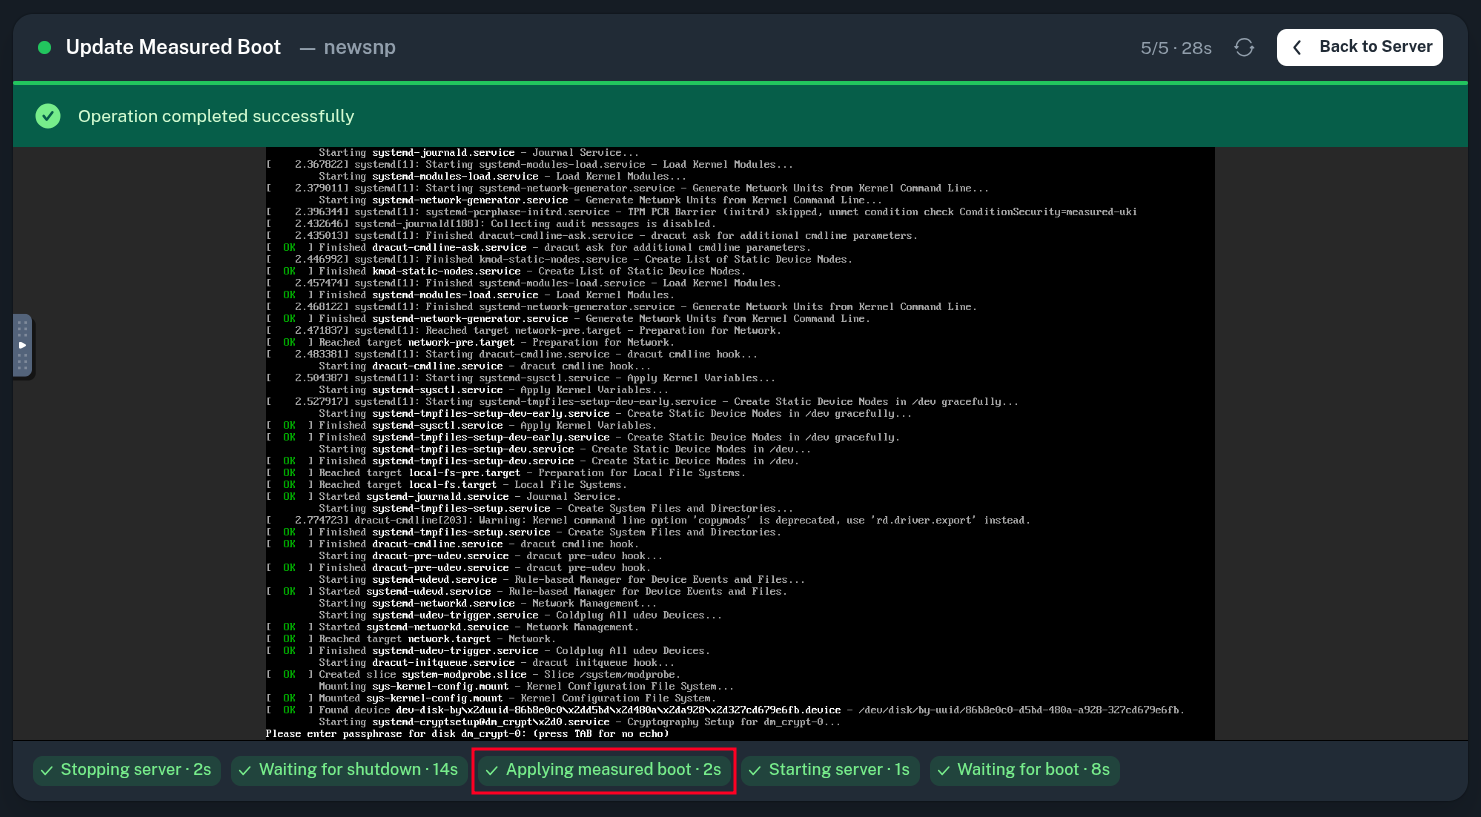
After this, the VM will be automatically rebooted from your UKI image with direct boot settings applied to it.
Obtaining the OVMF firmware
Virtual Machines with measured direct boot enabled need to use a special OVMF binary containing the SNP_KERNEL_HASHES metadata field. QEMU modifies this section by including the hash of UKI in PaddedSevHashTable structure and placing it in reserved memory-mapped metadata sections of OVMF. Then, the ASP measures OVMF memory pages (including the injected UKI hash) and finalizes the Guest Context Launch Digest (GCTX.LD).
We publish this OVMF binary, enabling you to calculate the measurement hash independently and verify the VM runs in a proper environment. You can download it from here and verify with the following SHA-256 hash.
$ sha256sum OVMF.amdsev.fd
ae562fa08aa0ae9419518b02a893c0be01ec39915da71d1ed4faa4ac8638988e  OVMF.amdsev.fd
The OVMF image is extracted from the official Debian ovmf-amdsev package.
OVMF Update Policy
We will notify customers by email at least 3 days before planned OVMF update affecting their confidential VMs. A new binary and SHA-256 hash will be provided. After receiving the notification, customers should update their expected measurement hash in trusted environment to ensure continuity of operations.
Calculating Expected Measurement Hash
Virtee's sev-snp-measure tool can be used to independently obtain the expected measurement hash for the current environment of your Virtual Machine. It is supposed to be ran within a trusted environment (not on the measured VM) and needs to be provided with the OVMF firmware and the generated UKI image.
$ ls  # ensure the required files are present in current directory
linux-7.0.0-22-generic.efi  OVMF.amdsev.fd
$ git clone https://github.com/virtee/sev-snp-measure.git  # clone sev-snp-measure
Then run the script and take note of returned hash value. You may need to change the vCPU type (--vcpu-type - EPYC-Milan for Premium VPS, EPYC-Turin for High-Frequency VPS) and expected number of vCPUs (--vcpus) to match your instance parameters.
$ ./sev-snp-measure/sev-snp-measure.py --mode snp --vcpu-type EPYC-Milan --vcpus 1 --ovmf OVMF.amdsev.fd --kernel linux-7.0.0-22-generic.efi
9f04aac41f563c84da348904ab2c2f06ef661426ccf4653e34f5980390c52e420c030607b94d8f584228ce1269bff1b3
Verifying VM Measurement
Just like we did in the first part of SEV-SNP guide, you need to install the snpguest tool and perform attestation within the VM. This time however, we will take a closer look at Measurement result and compare it with pre-calculated one from above.
$ snpguest report report.bin request-data.txt --random
$ snpguest display report report.bin
Attestation Report:
...

Measurement:
9F 04 AA C4 1F 56 3C 84 DA 34 89 04 AB 2C 2F 06
EF 66 14 26 CC F4 65 3E 34 F5 98 03 90 C5 2E 42
0C 03 06 07 B9 4D 8F 58 42 28 CE 12 69 BF F1 B3
Since we now have all the launch parameters required for verified boot (OVMF, UKI, CPU model and features), the hash should be exactly the same as computed using sev-snp-measure utility.
Next Steps
By this point, you have successfully verified the whole trust chain from AMD hardware to the authenticity of core OS components by reproducing the Measurement Hash. To automate this verification process, you may use an external (trusted) server for Remote Attestation. This server knows the current proper measurement hash and can take actions based on requests from the client (VM).
An example implementation could include enabling networking at initramfs stage, then configuring clevis with a remote Trustee Key Broker Service to release LUKS decryption key, only when the expected measurement hash is provided. That effectively prevents the VM from booting outside of trusted environment.