
Onidel Cloud supports taking, restoring, downloading, attaching, and deploying from snapshots of Virtual Machines.
Snapshots provide point-in-time copies of your VM's storage drives. You can use snapshots to roll back an entire virtual machine, deploy identical clone instances, or use Instant File Recovery by attaching snapshots as secondary read-only drives to selectively recover individual files without disrupting the existing system.
Creating a Snapshot of a VM
-
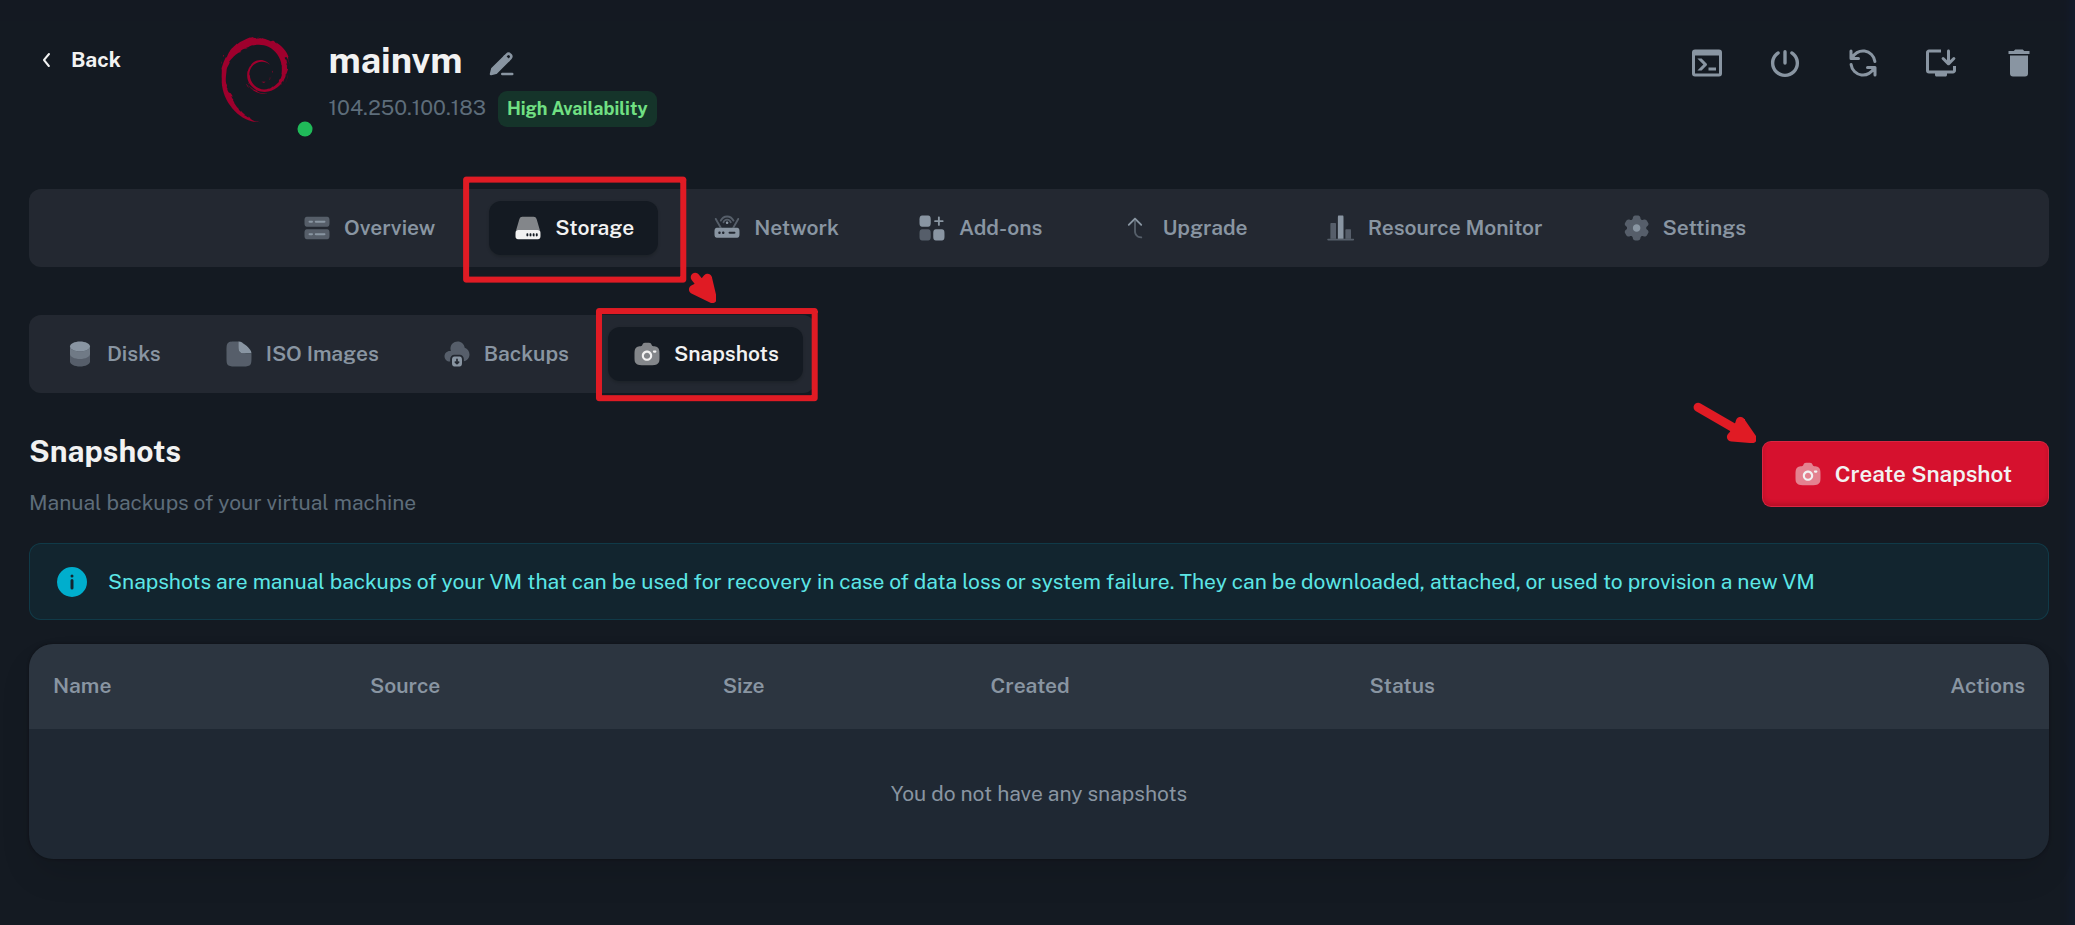
Navigate to Compute > Virtual Machines > select your VM > Storage > Snapshots.
-
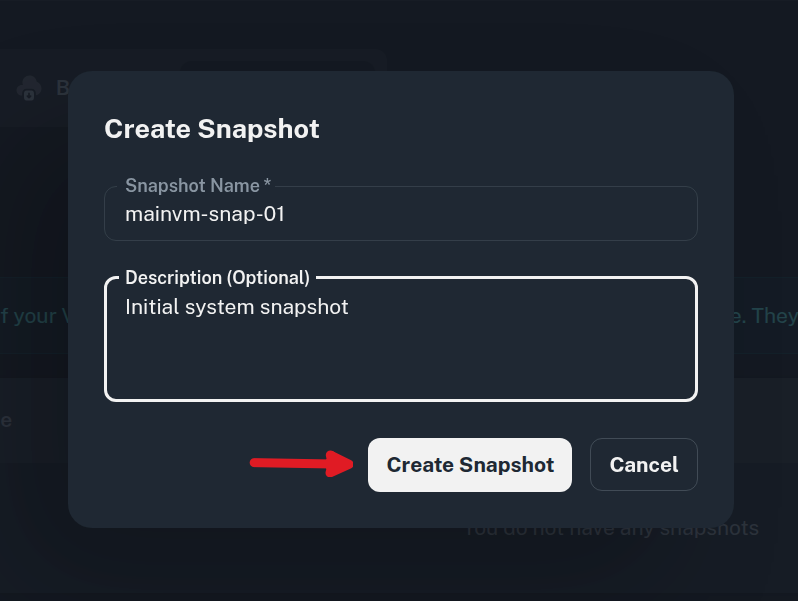
Click on the Create Snapshot button. Enter a Name and an optional Description for the snapshot.
-
Click Create Snapshot to begin the process:
-
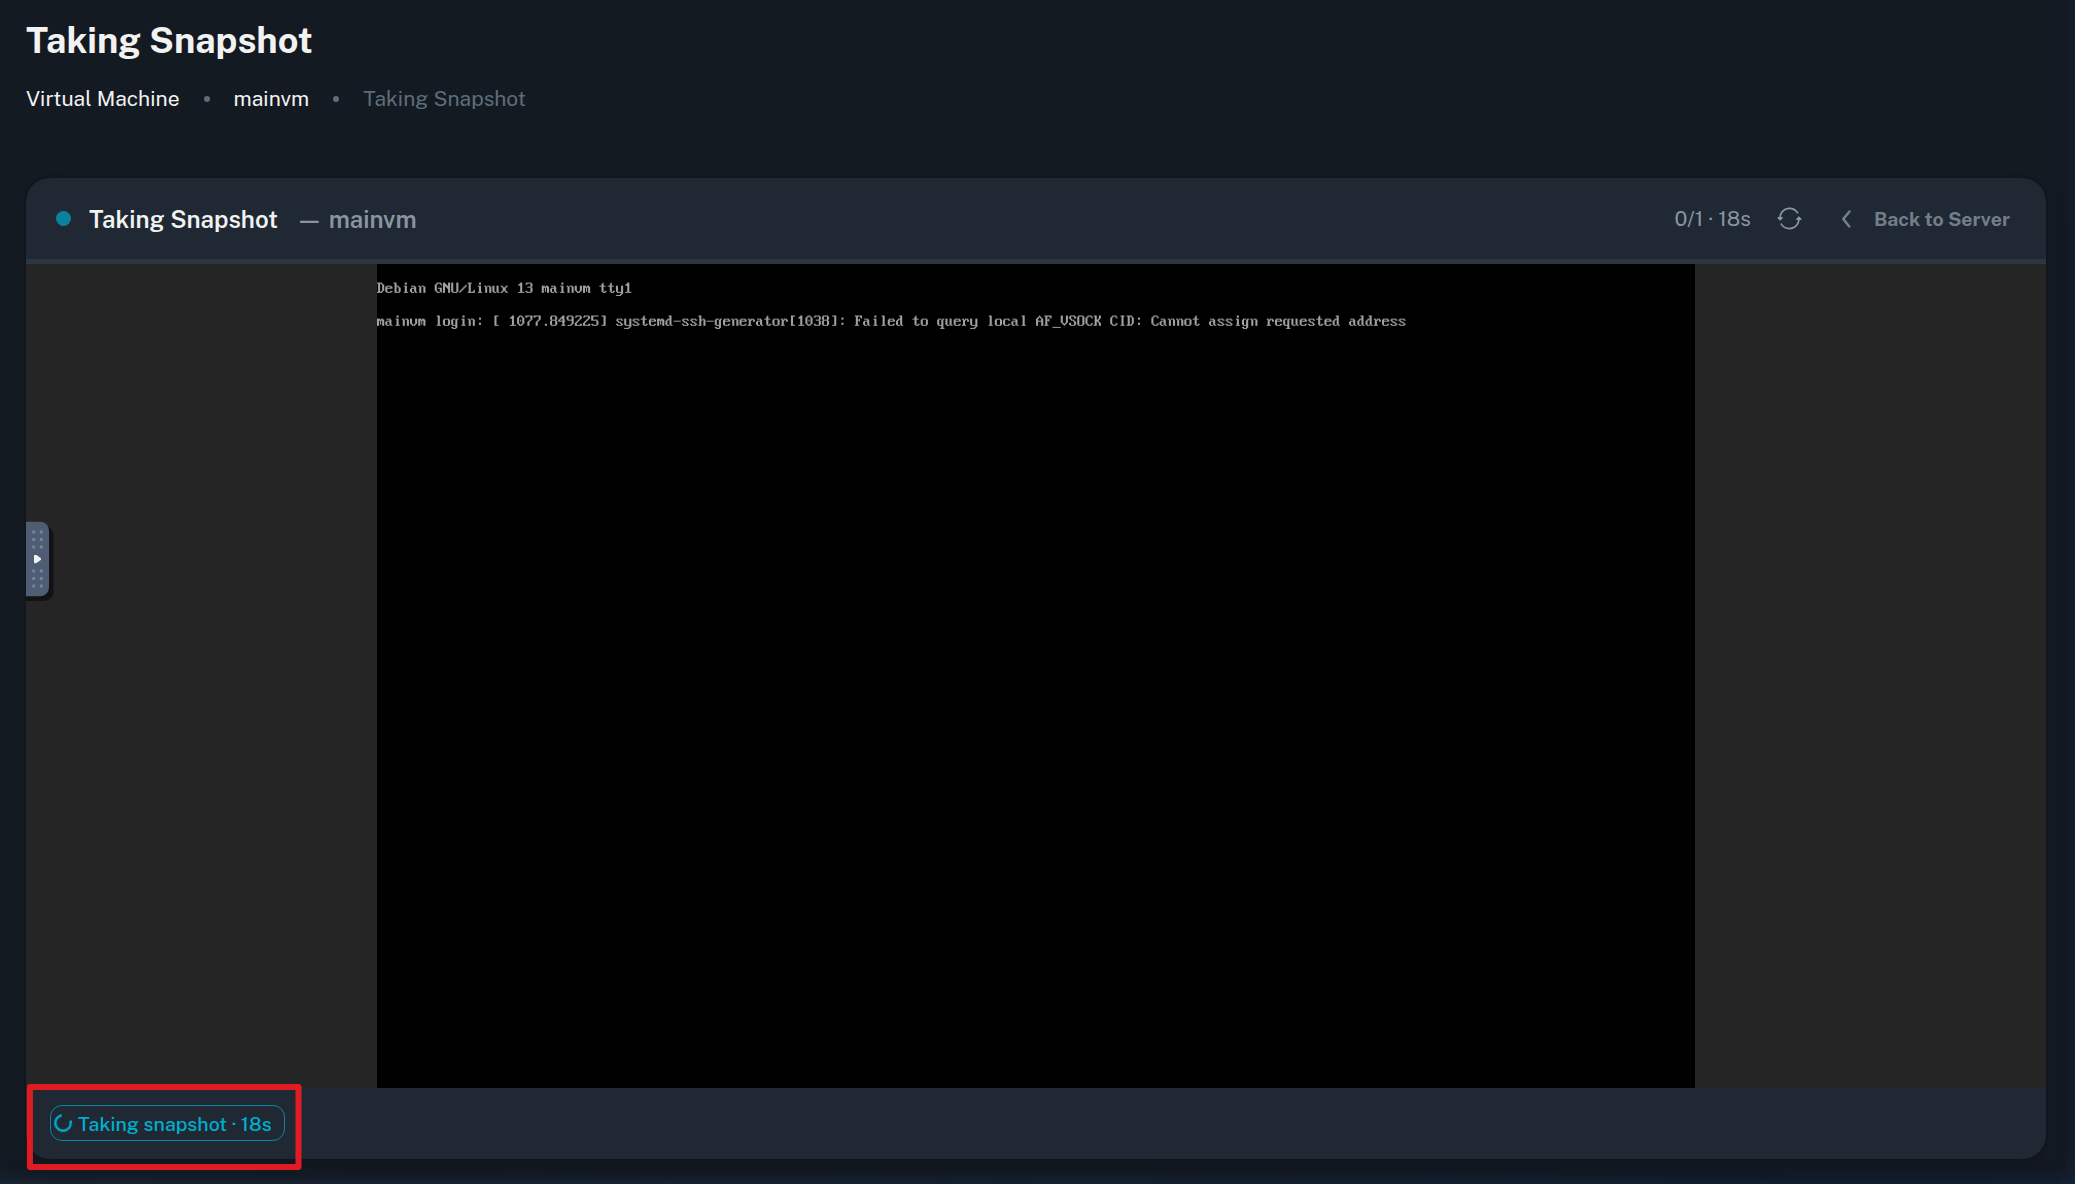
During the snapshot process, your VM stays online.
-
You will be temporarily redirected to the console window while the snapshot is being prepared.
-
Once the creation finishes, you can navigate out of the console window back to your VM management view.
-
-
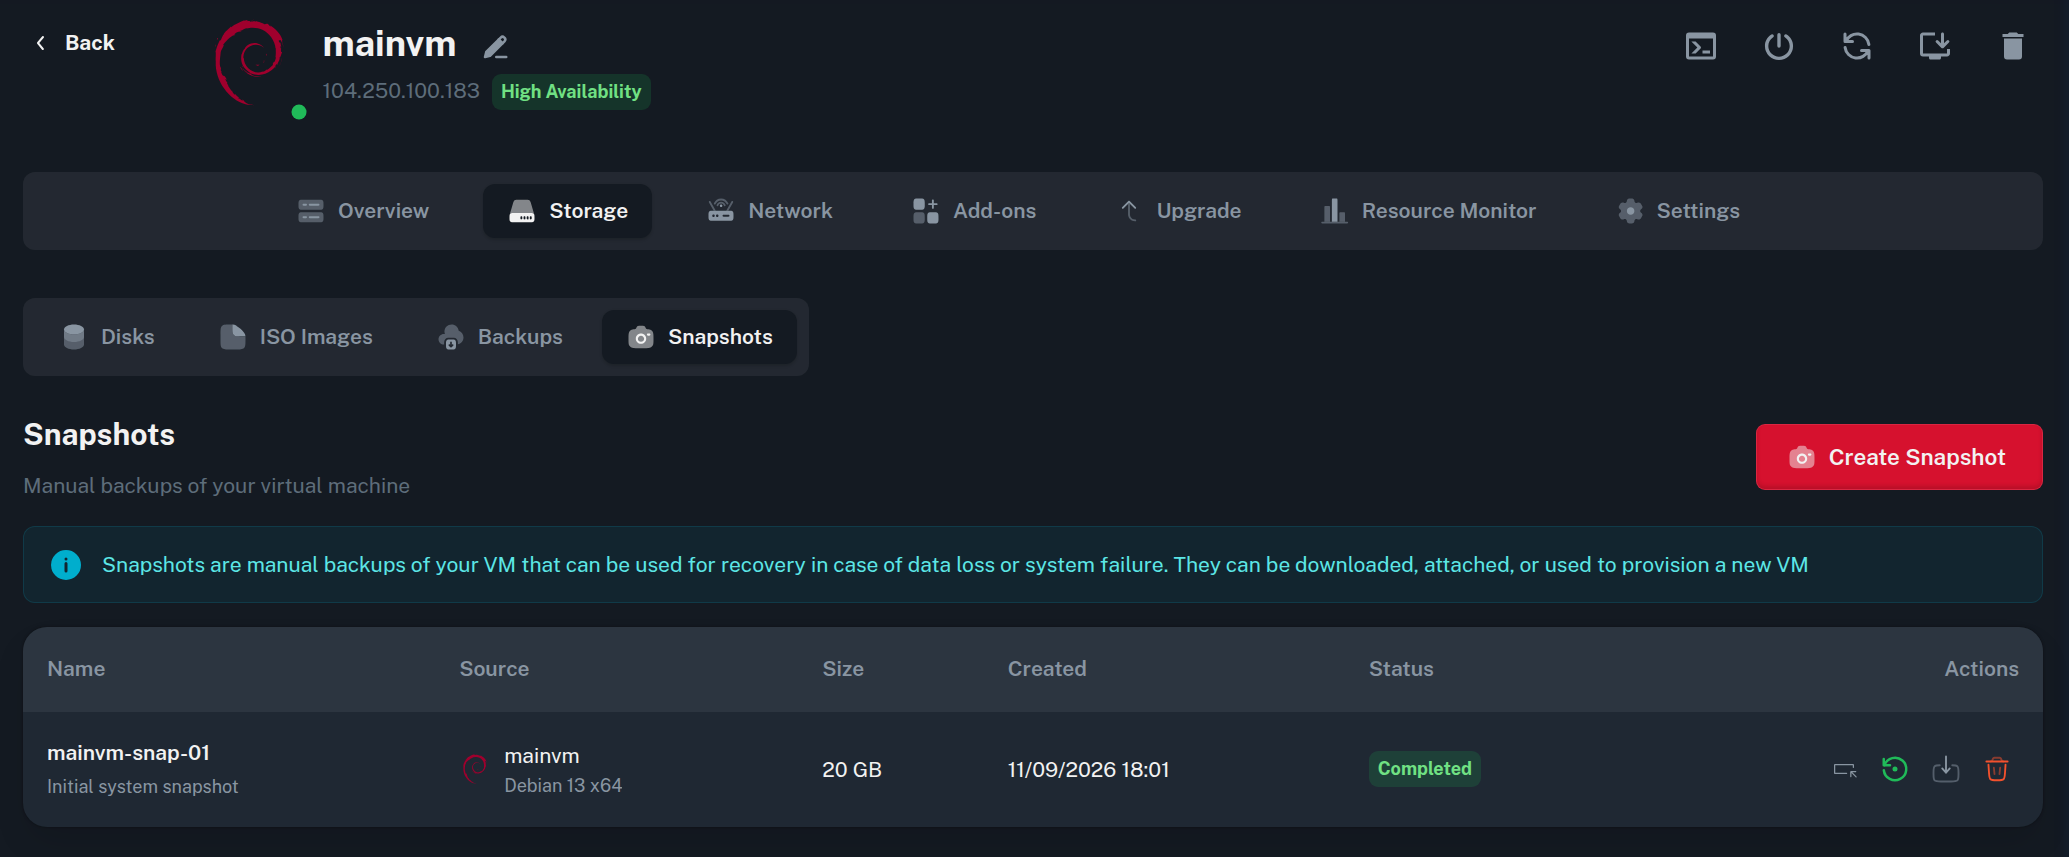
Once finished, the snapshot appears in the list under Storage > Snapshots. From here, you can Restore, Download, or Delete the snapshot (or attach it to a VM via Orchestration > Snapshots).
💡 Tip: You can also create snapshots by converting an existing automatic backup into a permanent snapshot via Orchestration > Backups > Convert to Snapshot. See Converting a Backup to a Snapshot in the Automatic Backup Guide.
Managing Snapshots Across Your Account
In addition to managing snapshots from within an individual VM's storage tab, you can view and orchestrate all snapshots across your account from a single pane:
-
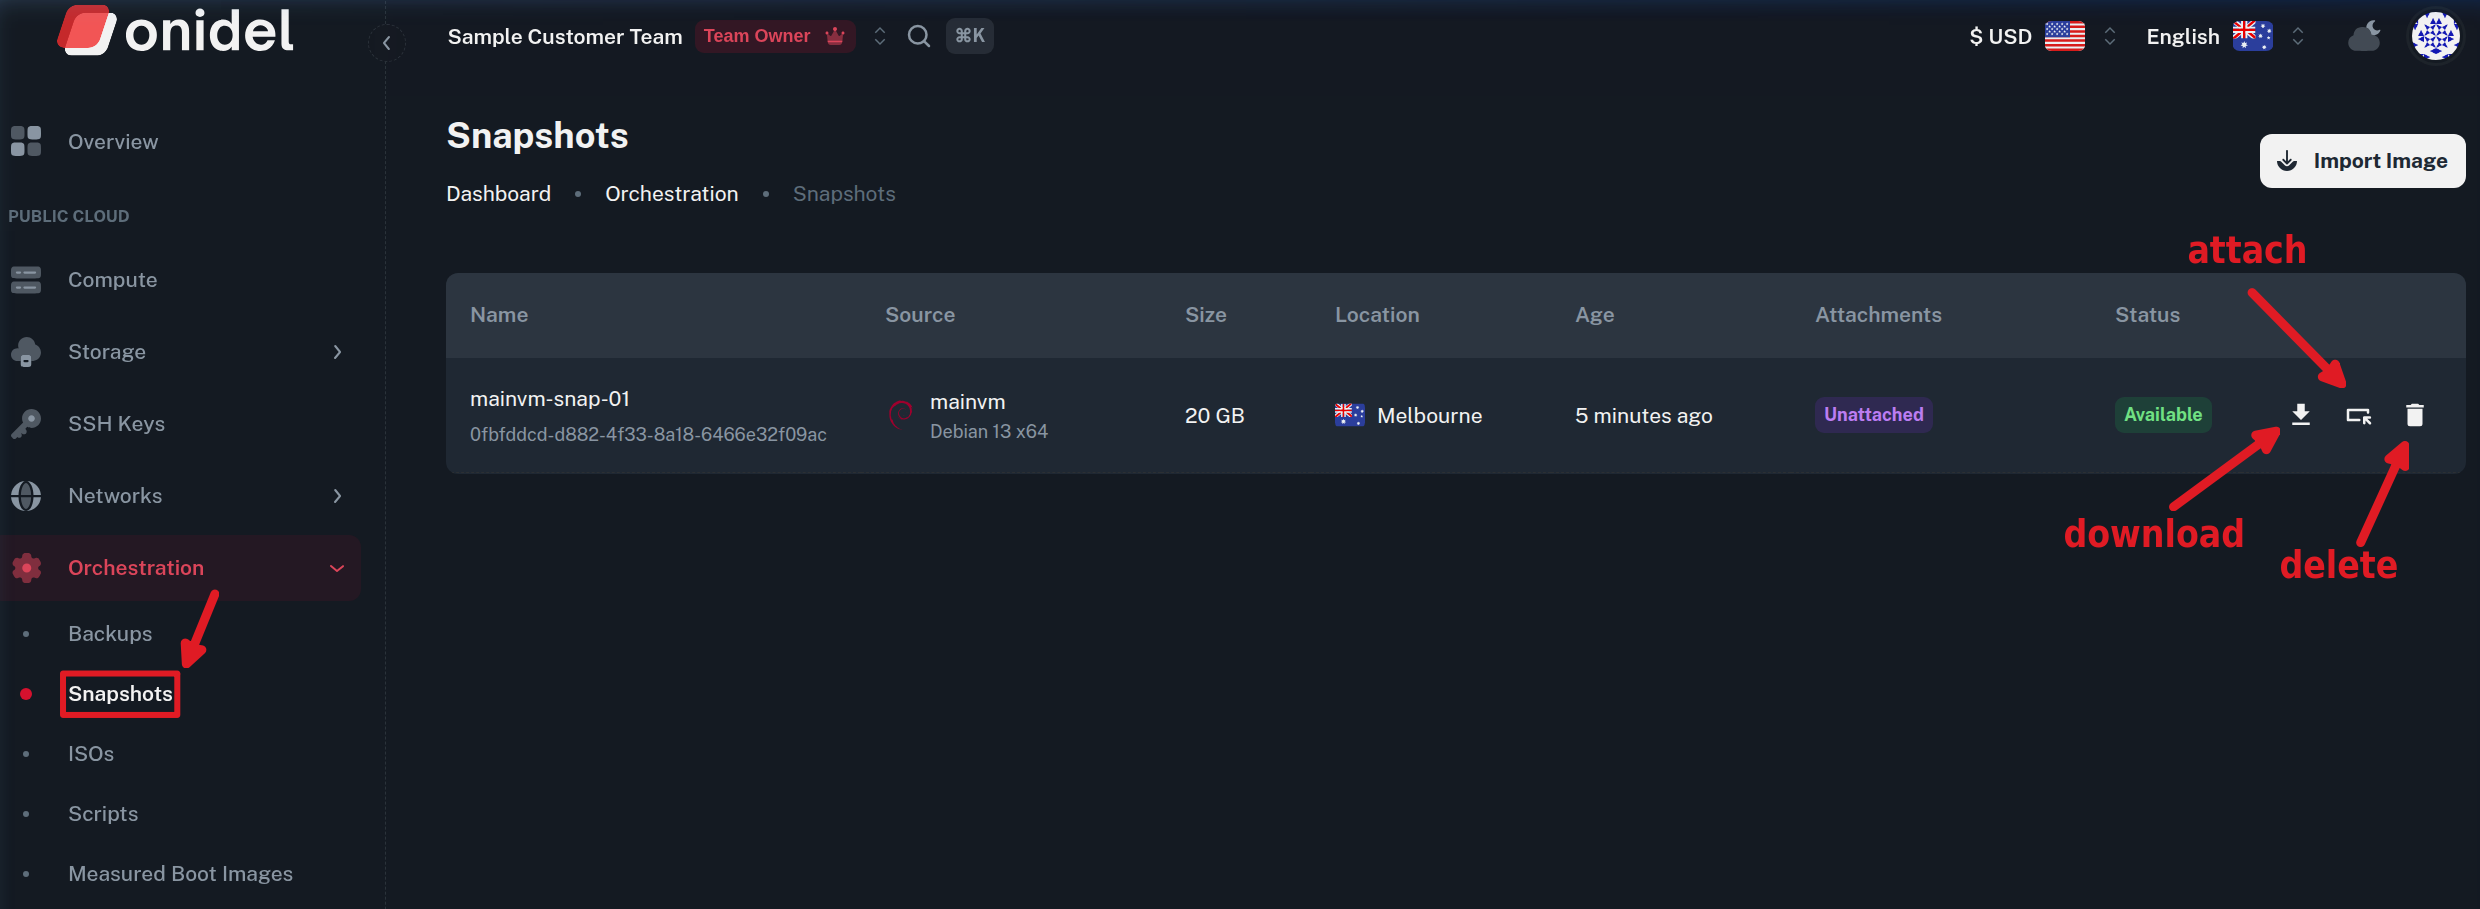
In the left navigation menu, click Orchestration > Snapshots.
-
This view lists all snapshots across all virtual machines, displaying:
-
Name and internal snapshot ID
-
Source VM and operating system template
-
Size (uncompressed)
-
Location
-
Age
-
Attachments status (
Unattachedor attached instance IP address) -
Status (
Available)
-
-
Quick actions available from the table include Download Snapshot, Attach Snapshot, and Delete Snapshot.
Attaching a Snapshot to Your VM
With Instant File Recovery, you can attach a backup or snapshot directly to your VM as a read-only disk. This makes it quite easy to browse and recover individual files or folders from an earlier state without needing to download the full disk image or restore the entire VM.
ℹ️ Note:
-
Attached snapshot disks are attached in read-only mode to guarantee data integrity.
-
Attached snapshots automatically unmount and detach after 24 hours.
-
Transparent Decryption (New York and Amsterdam): Snapshots of instances in New York and Amsterdam are stored in Backblaze B2 and automatically encrypted. When attached, Onidel automatically copies the snapshot to temporary storage, transparently decrypts it, and attaches it as a standard unencrypted secondary drive. You can immediately mount partitions and recover files without manual decryption.
Attaching via the Cloud Console
-
Navigate to Orchestration > Snapshots and click the Attach Snapshot button/icon on the snapshot row. (You can attach the snapshot to the source VM or to any other VM located in the same datacenter).
-
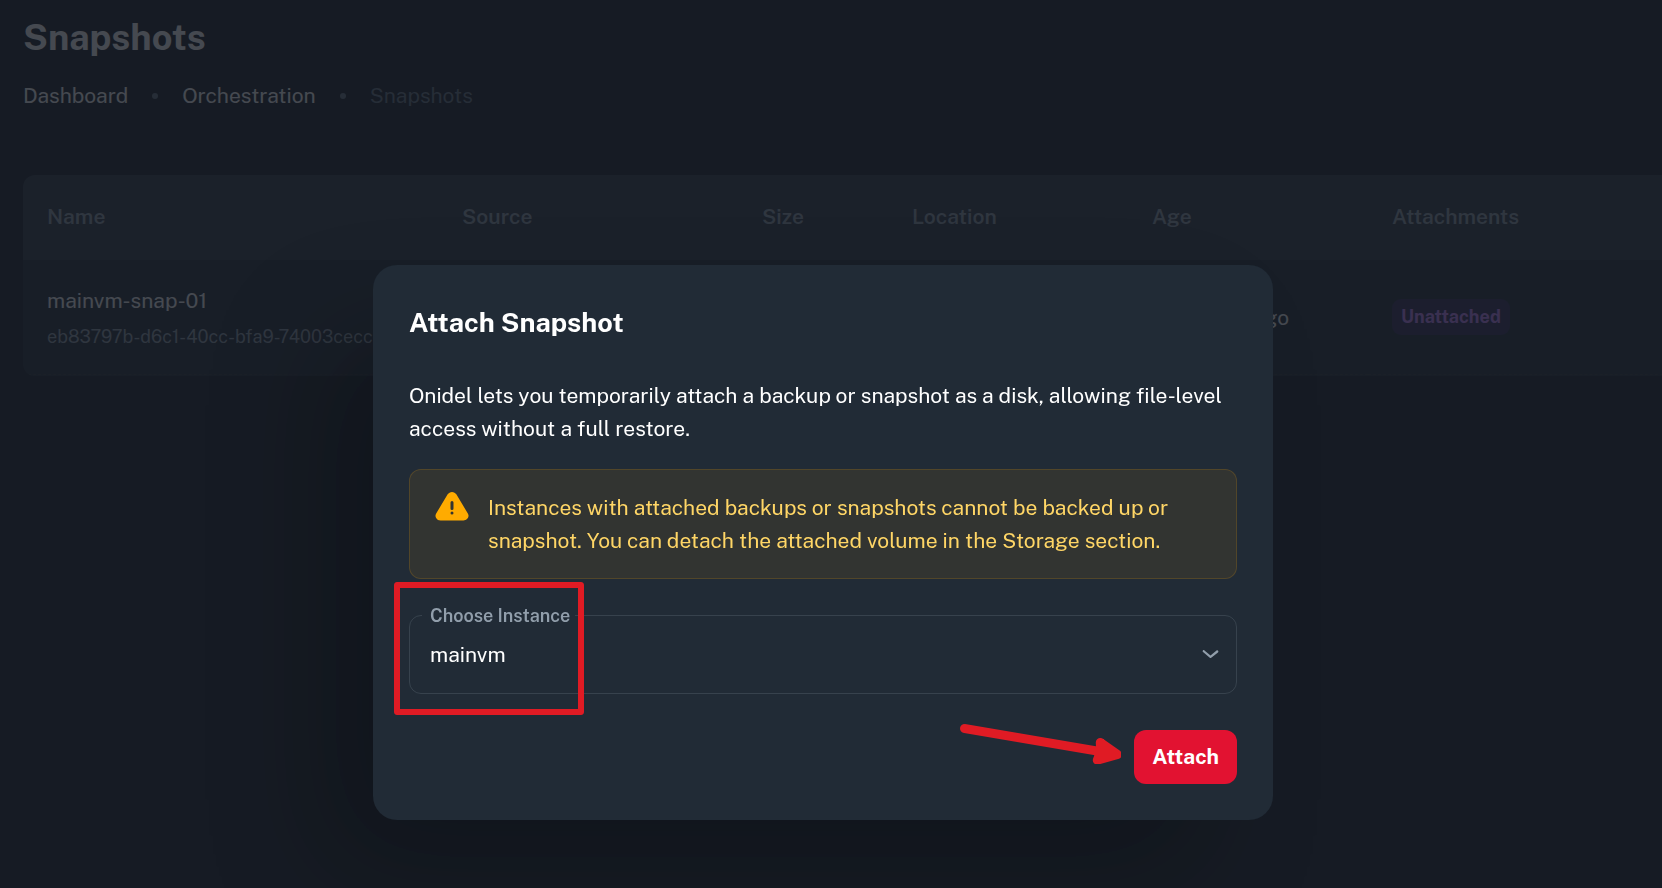
In the Attach Snapshot modal, choose the target instance.
-
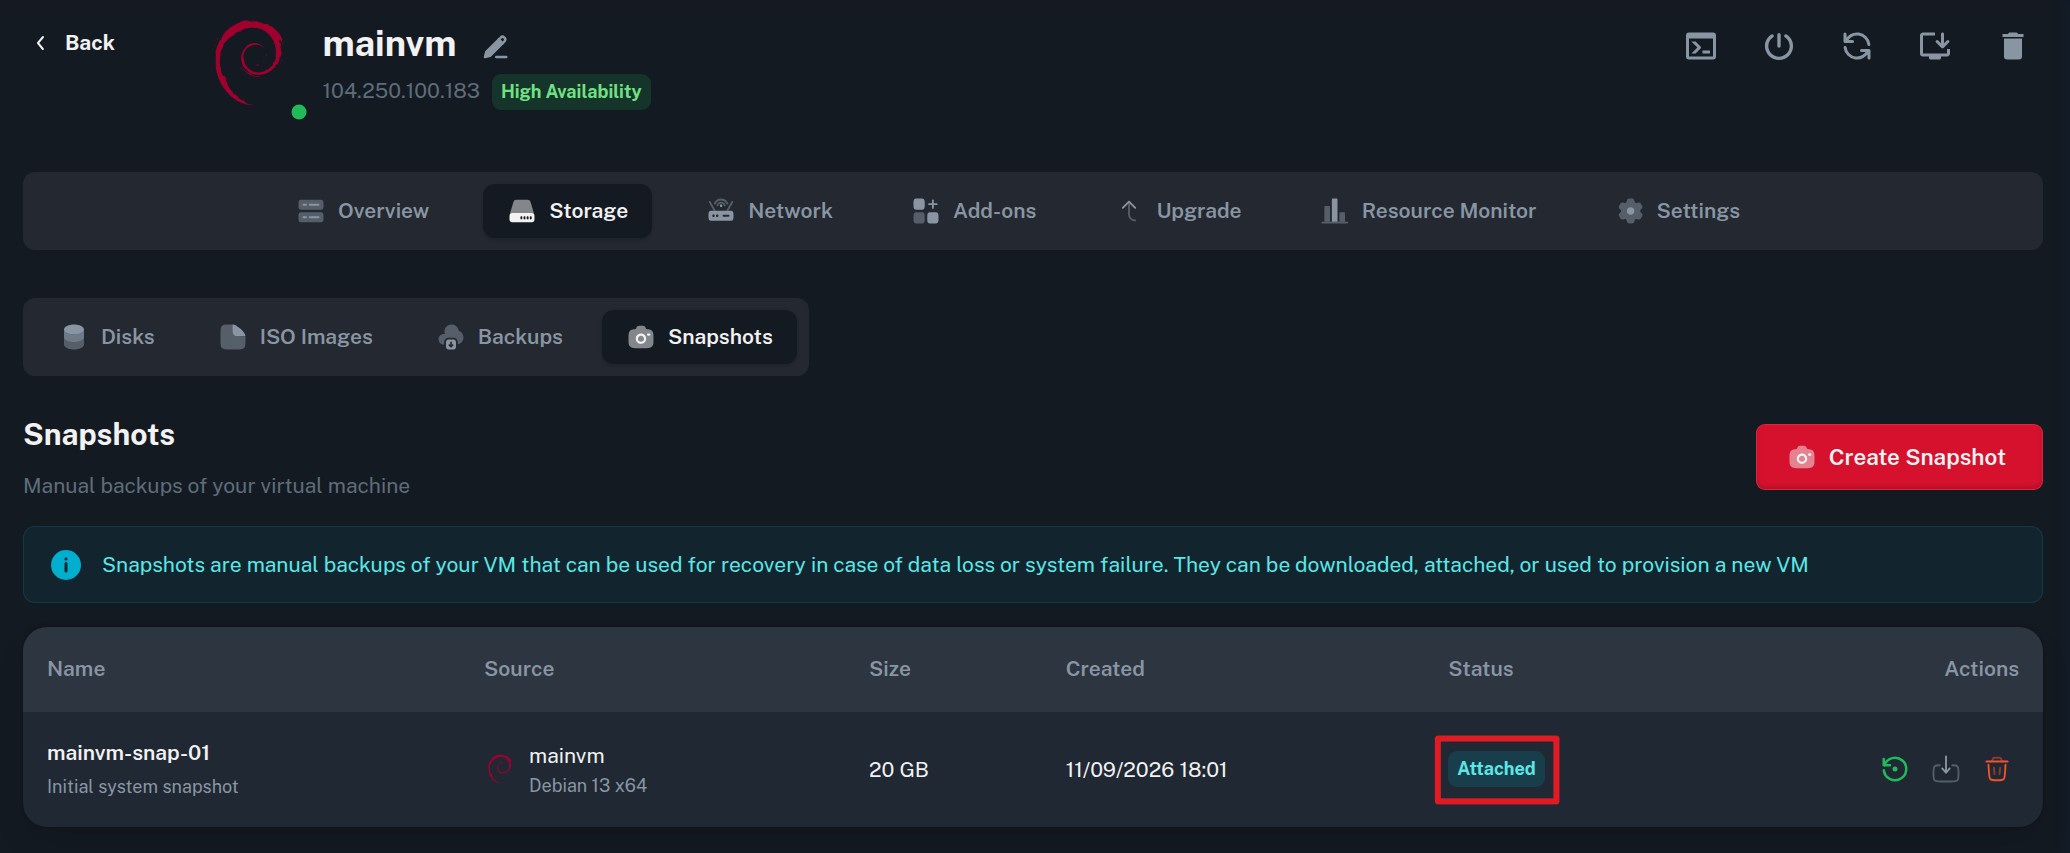
Click Attach. The snapshot table will update to show the attachment status:
-
In Orchestration > Snapshots, the Attachments column will reflect the attached VM.

-
In (Your VM) > Storage > Snapshots, the snapshot row displays a green Attached status badge.
-
Mounting the Attached Snapshot in Linux
Once attached, the snapshot appears as a secondary block device (typically /dev/vdb or /dev/sdb) inside your VM.
Identify the Block Device
Log in via SSH and check available block devices using lsblk:
$ lsblk
NAME    MAJ:MIN RM  SIZE RO TYPE MOUNTPOINTS
sr0      11:0    1 1024M  1 rom
sr1      11:1    1    4M  1 rom
vda     254:0    0   20G  0 disk
├─vda1  254:1    0 19.9G  0 part /
├─vda14 254:14   0    3M  0 part
└─vda15 254:15   0  124M  0 part /boot/efi
vdb     254:16   0   20G  1 disk
├─vdb1  254:17   0 19.9G  1 part
├─vdb14 254:30   0    3M  1 part
└─vdb15 254:31   0  124M  1 part
In the lsblk output, look at the RO (Read-Only) column:
-
The main VM drive (
vda) shows0(read-write mode). -
The attached snapshot drive (
vdb) and its partitions show1(read-only mode), confirming it is safely attached without risk of accidental data modification.
Mount the Partition
Create a mount point:
mkdir -p /mnt/snapshot
Because the snapshot is a read-only block device taken from a running system, mount it using the appropriate options for your filesystem:
-
For ext4 filesystems: Add
noloadto skip journal replay on the read-only disk:mount -o ro,noload /dev/vdb1 /mnt/snapshot -
For XFS filesystems: Add
nouuidto prevent kernel conflicts with duplicate filesystem UUIDs:mount -o ro,nouuid /dev/vdb1 /mnt/snapshot
Browse and Recover Specific Files
You can now freely browse the snapshot filesystem and copy any files or folders to your active system:
$ ls -la /mnt/snapshot/root
total 28
drwx------  3 root root 4096 Sep 11 15:58 .
drwxr-xr-x 18 root root 4096 Sep 11 15:42 ..
-rw-------  1 root root   35 Sep 11 15:41 .bash_history
-rw-r--r--  1 root root  607 Aug 24  2025 .bashrc
-rw-r--r--  1 root root  132 Aug 24  2025 .profile
drwx------  2 root root 4096 Sep 11 15:21 .ssh
-rw-r--r--  1 root root   19 Sep 11 15:58 snapshot-test.txt
Copy required files back to your live root filesystem:
cp /mnt/snapshot/root/snapshot-test.txt /root/restored-file.txt
Unmount When Finished
When you have finished retrieving your files, unmount the volume:
umount /mnt/snapshot
You can then detach the snapshot from Orchestration > Snapshots by clicking the Detach action icon (or allow it to automatically unmount and detach after the 24-hour window expires).
Downloading a Snapshot to Your Local Drive
Backups and snapshots are downloaded in Zstandard compressed format instead of uncompressed raw disk images. This drastically cuts down download times and saves network bandwidth - compressing a full 20 GB virtual disk down to approximately ~410 MB.
How to Download a Snapshot
-
Navigate to either:
-
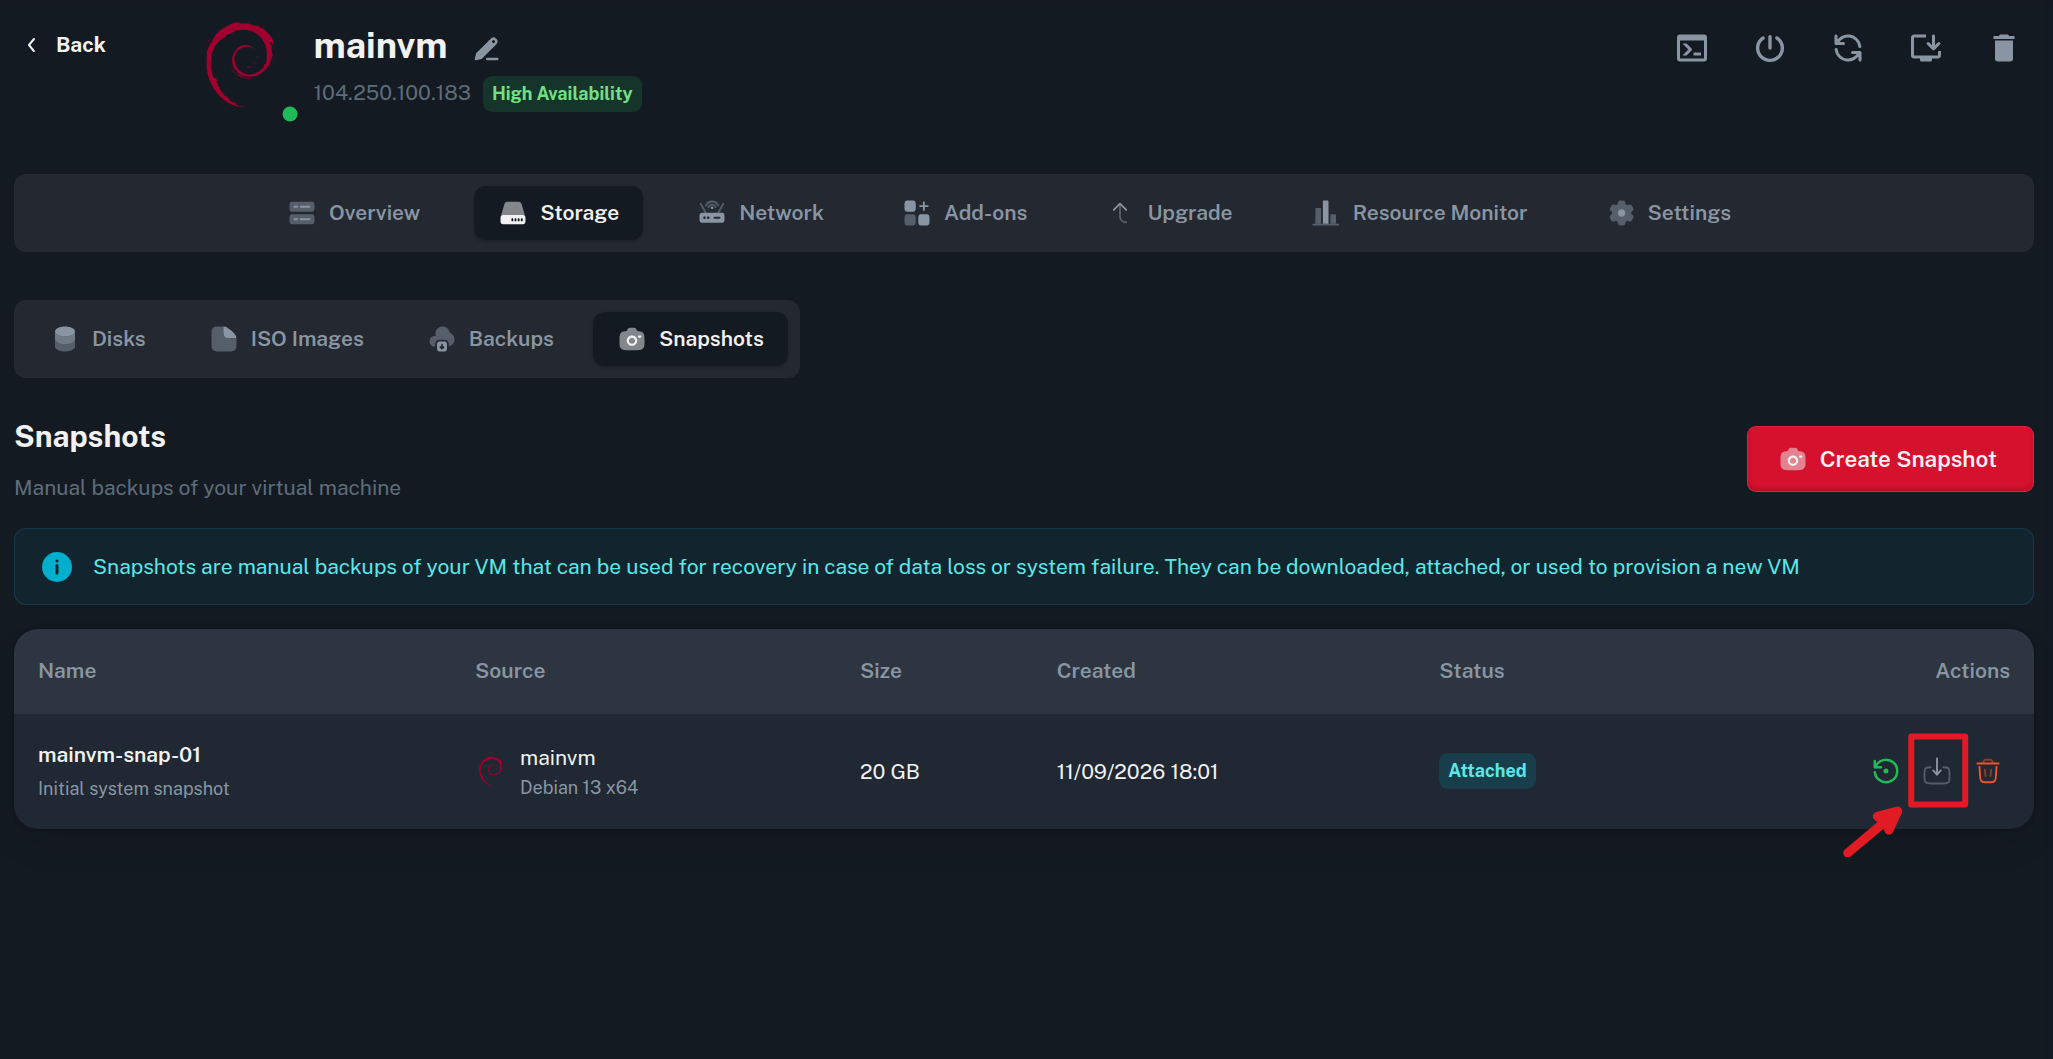
Compute > Virtual Machines > (select your VM) > Storage > Snapshots, or
-
Orchestration > Snapshots.
-
-
Locate your snapshot in the list and click the Download Snapshot icon button.
-
Your browser will download the compressed
.raw.zstdisk image file directly onto your local hard drive.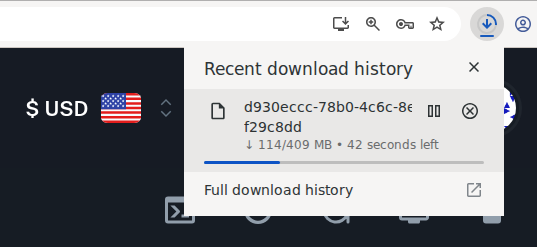
Encrypted Snapshots
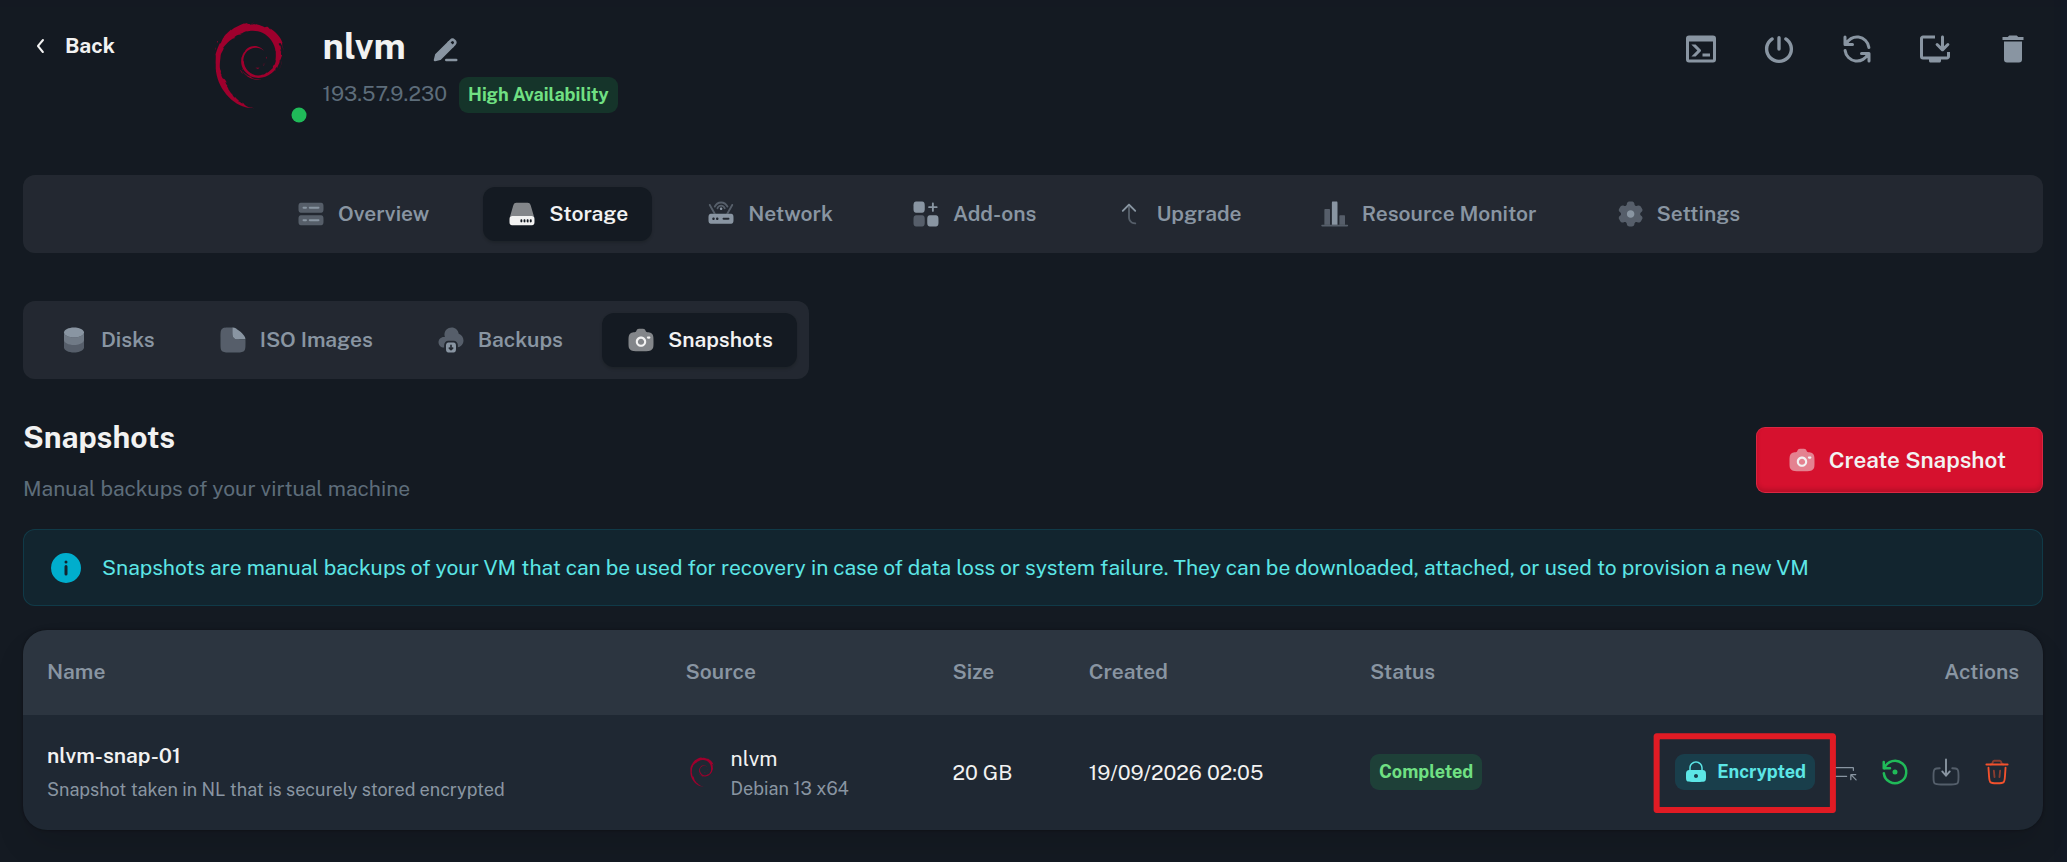
Snapshots taken in New York and the Amsterdam are stored offsite in Backblaze B2 and are automatically encrypted prior to upload with a unique per-snapshot key.
These snapshots display an Encrypted badge in the Snapshots table:
-
When you click Download Snapshot on an encrypted snapshot, a popup modal appears displaying the unique
agedecryption passphrase stored on Onidel infrastructure for that snapshot. -
Copy the passphrase, then click Download to save the encrypted
.raw.zst.agefile. -
Decrypt the archive locally using age:
age -d vm1072-disk0-20260911.raw.zst.age > vm1072-disk0-20260911.raw.zstWhen prompted, enter the passphrase provided in the popup modal.
-
Once decrypted to
.raw.zst, proceed with the standard Zstandard decompression below.
This process is also described in the Encrypted Backups guide.
Decompressing Downloaded Snapshots
To decompress the downloaded .raw.zst file into a raw disk image, you can use zstd (available on Debian based Linux via apt install zstd or macOS via brew install zstd):
❗ Important: Make sure you have sufficient free local disk space equal to or greater than the original virtual disk size (at least 20 GB for a 20 GB VM disk) before running decompression.
Decompress the file to produce the .raw disk image:
zstd -d vm1072-disk0-20260911.raw.zst
This will produce vm1072-disk0-20260911.raw, which can then be mounted locally (with losetup on Linux) or imported into hypervisors like QEMU/KVM and VirtualBox.
Restoring from a Snapshot (Full VM Restore)
Restoring rolls back the entire virtual machine's primary drive to the exact state saved in the snapshot.
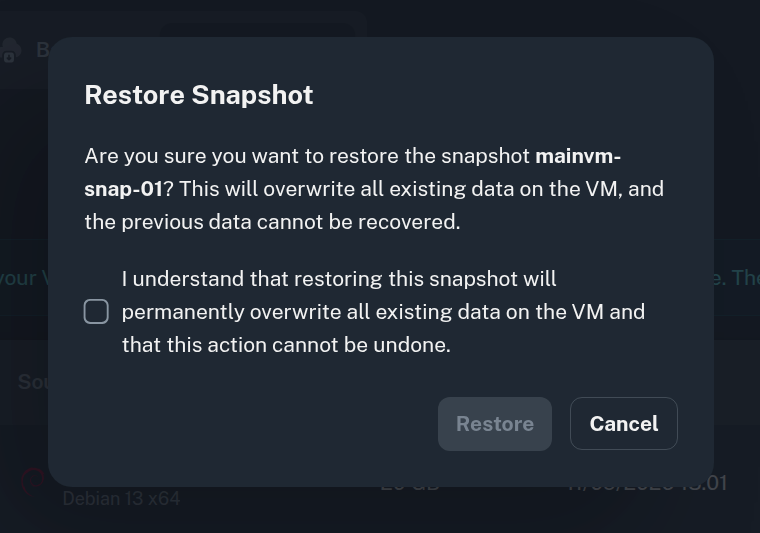
⚠️ Warning: Restoring a snapshot will overwrite all existing data on the target virtual machine. Any data written after the snapshot was created will be permanently lost.
-
Navigate to Compute > Virtual Machines > (select your VM) > Storage > Snapshots.
-
Locate the snapshot and click the Restore button.
-
A confirmation modal will appear detailing the overwrite warning.
-
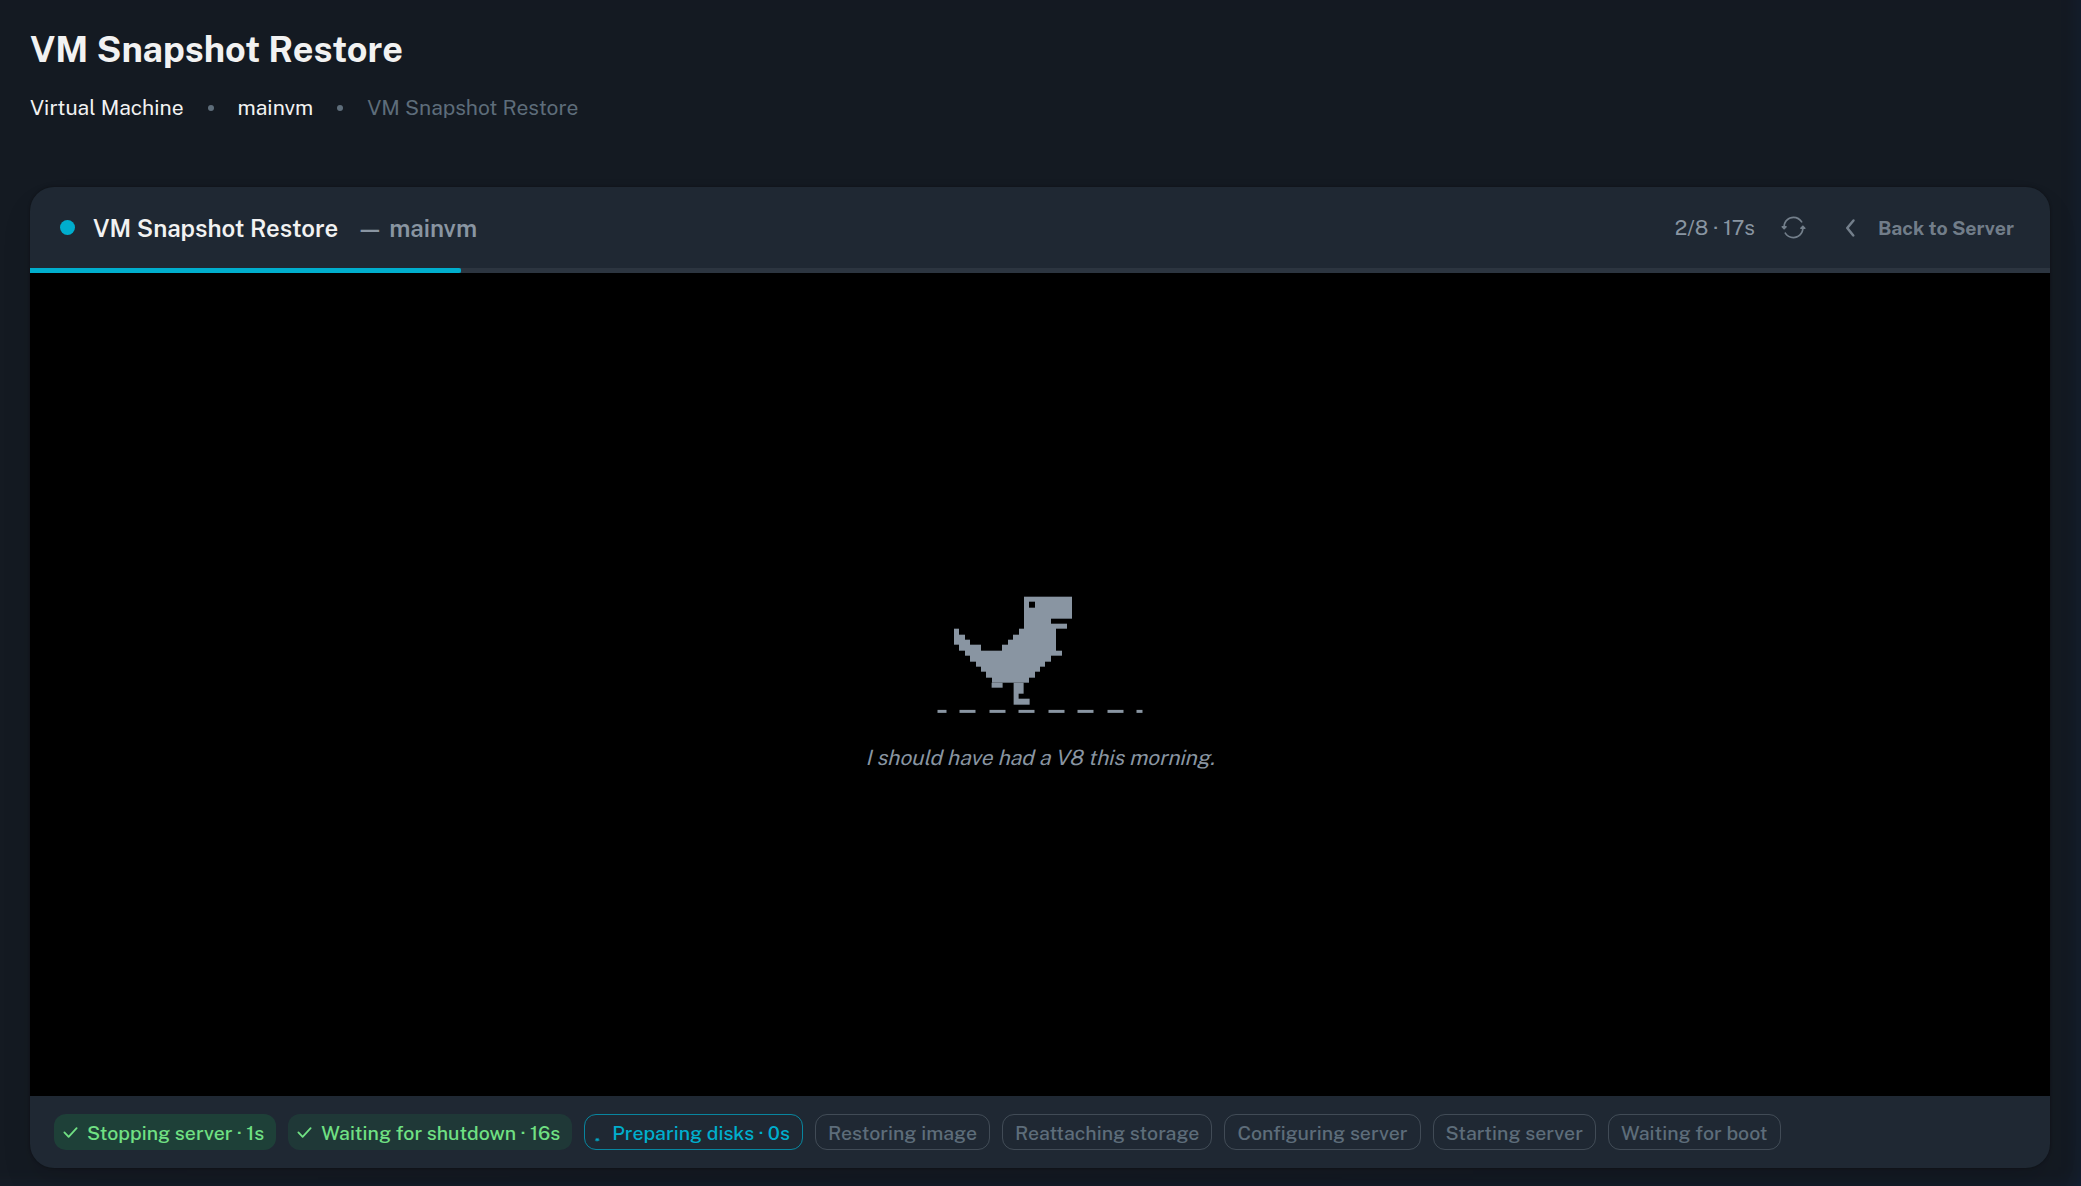
Confirm the prompt to begin the restoration. The VM will initiate the restore process.
-
Once completed, the VM will boot into the restored disk state.
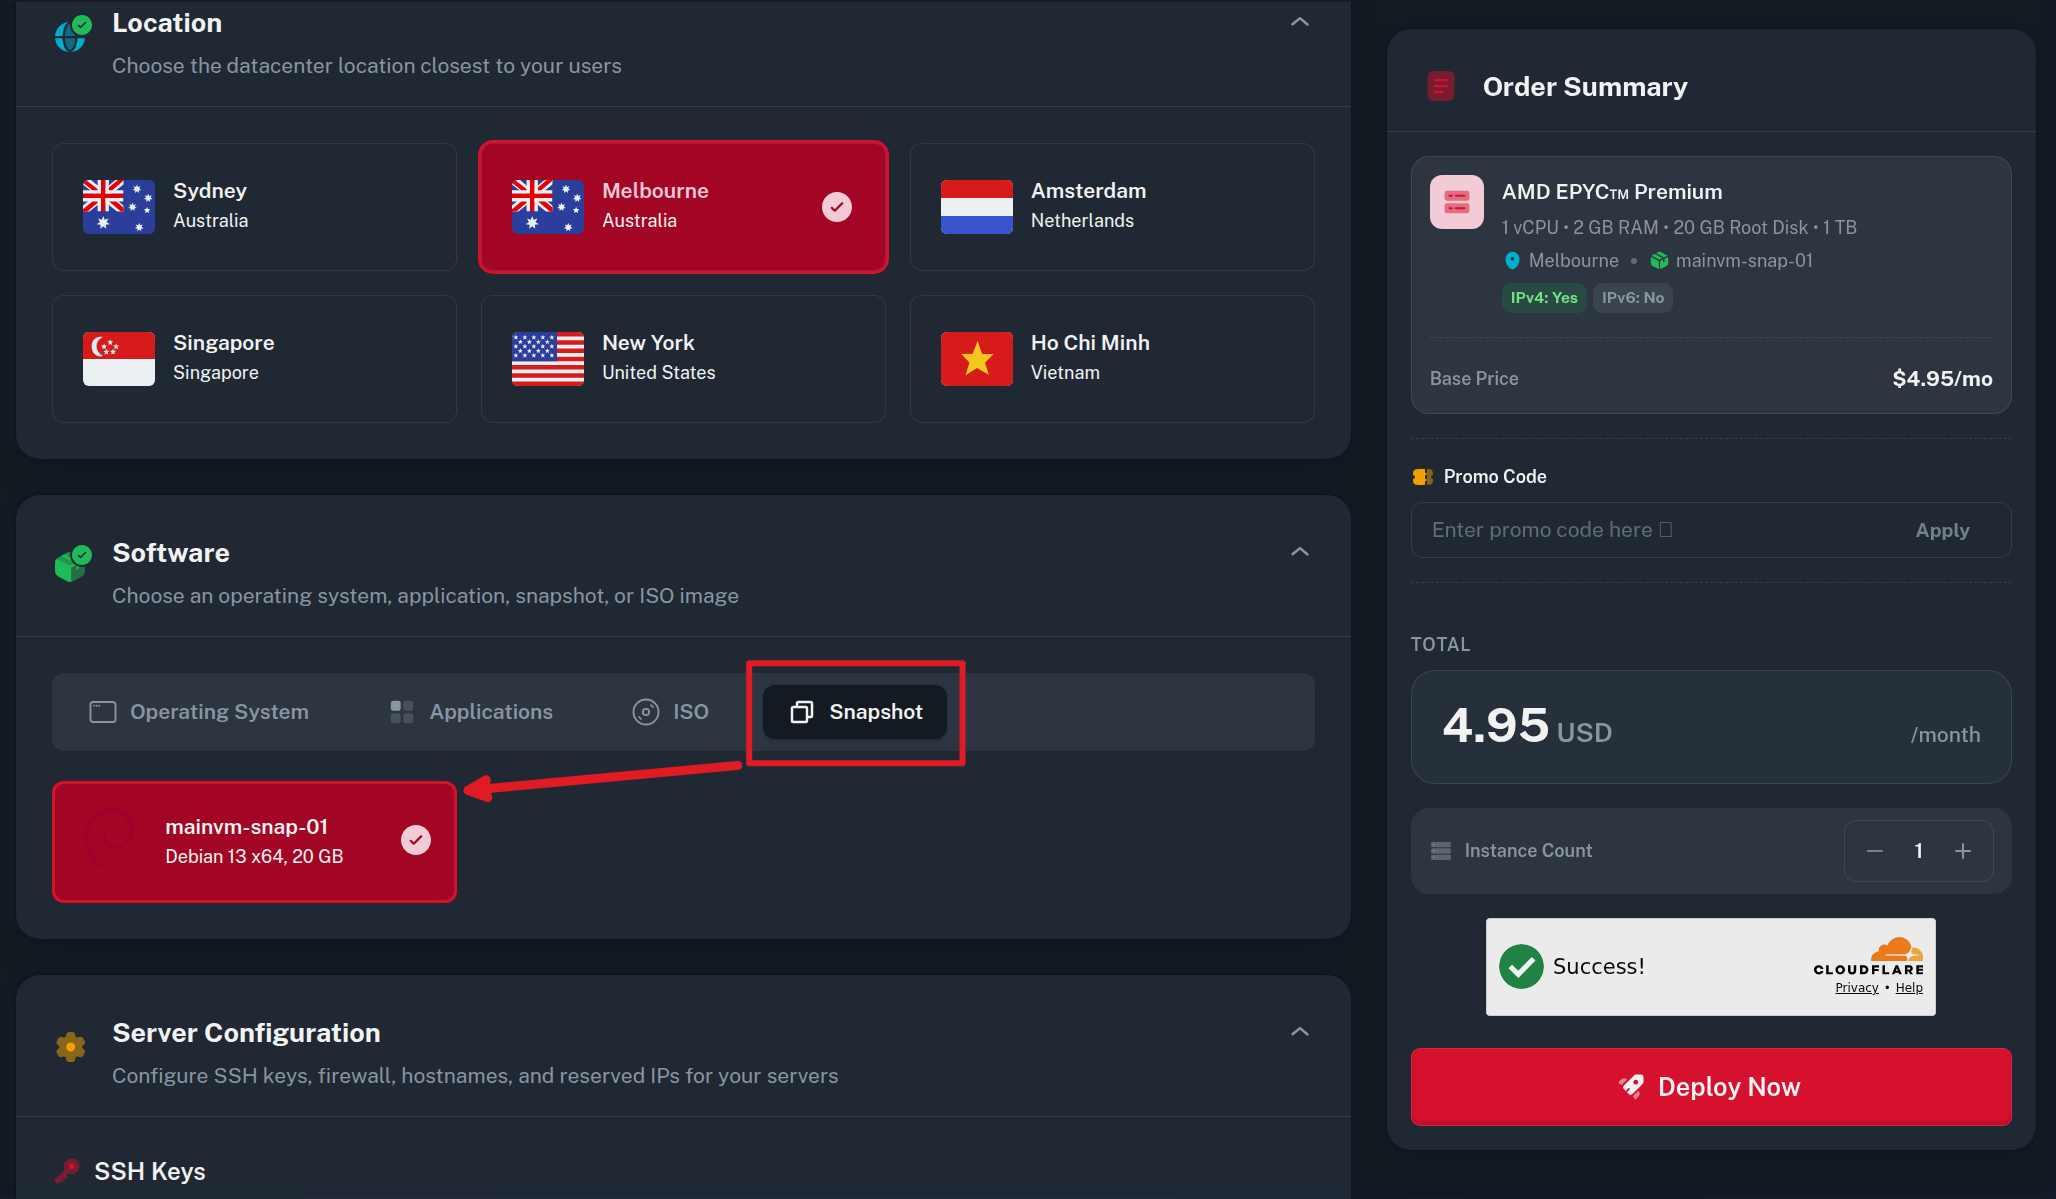
Deploying a New VM from a Snapshot
You can use an existing snapshot as a base template to launch new virtual machines (for cloning, staging environments, or testing).
-
Go to **Compute > Virtual Machines > **Deploy New Server.
-
Select your datacenter Location (must match the snapshot's location) and desired plan.
-
Under the Software section, click on the Snapshots tab.
-
Select your snapshot from the list.
-
Complete the remaining deployment settings (SSH keys, hostname, networking) and click Deploy Server.
ℹ️ Note: The new VM will receive its own distinct IP address and hostname, configured automatically via cloud-init. All software, user accounts, and disk data will match the snapshot state.
FAQ and Important Considerations
Storage Infrastructure and Security
-
Melbourne, Sydney, Vietnam, and Singapore Datacenters: Backups and snapshots are hosted directly on Onidel's dedicated native storage clusters for fast and quick recovery.
-
New York and Amsterdam Datacenters: Backups and snapshots are securely stored in Backblaze B2 and are automatically encrypted prior to upload. Encryption keys are generated uniquely per snapshot and isolated on Onidel infrastructure, ensuring Backblaze cannot read or access customer data.
Snapshots vs Automatic Backups
| Feature | VM Snapshots | Automatic Backups |
|---|---|---|
| Creation | Manual, on-demand point-in-time captures. | Automated, scheduled recurring captures (Daily, Weekly, Monthly). |
| Primary Use Case | Safety checkpoints before major OS upgrades, software updates, or experimental changes. | Continuous disaster recovery and operational protection without manual intervention. |
| Pricing | 2 free snapshots included per account. | $0.10/GB/month (calculated on provisioned disk size). |
| Storage Infrastructure | Managed by Onidel. | Stored on default Onidel infrastructure or custom external S3 destinations (AWS, Cloudflare R2, MinIO, Garage, Onidel Object Storage). |
| Retention | Stored indefinitely until manually deleted. | 2 most recent versions (Onidel storage) or perpetual (custom S3). |
| Deployment | Can be deployed directly as new VM clones via Deploy New Server. | Backups can be restored to the source VM or converted to a permanent snapshot. |
💡 Tip: For full details on configuring automated schedules or connecting custom S3 storage destinations, refer to the Automatic Backup Guide.
Price
-
2 snapshots per account are free.
-
If you need additional snapshot slots, please open a support ticket.
Datacenter Location
-
Snapshots are strictly tied to the datacenter location where they were created.
-
A snapshot taken in Melbourne can only be restored to, attached to, or deployed as a VM within the Melbourne location.
Target Drive Size
-
Snapshots can only be restored to a VM with an equal or larger drive size.
-
Restoring a snapshot to a VM with a smaller disk is not supported.
Attached Snapshot Behavior
-
When attached, snapshots are exposed as secondary block devices in read-only mode.
-
Attached snapshots automatically unmount and detach after 24 hours to ensure clean resource handling.
Retention and VM Destruction
-
Snapshots are independent storage entities and are not deleted when the source VM is destroyed.
-
If you no longer need a snapshot, delete it manually via the Storage > Snapshots or Orchestration > Snapshots menu to reclaim quota.